Summer Ball Week 5

Posted on

I didn’t get to add a progress photo last week, due to no-school days. We had a 4 day week, then a 3 day week, and school was cancelled today which means this will be (at most) a 4 day week. The weather is not looking good for tomorrow, either.

I did manage to get a bit of work on this done in the past two weeks, as you can see. I am hoping to get all of the missing background and at least half of the man done by the end of next weekend.

summerball5

XXX
Carrie


Summer Ball, Week 2

Posted on

I didn’t get as much stitching done this week as I would have liked. But, I am determined to take a photo once a week of this project to see what I have worked on. Now that I can actually tell what the design is starting to be, I will rotate my progress photos so you can see the project right-side-up.

 summerball2

I am kind of freaking out because my colors don’t seem to match other stitched designs that I have seen online. I am really hoping that my chart isn’t wrong. I had posted before about finding mistakes in the chart, and I am going to be so upset if some of the colors listed on this chart are wrong. I have heard someone say that they started using the magazine to stitch the design, but then lost it. So they bought a copy off of the designer’s website (which is what I did), only to find that the ladies’ dresses were different colors. The columns I have stitched so far do not seem to be the same shades as in the finished piece. I don’t know if it is because I am using DMC and the model was stitched with Anchor, or if it is a chart error. I guess I will keep plugging away, but I am getting a bit nervous.

Now that it is February, it is also time to start thinking about what I can stitch from my stash this month. I completed three small kits last month. With it being a short month and being assigned to bring in goodies for both kids’ holiday parties, I probably won’t beat that this month. But I would like to do at least one finish a month. I guess I had better go back through my stash to see what is calling out to me!

XXX
Carrie


Summer Ball, Week 1

Posted on

I started A Summer Ball last Sunday, so I plan to take a photo of my progress every Sunday until it is finished. Here is one week of stitching completed.

summerball1

I am stitching this sideways because of the long width of the chart. So the corner I have finished is actually the lower left corner. If you look sideways, you can make out the floor and the columns of the ball room. Next I get to start on the gentlemen! Actually, you can already see the two black shoes of the first gentleman.

XXX
Carrie


What am I supposed to do with this?

Posted on

I started a new kit last night, and all was going well until I came across this.

flossoops

Yup, a huge flaw in the floss. And of course it is right in the middle of the strand. Now what? I guess I will have to cut it out and stitch with really short lengths of floss, and hope I don’t run out.

I’m really enjoying these small cover kits, and it’s great to use up my stash. But I feel bad that I had to put that deer in the woods away yet AGAIN, and that I haven’t started on Summer Ball. I wanted to start it on January 1 and work a little bit each day. But these little guys are so fun and easy to work on with kids around; there isn’t much counting or sorting of threads. I did put a lot of work into gridding the fabric for Summer Ball, but oh well, I guess it will just have to wait.

XXX
Carrie


The Deer In The Woods

Posted on

I am down to only a few WIPs. Peacock Tapestry will take years to finish, so I am not going to bother with that. Maybe when the kids are older and I can concentrate on it better. The hummingbirds were stitched on such small count fabric, I doubt I will be able to ever finish that. Since I don’t have a whole lot done on it, I think I will just toss it (I don’t think I have ever thrown out a project before!) But it is just too hard on my eyes. I made a huge mistake of stitching over one on it, and it is probably 25 or 28 count fabric. The embroidered pillow cases are not even cross stitch, and they aren’t much fun to work on. And then there is this deer in the woods. I started this thing a couple of years ago, I think. I thought it would be a quick and fun project. I was wrong. The colors are entirely brown and green, and there are lots of shades of each. The chart is from a magazine and is in full color, so I can’t easily photocopy it to mark off my stitches. But now that the stocking is done, I have started working on it again. It will be my “once in a while” project. When I get tired of it, it will get packed away again. Here is my progress so far.

 deer1

I have also decided on which tiny project to tackle from my stash. It is the free WOXS kit of a penguin on skis. It has a card and envelope for easy finishing. Hopefully I can whip up a bunch of these small freebies throughout the year.

penguin1

XXX
Carrie


The angel!

Posted on

The angel is really starting to take shape! I have decided to do the backstitching my own way. The directions called for couching and cording of the yellow/gold outlines on the robe, and I wasn’t really in the mood to do either. I just want to be done with this project, which has been 5 long years in the making. I made lots of mistakes along the way. The part of the robe where the black and dark green were mixed together (the triangle shaped areas) were supposed to be done in half cross stitch. Oops. The yellow/gold backstitching on the robes was supposed to have gold metallic threads mixed in. I just didn’t feel like working with that stuff any more. The wings are a totally different color from the photo on the kit because, well, Dimensions either messed up or used different colors when they stitched the model. So the backstitch on my wings barely shows up. The kit photo has much nicer colors. Oh well, you live and learn. This was my first Dimensions kit and definitely my last! I can’t wait to stop using this horrible shredding floss and get back to stitching with real DMC.

The kids have their Christmas concerts at school tonight and tomorrow night, so I probably won’t get any stitching done until at least Thursday. But hopefully I can get a lot done over the weekend and maybe, just maybe be done with this stocking by next weekend. Actually, I have to be. Christmas is just a few days after that. Yikes!

 stockingdec8

XXX
Carrie


Done with the cross stitch!

Posted on

I was hoping to get all of the cross stitch done on the stocking by the end of the weekend. And I’m happy to say, I did it by Saturday! But I am not going to relax just yet. I still have a TON of backstitch to do. And I think I need to plan a good three days to get the stocking washed, ironed, cut out, and sewn together. This gives me just three weeks to do all of the backstitching. Not only is there a lot of it, but it is complicated – lots of colors, lots of stitches that don’t fall in any actual Aida block, and lots of couching and cording. Ugh. I guess I better get cracking!

XXX
Carrie


Posted on

One border section done, two more to go! I am really hoping I can have both of those sections done by the end of the weekend. Thanksgiving is coming up and hopefully I will have time to work on this then. I would love to be able to start on the backstitch before December! The only problem is, this design is getting so out of whack. The areas where the solid red is are so heavy and warped. It made stitching the multicolored border at the heel difficult. I can’t get my fabric taut on the scroll frame, no matter how many times I take it off and start again. I am having to hold the fabric taught in my left hand (pulling the left edge of the fabric towards the left) while I stitch with my right hand. This is the only way I can get tight fabric. A hoop would give me even tension but there isn’t enough fabric to use a hoop at the sides of the design. The little bit that is showing at the bottom of the toe part is literally how much extra fabric I have on this. Just one more reason why I will never stitch another kit from Dimensions. I can not wait to get this thing done! And I’m sure Adrienne will love finally having a stocking with her name on it. Christmas Eve is exactly one month from today. Not much more left to do on this now. I think I can, I think I can, I think I can!

stockingnov21XXX
Carrie


Whew!

Posted on

The heel, toe, and stocking top are finished, and I did not run out of floss. But I have only a few strands left, and I still need to use it in the multicolored border designs which go inside the green lines. So I am not out of the woods yet. But these areas should blend in a lot better if I do run out and need to substitute with another color.

stockingnov18a

XXX
Carrie


Running Out of Floss

Posted on

I will definitely never do another Dimensions kit again. I am certain I will run out of the red floss used in the heel. What I am doing now is stitching a row, leaving a row blank, stitching a row, etc. I will then go back and fill in the gaps with whatever floss I have left. If I do run out, I will have to substitute DMC but at least the new floss won’t be in one big block area, which would stick out like a sore thumb. Hopefully if I do have to substitute, it will be subtle.

stockingnov17aXXX
Carrie


Getting Bored

Posted on

I have to admit, I am getting tired of working on this stocking. Having a deadline is not helping. I have spent countless hours stitching since the last photo I posted, and I  just feel like I am getting nowhere. I know that’s not true, but I feel that this will never be done by Christmas. I am hoping that I can start working sideways to get over to the other side where the red heel will go. I think if I can get that heel out of the way, this project will look much more finished and will give me a sense of accomplishment. I don’t dare try to count over the empty spaces to work on it though. I know if I did that I would find after stitching it all that I had counted wrong. The nativity scene and the grass have to line up exactly with the heel and the border that goes around it.

stockingnov10

The snow came down heavy all day yesterday. I don’t think it stopped from the time I woke up until I went to bed. Today was more of the same. It’s the perfect weather to curl up with my stitching and listen to some Christmas music. Yes, I actually found the holiday stations on iTunes radio yesterday and listened to Christmas songs while stitching and cleaning the house. I hate winter, and am not ready for snow yet, but I guess I have no choice. Might as well make the most of it and stay inside the warm house and stitch!

XXX
Carrie


I’m seeing red!

Posted on

stockingoct28a

I have been working on the toe of the stocking, which is all done in 4 strands of red, using half cross stitches. After doing the outline, it was actually a nice treat to be able to sit down and stitch without counting or without changing colors. My goal was to fill in the outline over the weekend, but I didn’t quite make it. I completed the toe on Monday afternoon.

 stockingoct28

Now we are getting somewhere! The orange colored parts of the chart are the parts that have been stitched. These photos were taken with my digital camera – such a difference from the iPhone!

XXX
Carrie


Progress

Posted on

I have been stitching like crazy! Finally Joseph, a shepherd, and some palm trees are visible. I think I will work on the rest of the grass next and then move on to the huge solid red toe. Once I get the outline done I won’t have to count, so it should go pretty quickly.

I also finally found my long lost digital camera, so after I get the battery charged up I can stop taking pictures on my phone. The quality of the picture below is really bad compared to what the project looks like in real life.

XXX
Carrie

stocking7


A Feeling of Accomplishment

Posted on

october12014

Tonight I finally made some real progress on the angel stocking. Other than the backstitch, the angel herself is complete. Notice that there is a blank row at the very top of the stocking, under the green row of stitches. The multicolored pattern will go there, but it was such a pain to stitch that I had to take a break from it after completing the first row. There will also be a row of that pattern at the heel and at the toe.

I am a bit worried about the name at the top. It looked great when I stitched it, but when I took the project off of the scroll rods to get a picture, the entire piece was warped out of shape. Hopefully I will be able to press it into shape when it is all done, but I don’t know if the long stitches on the name will be okay. I might have to take them down with some couching stitches. Worst case scenario, I will have to rip the name out and do it again at the very end.

XXX
Carrie


An almost complete angel

Posted on

I have not taken photos of my progress on the Heavenly Herald stocking in a while, but I have been working on it. I am pleased to say that the angel is almost finished! Except for the backstitch, that is. If the kids give me a bit of time tonight I should be able to finish up the last cross stitch part of her dress. After that, it is onto the rest of the sky, which should go fast since it is all half stitch. I can’t wait to get this stocking done!

XXX
Carrie


Buttonhole Stitch

Posted on

I. Hate. Buttonhole Stitches. hardanger10

My Hardanger heart is coming along great. It’s almost finished, in fact. But I am having trouble with the buttonhole stitch which goes along the edge. This allows the piece to be cut out and not fall to pieces. I have looked at numerous books, websites, and YouTube videos. So far the most helpful has been this one. My main problem was that the pearl cotton #5 seemed too big to use, and yet the #8 seemed too fine. The pattern calls for the #5, same as the Kloster blocks, so that is what I am using. But it is not going well. I did manage to make my first row and then turn an outside corner. Yay! But now I have to do an “inside” corner. I have no clue what I am doing. Back to the video. For the third time. Maybe tomorrow will be better.

[Update: December 1, 2021. I just found that the link above for a helpful video is no longer there. I have found a wonderful new tutorial video series by Epida Studio which you can view here.]

XXX
Carrie


Dove’s Eye Stitch

Posted on

Here is my Hardanger heart with a couple of Dove’s Eyes attempted. It would have been nice if the instructions had told me I was supposed to complete them as I was doing the wrapped bars, instead of after. As you can see, I had many of the wrapped bars done already. Instead of taking them out, I decided to just add the Dove’s Eyes after. I think it turned out okay.

 hardanger8

And here is the result after all of the Dove’s Eye stitches and wrapped bars have been completed:

hardanger9

All that’s left now is the Buttonhole stitches around the edges!

XXX
Carrie


Back to Hardanger

Posted on

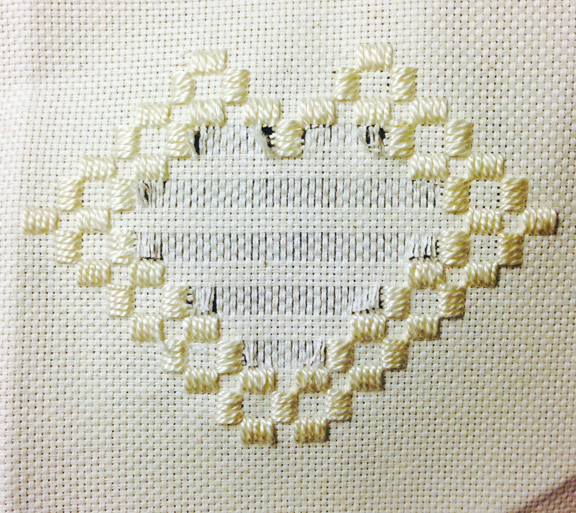
At the end of July I wrote about trying out Hardanger. I had to stop after the kloster blocks because I did not have suitable scissors for the cut work. Well, I have found a pair that work and after a few tense moments, made my first cuts. I was having a terrible time trying to get the point of the scissors into the fabric, and then I decided to take the project out of the hoop. Eureka! Why don’t any of the Hardanger tutorials, either online or in books, tell you to do this? Holding the fabric loosely helped immensely. After the cuts were made, I used tweezers to pull the threads out. At first it was very difficult to know what to yank on and what to leave alone. But then I used my fingernail to rough up the cut areas and this made the cut threads stand up. After a few threads were pulled, I had the hang of it. Here is what the heart looked like with just a few horizontal threads removed:

hardanger5

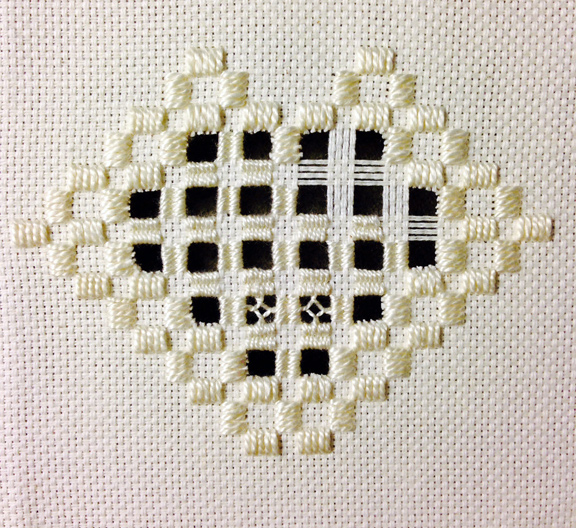
It was quite hard on my hands to do all of the cutting. During the process I was not sure I would want to attempt Hardanger again. After all the threads were removed, this is what it looked like:

hardanger6

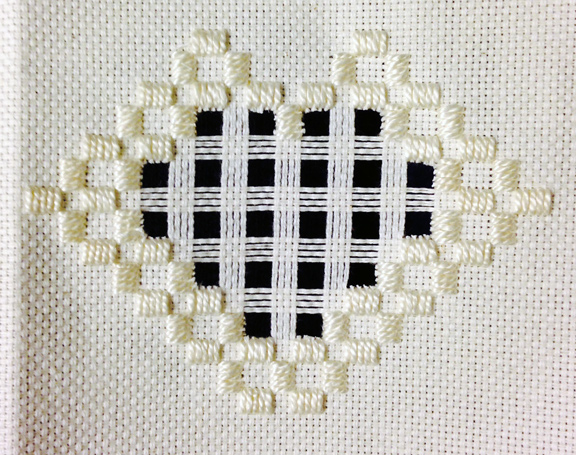
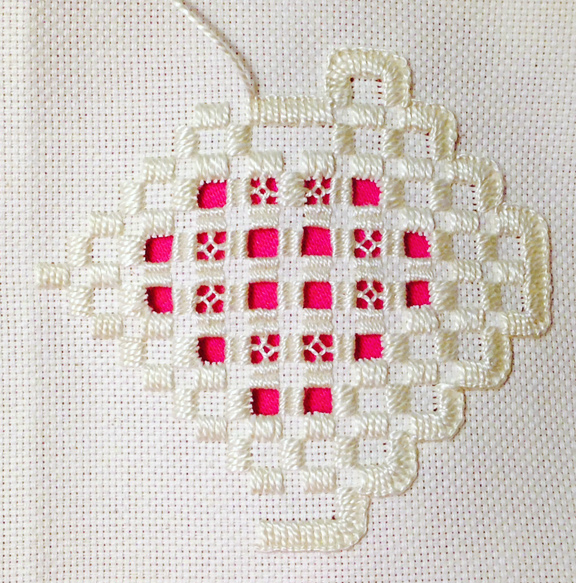
Now the needleweaving can begin. I found the needleweaving to be not only easy, but relaxing and fast. It made me rethink my position on not doing Hardanger again after this project.

 hardanger7

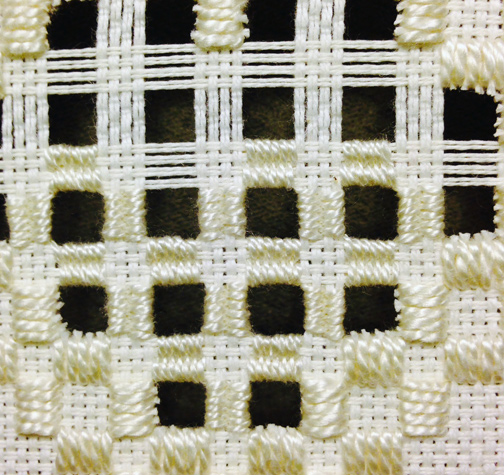
After the needleweaving is complete, the empty spots will be filled with Dove’s Eye and the edges will have a buttonhole stitch done around them. This will allow the heart to be cut out without falling apart.

You can get the scissors I use from crossstitchers.com
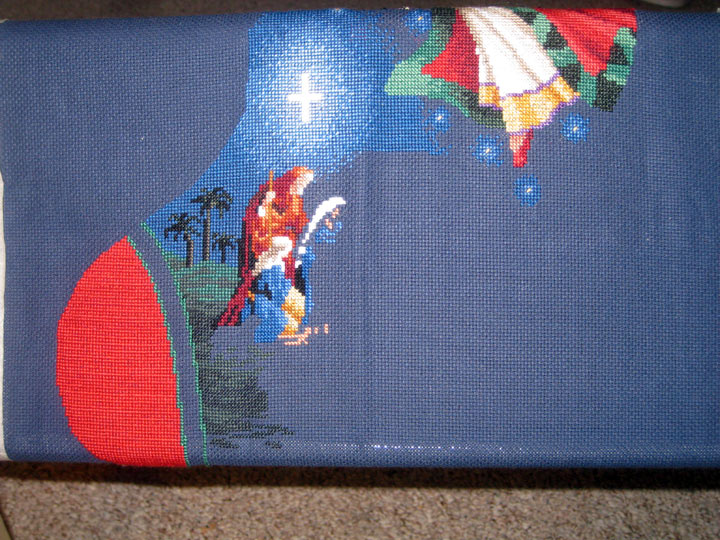
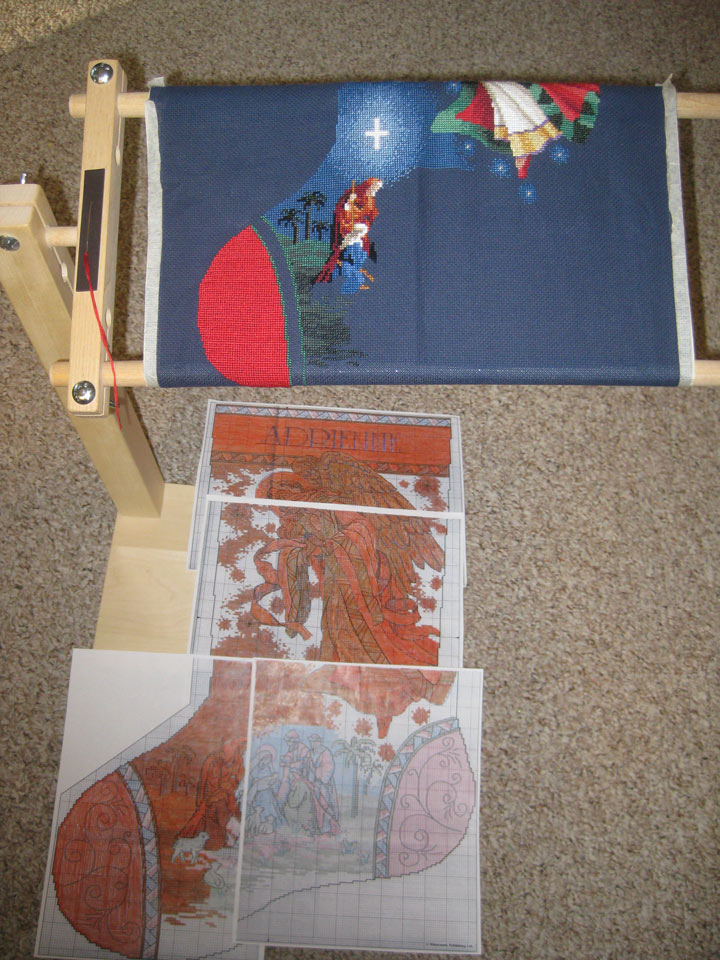
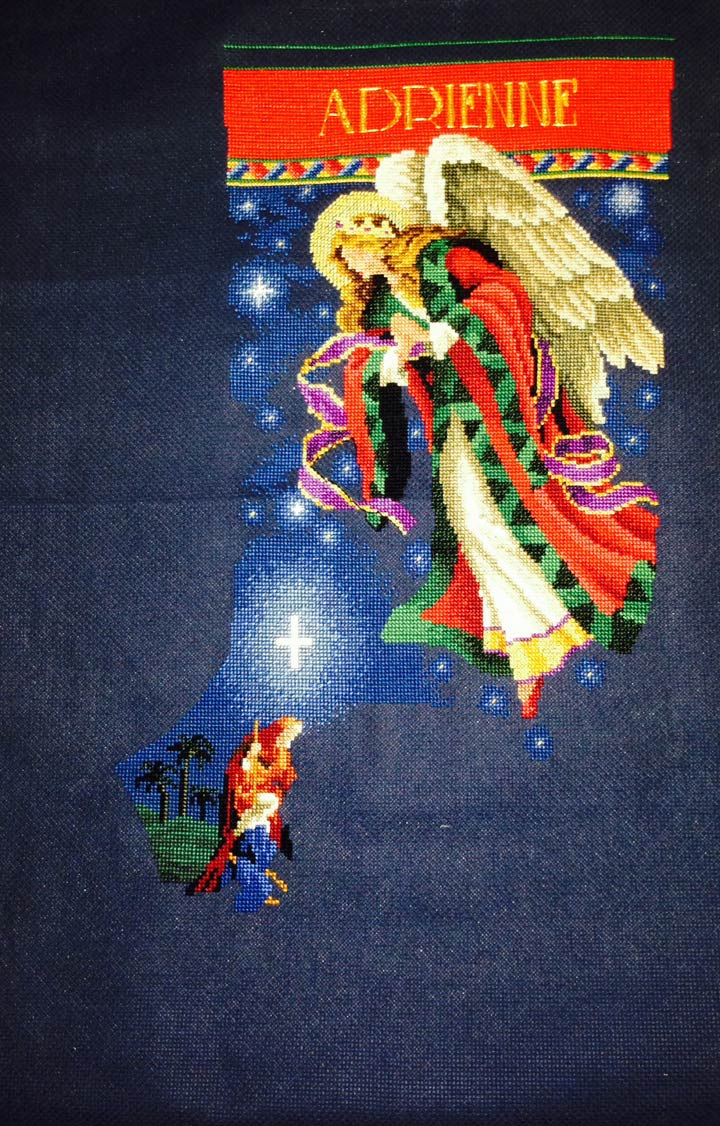
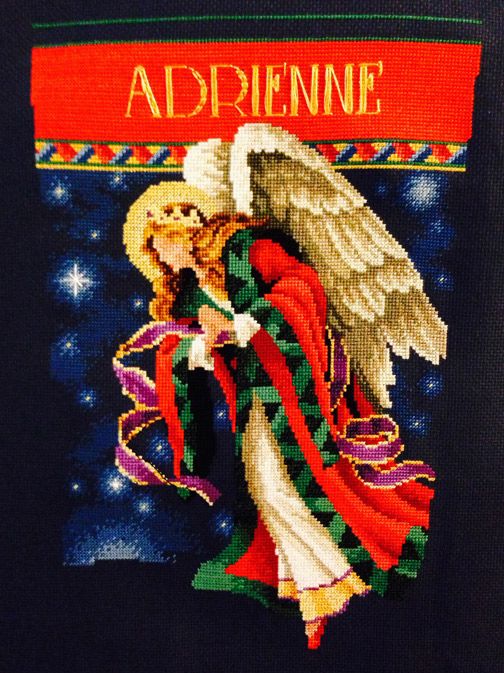
XXX
Carrie