XXX
Carrie
I have a hard time turning my brain off. Here is where I can let my thoughts out…
XXX
Carrie
It’s one of my favorite days of the year! I’ve waited so long for this gem from Just Cross Stitch magazine to arrive! I have a new idea for this year… I am going to see how many items from this magazine I can make in a one year period. I think I will give myself time to go through the magazine and make a list of what fabrics, floss, and embellishments I will need to create these designs, and order whatever I don’t have. And then I will start stitching on October 31 and stitch through October 30 of 2023. I probably won’t stitch them all because there are a few designs that don’t appeal to me, and I don’t have anywhere to hang the really large designs. Plus I will want to stitch other things besides Halloween. But this will give me a great large assortment of smalls to display for Halloween next year. In the meantime, I should also try to finish off the Halloween smalls that I have stitched throughout the years that are just sitting in a box and have those ready for display for this Halloween.
All in all, I think the majority of the designs in this issue are right up my alley!
XXX
Carrie
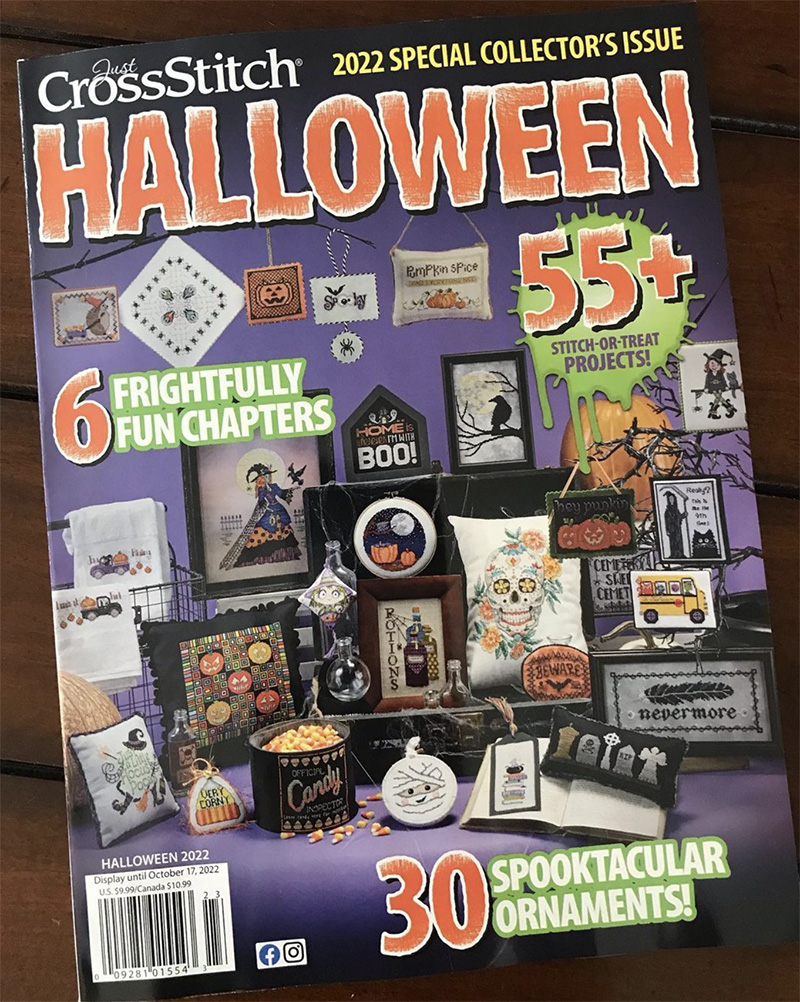
Annie’s just released the cover for the Just Cross Stitch 2022 Halloween issue which will be available to purchase in July. This is the special issue they put out each year, which is NOT included in subscriptions.
XXX
Carrie
The other day my daughter was sick with a migraine and just wanted to sleep on the couch. My husband was out getting new tires put on our truck and the house was quiet. I decided to go through my small patterns that I had collected to make during my “year of smalls” and kitted up a bunch of them. Now whenever I need a project I can just grab one out of a basket. This will work well for when I will find myself waiting somewhere… in the car for a child to get out of school, in the doctor’s waiting room, etc. Each pattern is either a freebie found online from a designer’s Facebook page or something that was featured in one of the British magazines that I subscribe to via Zinio. The patterns are printed out and cut down to a small manageable size and put into a ziplock bag with a hoop, the needed threads, a pair of scissors, and needles.
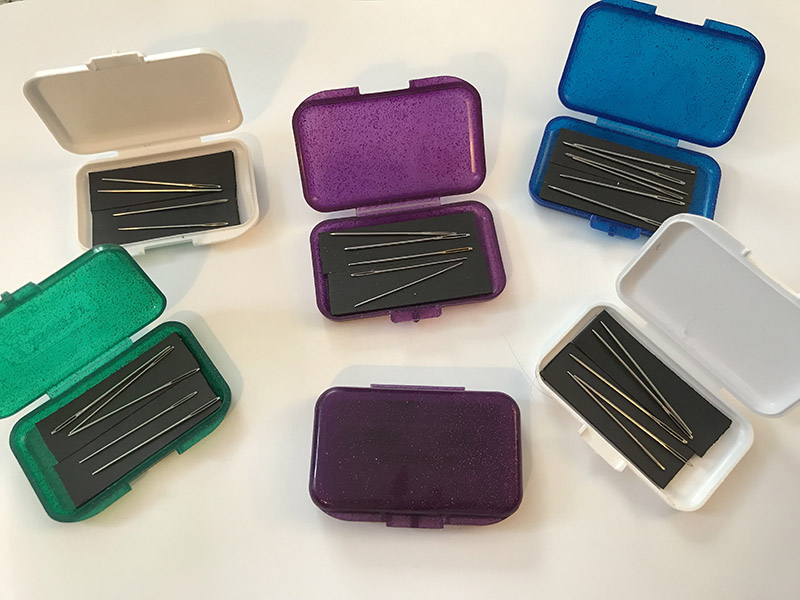
I had already come up with the idea for needle cases out of old wax containers years ago, but while making up these kits I decided to make a lot more of them. Luckily, I had saved most of the containers that my son and I had received from the orthodontist during our years of treatment, and all I needed to do was cut magnet strips the correct size, stick them down into the cleaned out containers, and add needles. The magnet strip was found rather inexpensively at Walmart and comes in a roll, with adhesive on one side. If you have a child with braces, be sure to keep the wax containers! They are the perfect size for storing needles and can be thrown into the kits you make up. Two strips of the magnet positioned next to each other fills the container with a magnetic surface very nicely.
Since I did not have enough scissors to make up a lot of cross stitch kits, I went to Amazon and looked around. I found a great deal on these scissors which were marketed as nose hair trimmers! For only $8.99 for 5 pair, it seemed like a good bargain. When they came in the mail I was amazed at how sharp they were, and they are the perfect small size to add to my project bags. They are also inexpensive enough that if they get lost or broken it is no big deal.

You can purchase the scissors here. Sorry, the needle cases are not for sale!
XXX
Carrie
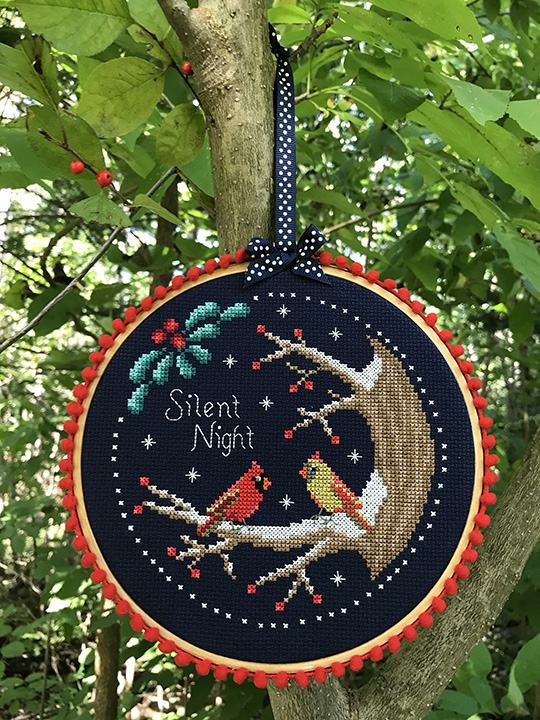
Today I am going to show you how I finish my cross stitched projects in an embroidery hoop.
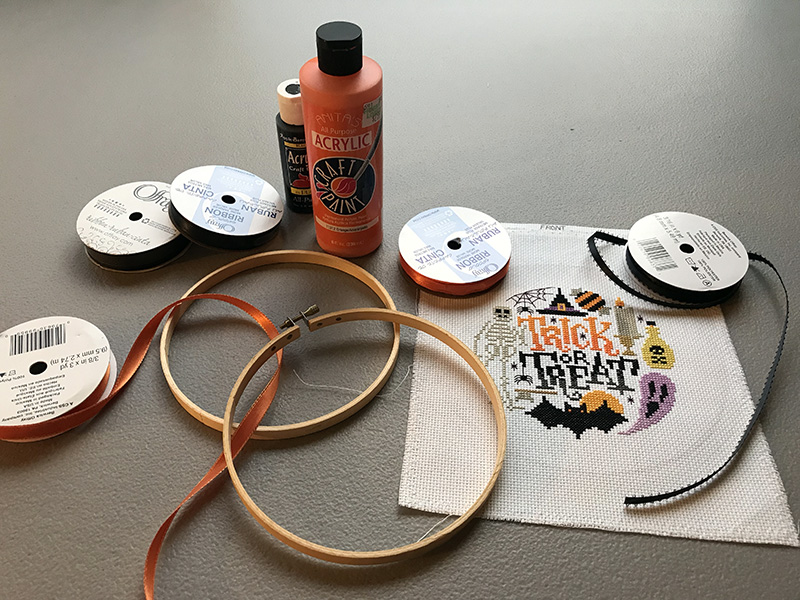
First, gather your materials. You will need paint and a paintbrush, or a paint marker such as a Posca pen. When using paint I like to use the small bottles of acrylic craft paint and a wooden handled sponge applicator instead of an actual paintbrush. Cover your work surface.
You will also need felt that matches the color of your fabric, ribbons and other embellishments, scissors, and a hot glue gun.
Carefully paint the outer hoop only, using thin coats of paint. It is better to let the project dry and then add a second or even third coat, rather than trying to paint on one thick coat. Try not to get paint on the inside of the hoop, but be sure to paint the outside edges. You will probably need to do one side, let it dry, then do the other.
If you want to wrap a decorative ribbon around the hoop, follow the next step. If you will be painting your hoop only, you can skip this part.
Add a drop of hot glue to the top of one side of the hoop and attach your ribbon at an angle. When it is dry, cut off the edge to be flush with the hoop. Slowly wrap the ribbon around the hoop, leaving a gap so the contrasting paint color can show. Add a drop of glue on the underside of the hoop only, about every other wrap. Use only as much glue as needed to ensure a secure hold. Too much glue will be messy and bumpy.
When you get to the other end of the hoop, add a drop of glue to the end and trim off the end just like you did when you started.
Place your finished cross stitch project in the two hoops and tighten it, being sure the design is centered and the fabric is taut.
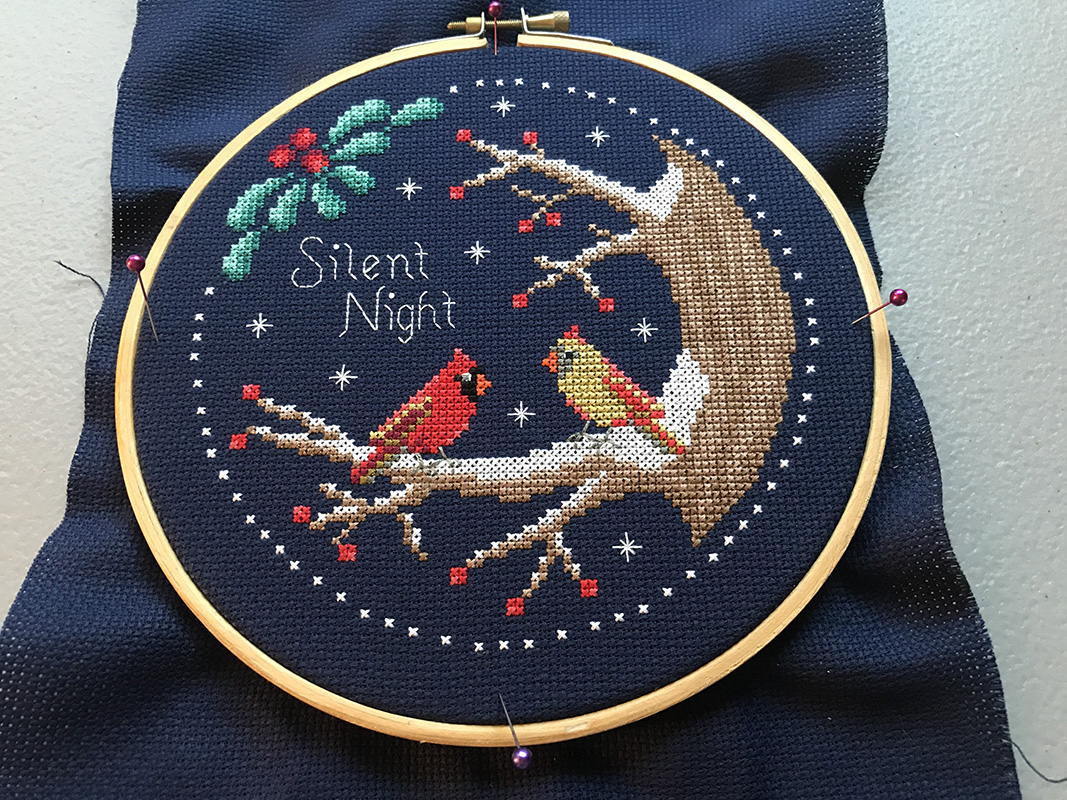
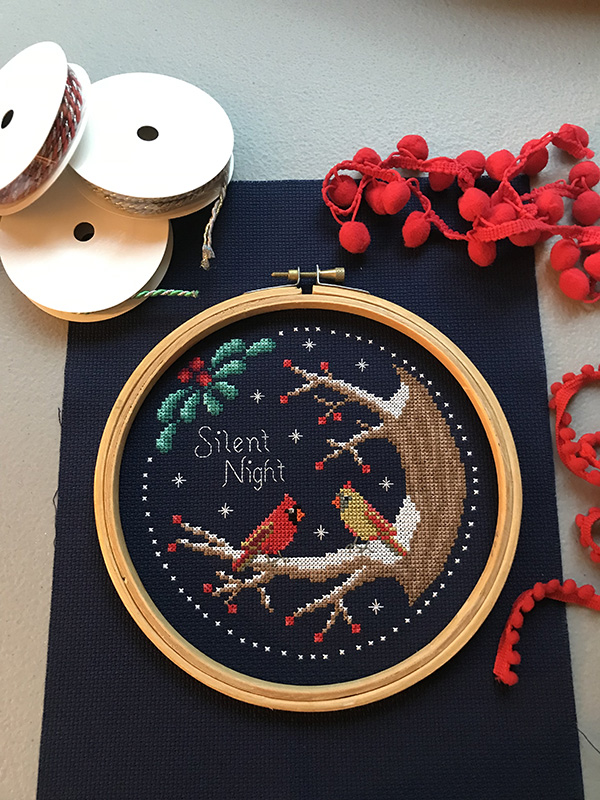
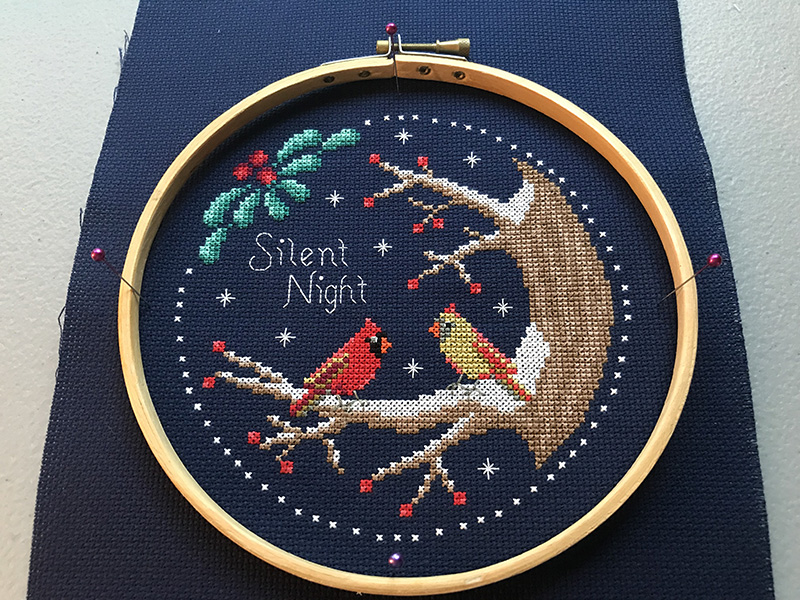
If you find it difficult to get the hoop exactly centered, as I did on this Silent Night design with a circular stitched border, lay just the top hoop on the fabric and use pins to mark the four sides. Count an equal number of stitches from the sides of the stitching and keep moving the pins, one Aida block at a time, until you have an equal number of empty stitches on all four sides, as shown below.
Cut the excess fabric away from the hoop. You want to leave just enough fabric to be able to wrap around the hoop and glue down to the inner sides of it.
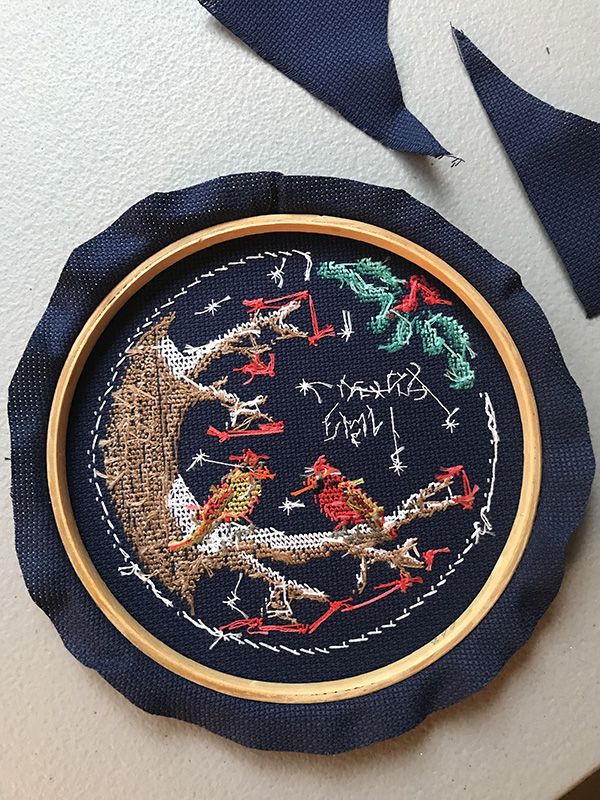
Carefully fold the cross stitch fabric over the inner hoop and hold it in place with hot glue. Continue this process around the entire hoop. You want to be sure that the fabric you are folding over isn’t so big that it lays on the back of the stitched piece, to avoid a bulky finish.

Sometimes you won’t have much excess fabric at all, such as with this free cover kit that came with an issue of The World of Cross Stitching magazine. When this happens, it may be easier to trim all excess fabric off after the project is in the hoop.
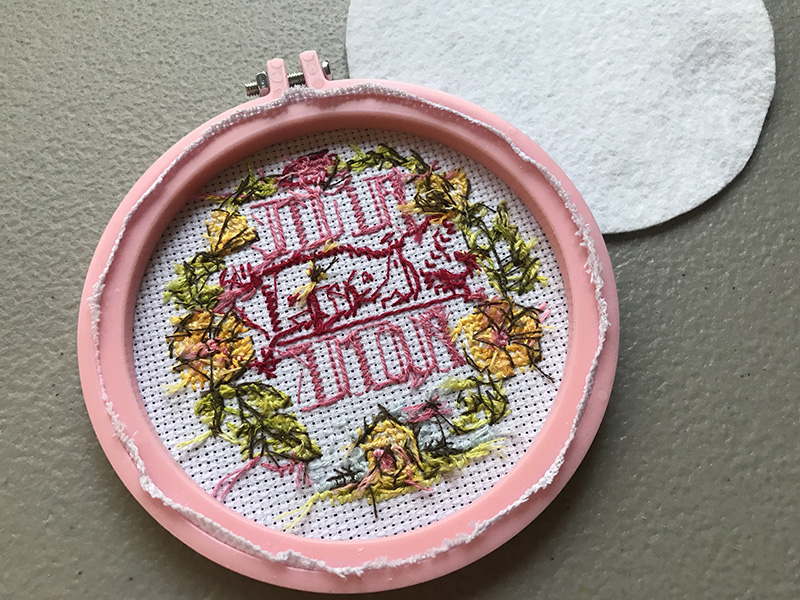
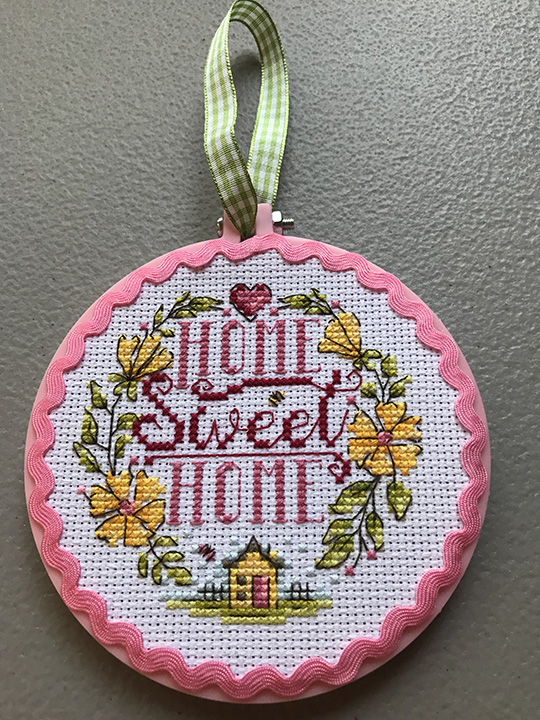
Next, cut a circle of felt the same color as your cross stitch fabric and glue it around the edges of the back of the hoop. You can also add a second, slightly smaller smaller piece of felt directly to the back of the stitching, and this will help the design not be see-through if you are hanging it in a window where sunlight will shine through it. I would caution against adding glue to this piece, however. I try not to let glue ever touch my stitching, as it can yellow over time.
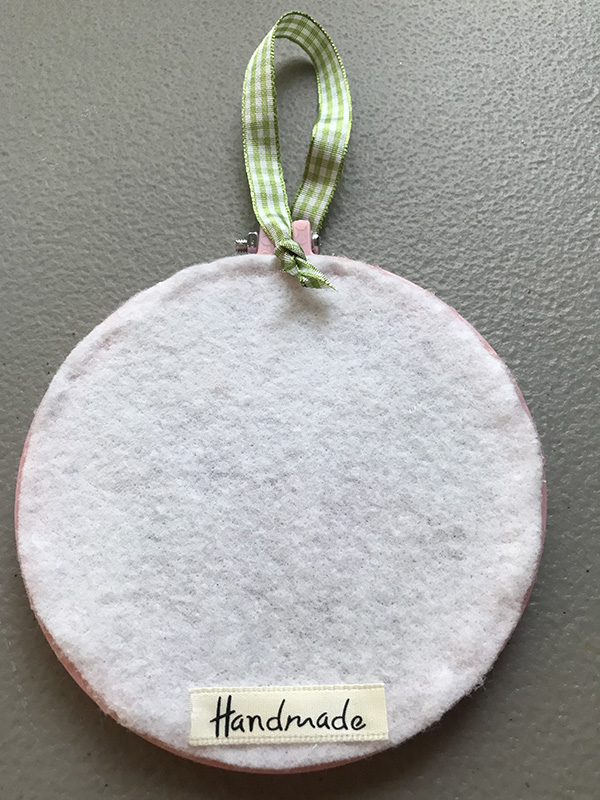
Once your felt is added to the back, you can add a cute label, if you wish. This label was cut from a piece of ribbon that was added with just a touch of hot glue.
Add a ribbon for a hanger and then you can add other embellishments like a bow, other ribbons, small greenery, pinecones, buttons, etc.
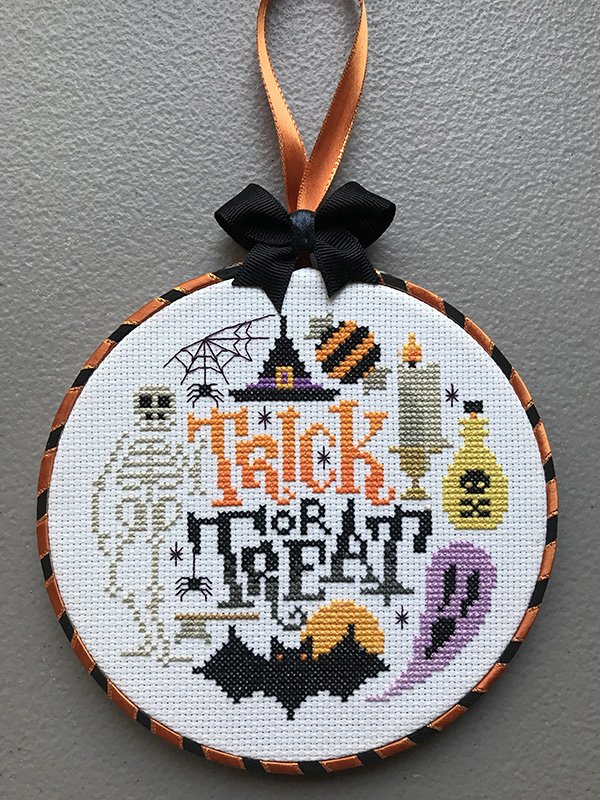
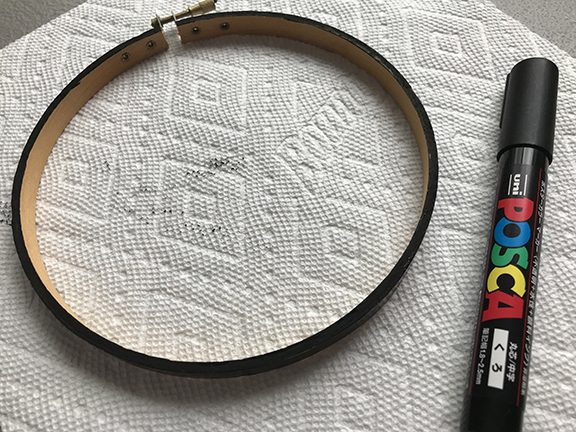
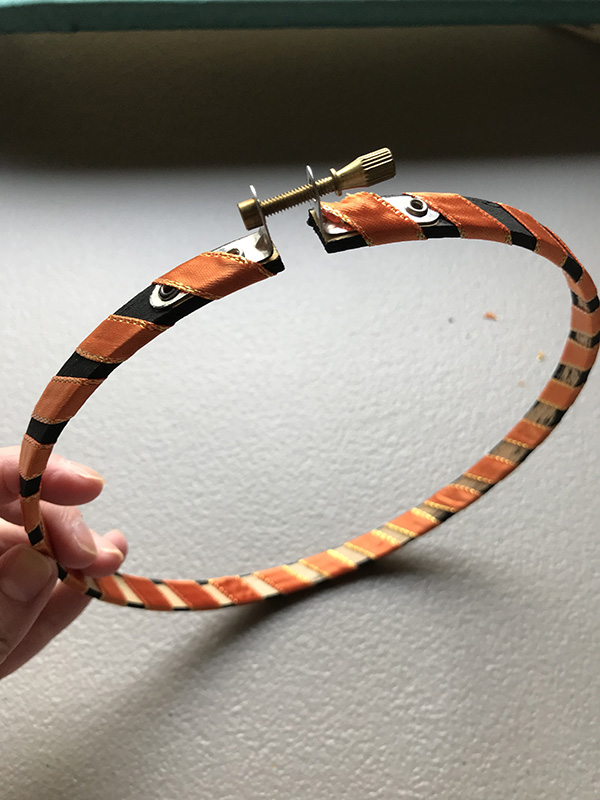
You can also finish off a plastic or painted wooden hoop with ric rac, as shown below. I started at the top and added a drop of hot glue, then pressed the ric rac in place. I curved the trim around the hoop and put a drop of glue every other top curve in the ric rac.
Pom Pom trim also makes a cute addition to your hoop finishing. I added it to a natural wooden frame that I did not paint, below. I used hot glue to add the trim on the outside edge of the outer hoop, making sure the pom poms were facing toward the stitched front.
What fun finishing designs can you come up with?
XXX
Carrie
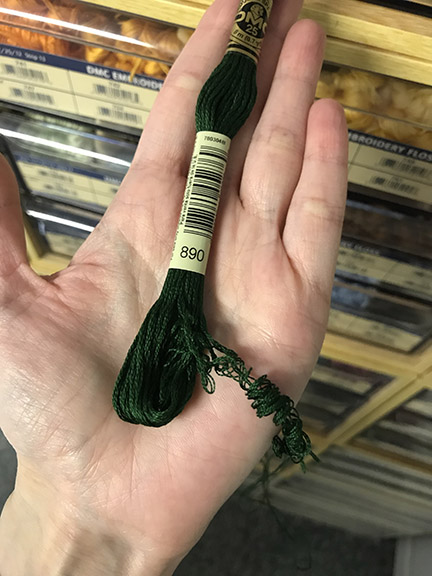
The 2013 exclusive DMC colors which were only being offered in a special boxed set are now available for open stock!
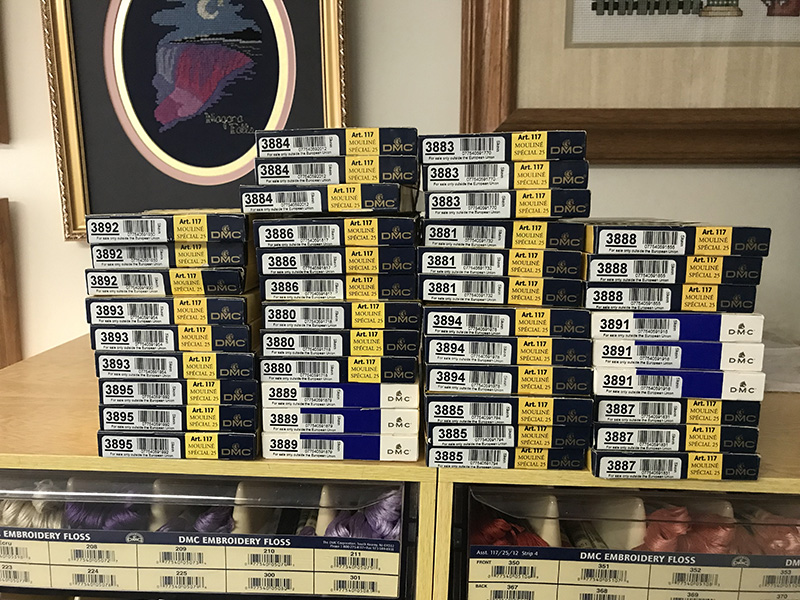
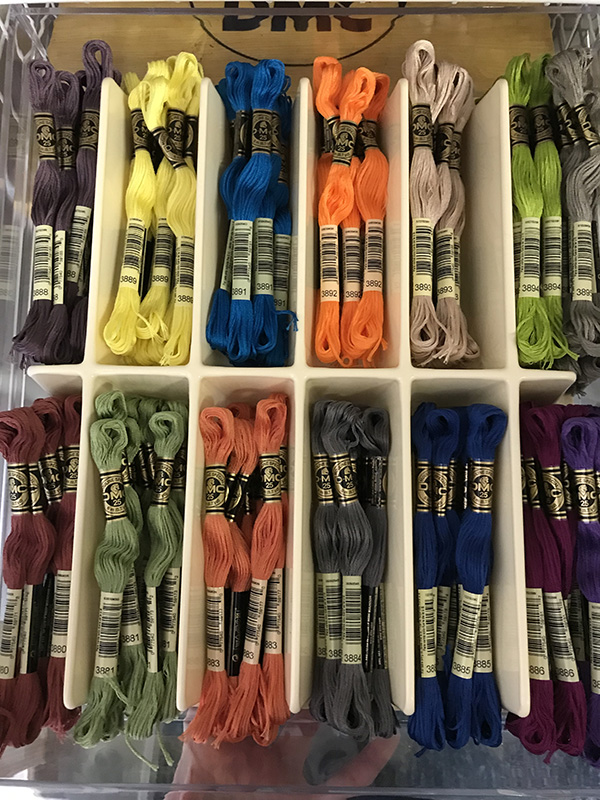
16 colors were initially introduced and sold in the exclusive set only; they were not available for individual purchase. Of course, after designers started using these “new” colors DMC decided to discontinue them. They kept releasing the boxed set but with only a few of the new colors, and the rest were not-quite-so-similar substitutes from their normal range of floss. People were extremely disappointed when they purchased the boxed sets around 2019-2020 and found they were not the same set that was released initially. No one knows how long these will be available in open stock, though, and DMC only released 14 of the 16 colors. According to DMC’s American headquarters, these colors have been discontinued and they are selling off old stock (which might be why most of the boxes are the old blue and yellow color instead of the new blue and white). Yet according to some US distributors, these are “new” colors.
You can purchase 14 of the 16 colors at www.crossstitchers.com
XXX
Carrie
Recently my daughter got sick and of course as soon as she was better I caught it. But she was only really sick for 2 days, and I am now on day 10. It started with a sore throat, sinus pain, and fatigue. Then after I got on antibiotics it turned into a cough, ear pain, and chest pain. Luckily no fever, loss of taste or smell, or other issues. But the overwhelming exhaustion is really kicking my butt. I started out in bed, then moved to the couch, and now am able to do a few things throughout the day like throwing a load of laundry in the washer and loading the dishwasher. But that’s about it. The TV has been my only companion, as I just can’t keep my eyes open enough to look at a chart or a needle.
Today I did manage to overcast the edges of two pieces of fabric on the sewing machine. I had two projects picked out before I got sick, Bent Creek’s “Santa’s Reindeer” and a Halloween design by Emma Congdon from one of the British magazines. I am not sure which magazine or which issue, but I am stitching mine from what I believe is the October 2020 issue of Вышивка крестиком, a Russian magazine. I know it was in the British magazines first, because I have the issue it was originally in somewhere. I think it was an issue of Cross Stitch Crazy, but I can’t be certain. When I wanted to stitch this design I couldn’t find the issue it was in, and the Russian version (which I subscribe to through Zinio) happened to have a clear photo of the designs on the cover.
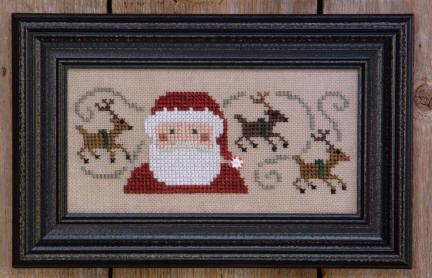
The Bent Creek design will be (I believe) the first time I have cross stitched with pearl cotton. Why this company chooses to use pearl cotton instead of embroidery floss, I’m not sure. But it should be interesting and a pretty quick stitch, as the design is small and not many color changes. I love the addition of a peppermint button on Santa’s hat.
The Halloween design is something I have wanted to stitch for a good year now and never got around to it.
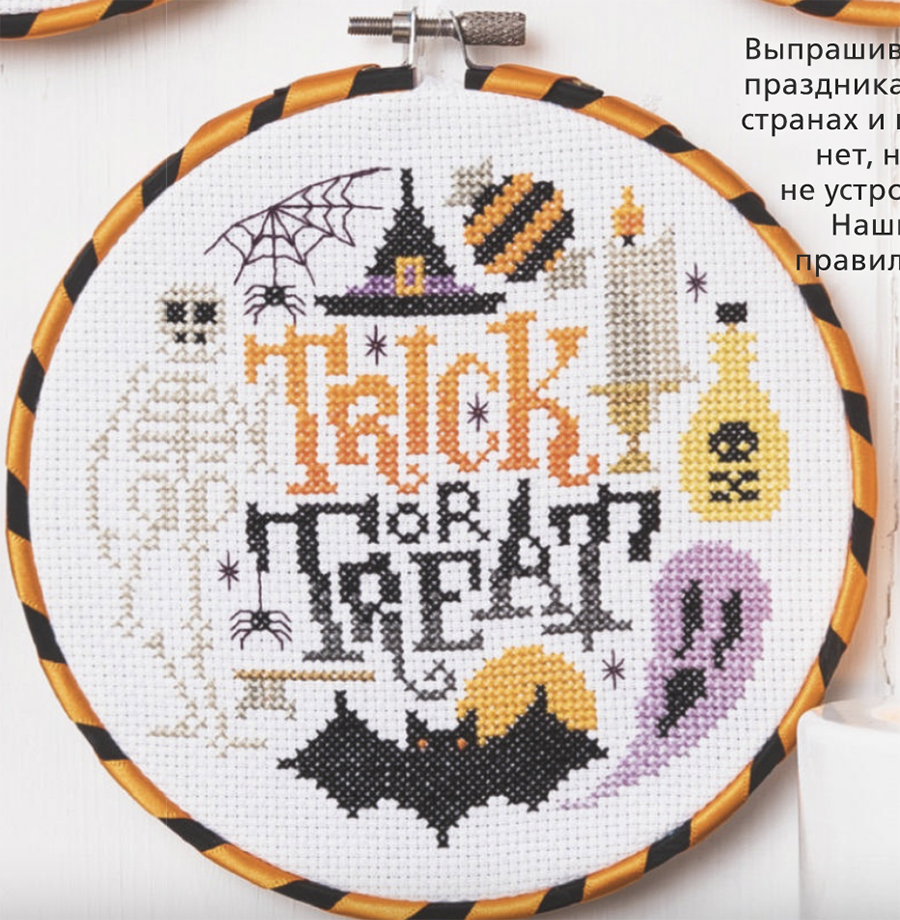
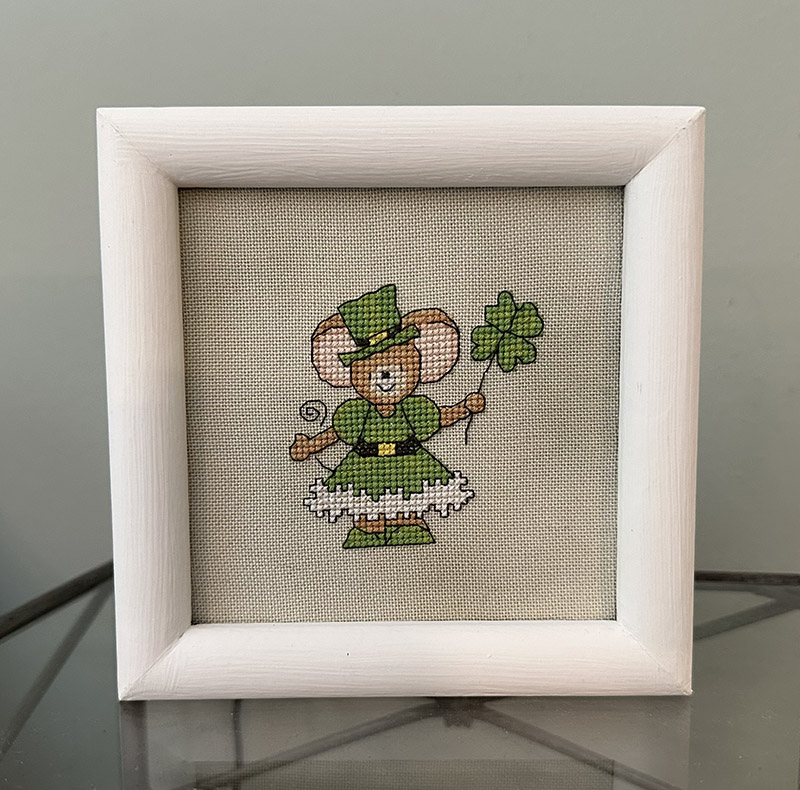
There are 4 designs but this one is my favorite. I even found the perfect piece of Aida that I didn’t even know I had in my stash… it is 14 count white but it is actually glow in the dark! I have no idea where I picked that up. It is only big enough for one design, unfortunately, but I am not sure I would ever stitch the other 3 designs anyway, as I have so many things I would love to do. I definitely can’t get this done in time for Halloween this year, but I love stitching all sorts of holiday designs all through the year. If we can have Christmas in July, why not Halloween in November?
XXX
Carrie
I just received an email from Wichelt Imports informing me of their NEW glow in the dark seed beads!
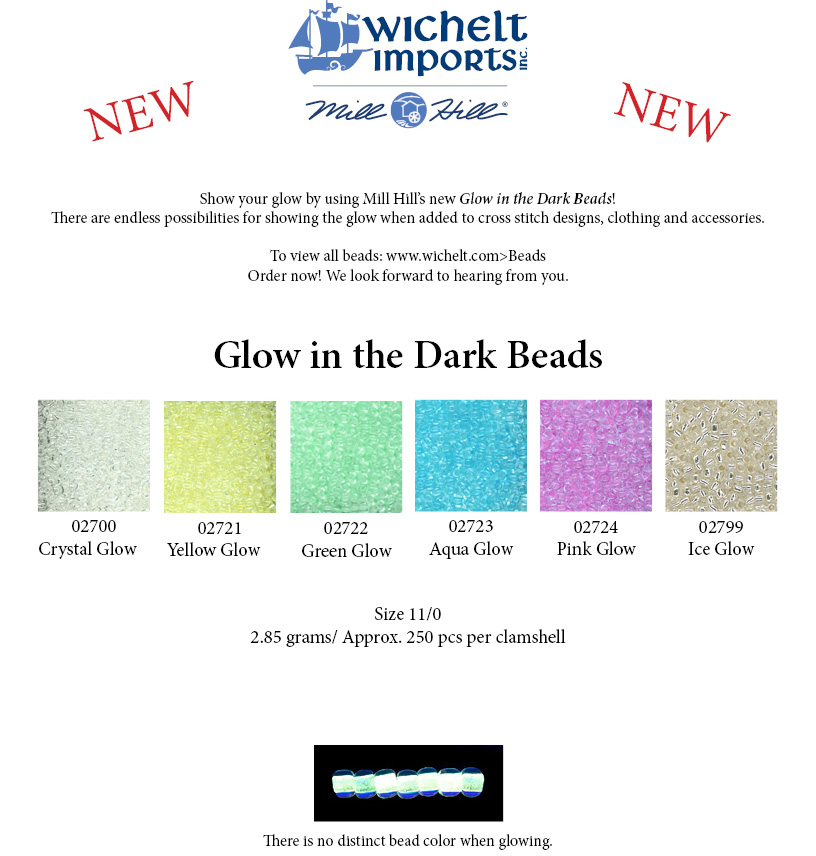
These could really be neat on Halloween or space themed designs.
XXX
Carrie
Stitchers all over the world are spending August 13 stitching the day away. Are you? I can’t, due to a family member’s birthday. But I’d love to see if I can get some stitching in on Saturday.
XXX
Carrie
The cover has been released for the 2021 special Halloween issue from Just Cross Stitch!
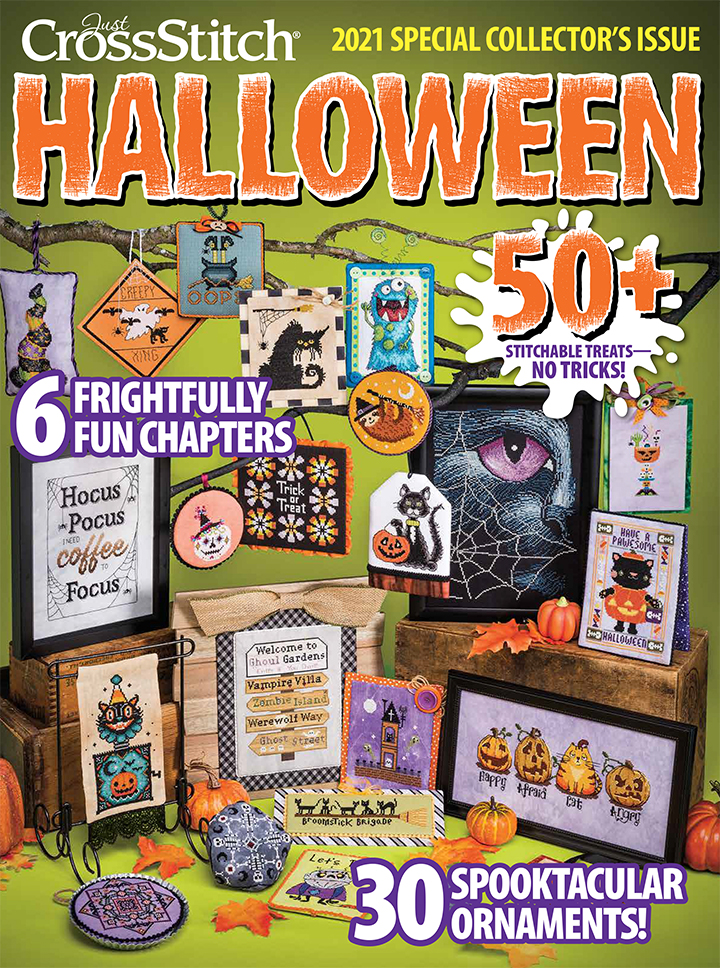
This issue will be available for sale in July.
XXX
Carrie
After seeing so many people online make their own dyed cross stitch fabric, I decided to give it a try. I looked up articles online and watched videos on YouTube, and combined the best tips and tricks from all of them to try it out myself. My first try was a big success and I am so happy with how my fabrics turned out. My daughter was so impressed (and it looked like so much fun) she begged to help me out with my next batch. The first batch I did consisted of fabrics that I have collected over the years from garage sales, grab bags, etc. They may have been dirty or musty smelling, had pet hair on them, were odd or small sized pieces, or were fabric counts I wouldn’t usually stitch on. I thought they would be a good test for the dyeing process and if it didn’t work out, I wouldn’t be out anything except for a bit of dye.
STEP I: WASH FABRICS
Note: You do not need to do this step if your fabric is brand new. I only washed my fabric because I did not know where it came from and some of it had obvious stains on it or came from a smoking household. Most of it was white but I did have one piece of a salmon colored fabric that I didn’t really care for, and decided I wanted to add darker pink and purple to it.

Put the fabric in a large bowl filled with warm water and a tiny amount of dishwashing liquid (such as Dawn). Agitate the fabric in the sudsy water and let sit for about 15 minutes. Agitate the fabric again and then take the fabric out and rinse it completely in clean water.
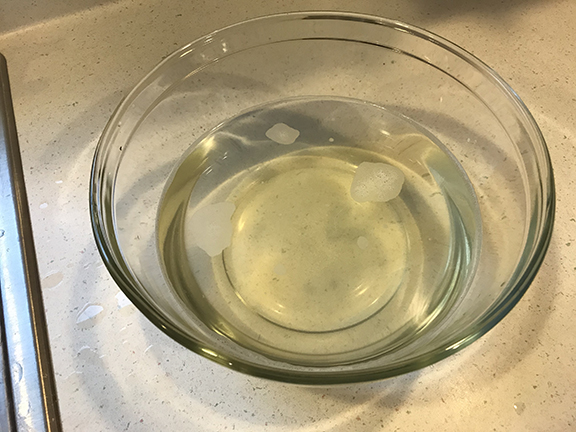
This is what my water looked like after I washed the fabric… yuck!
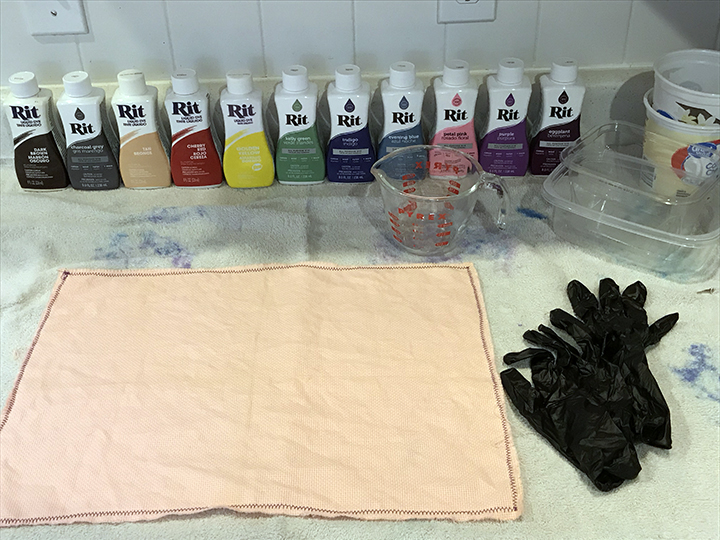
STEP 2: GATHER YOUR SUPPLIES
You will need some old towels that you don’t mind getting stained, gloves (either household rubber gloves or the disposable kind), plastic spoons, various sized plastic or glass containers, a measuring cup, a pot of very hot water (make sure it stays hot during the whole dyeing process), paper towel, your cross stitch fabric, and your dye. I used liquid Rit dye which can be purchased at grocery and craft stores. Save the powdered dye for when doing the ice dyeing method. Rit makes two kinds of liquid dyes, one for natural fibers and one for synthetics. Since you will most likely be dyeing cotton or linen, you will want the original Rit dye. Look for their special dye for synthetic fabrics if you are dyeing things like polyester.
It also helps to wear old clothes that you don’t care about, as you may get dye on yourself.
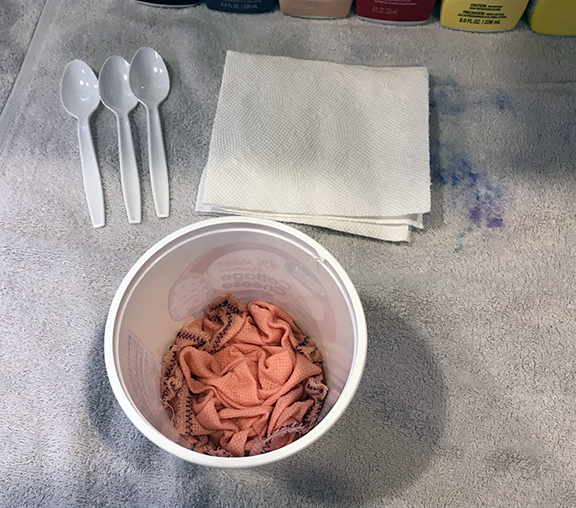
Note: DO NOT USE ANY UTENSILS/BOWLS FOR FOOD AFTER USING THEM FOR DYEING! Gather up some old or disposable items for this project. I used plastic spoons and various containers like yogurt and cottage cheese tubs and the plastic tubs that lunch meat comes in. Make sure if you are using plastic that it can withstand very hot (almost boiling) water. I learned this the hard way! Anything that is dishwasher safe should be good to use.
STEP 3: PREPARE FABRIC

Use a sewing machine or serger to either zig zag stitch or serge around the edges of your fabric. TIP: If you need to wash your fabric like I did above, you will want to do this before washing it. The fabric will unravel when it is handled or gets wet.
If you are using unwashed fabric, it will be dry. Wet it thoroughly and carefully squeeze out the excess water.
If you want to dye your fabric a solid color, make sure you use a large container to dye it in – it should be bigger than the piece of fabric. Lay your wet fabric down flat in the container so that the dye can cover the fabric evenly.
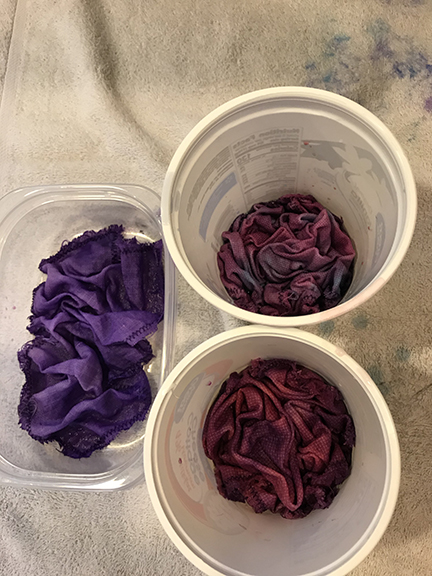
If you want the mottled effect, use a container that is much smaller than your fabric. Lay your wet fabric down on your work surface (covered with an old towel) and pinch it in the center. Carefully scrunch the fabric bit by bit all the way around, by pinching and pulling it towards the center of the fabric. Place it like this in the bottom of a small container. Use your fingers or the end of a spoon to make sure the fabric is nicely scrunched up all over. You want some areas to be on the bottom of the container to catch the most dye, and some areas to be peaked up at the top to not get as much dye.
STEP 4: PREPARE DYE
As you can see in the photo above, I started with a salmon pink color of fabric that I knew I would never use for anything. I dyed directly on top of this color to make a darker pink/purple color. You can start with fabric that is white, beige, pink, yellow, or any other light to medium color. Just make sure the dye you are using is a darker color. If you are using white fabric but want to dye it a solid color first and then do mottling on top of it later, be sure to use a large container to dye the initial fabric all one shade.
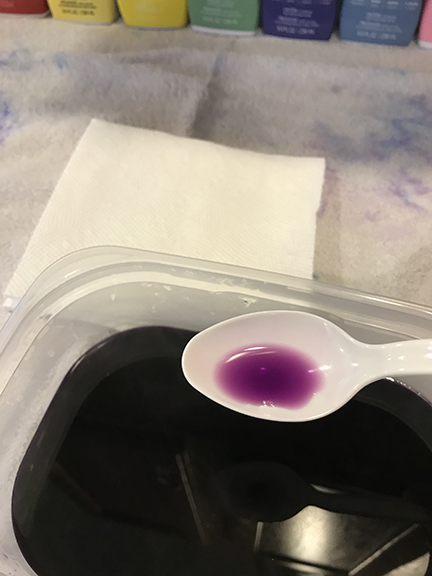
Scoop out one cup of hot water and put it into a separate container. Be careful, really cheap plastic containers will melt when you add the hot water! Shake well the Rit dye of your choice and add about 1 T of dye to the water. Stir with a spoon until thoroughly mixed. Take a small amount of dye on your spoon and let it drop onto a white paper towel. This will give you an idea of the shade. If needed, add more dye until you are happy with the result.

STEP 5: DYE YOUR FABRIC
Carefully spoon out some of the dye and pour it onto your fabric.

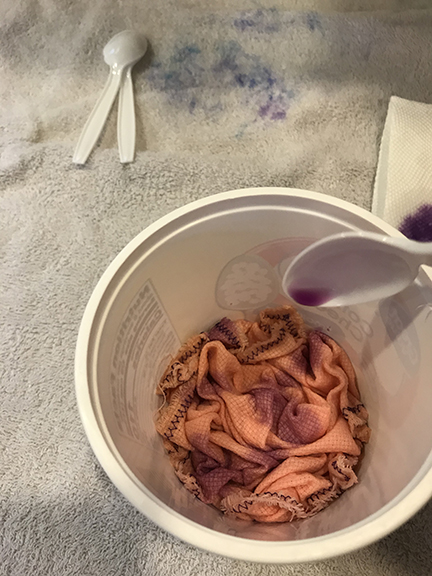
Keep spooning the dye over the fabric until you think you have added enough. To get a nice mottled effect, add more dye to some areas and less to others. Anything that is sticking out on top will have the least amount of dye. Use the spoon to poke the fabric and make sure that the nooks and crannies are filled in. With this fabric, I did leave parts of the salmon color un-dyed since it was already a solid color. If your fabric is white and you don’t want any white spots showing, make sure you take the time to poke around at the fabric and ensure that no white is showing. Clear containers are nice because you can look at the bottom and sides to make sure no white is showing. Do not add too much dye. You do not want the fabric swimming in dye. The top of the fabric should not be submerged. You can pour off excess dye back into your dye container (or the sink) if you think you added too much.
If you want to add more than one color of mottling, prepare the additional colors the same way you did with the first, using separate containers for each. Make sure your pot of water is still hot. If you keep it simmering on low, it should stay hot for you. If you turn the burner off completely, the water will cool down quicker than you think. You can also use the same (original) batch of dye and add more color to it to make it darker, and then pour that over some areas of the fabric. For my fabric above I dyed the salmon colored fabric first with purple dye, then I went and added eggplant dye to that purple dye to make it a darker and slightly different shade. You can see the purple and the eggplant dye samples on the paper towel, below.
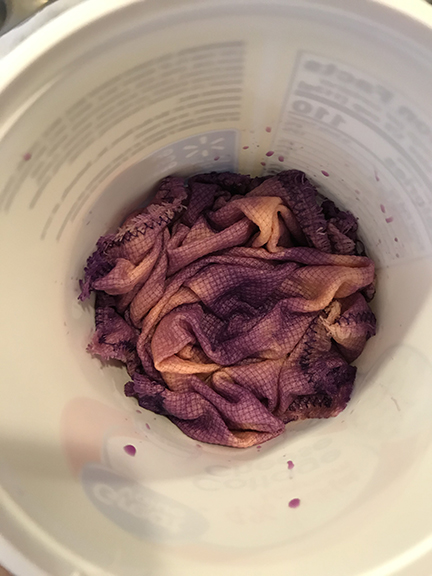
Let the fabric sit for 20-30 minutes, depending on how dark you want the colors to be. Keep in mind that the fabric will appear much darker when it is wet.
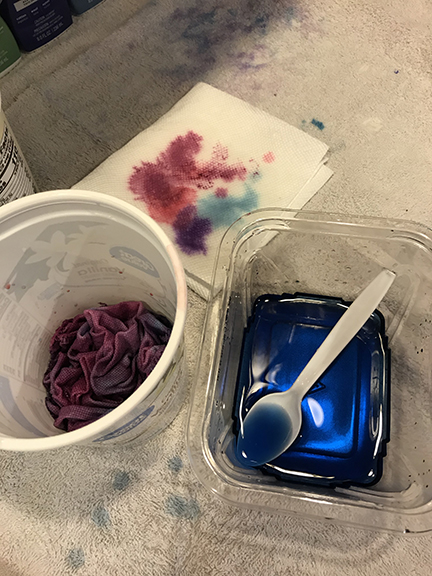
After getting that piece of fabric done, I moved on to two pieces of white fabric. I wanted to dye one piece a nice dark purple with lighter mottling, and the other a mixture of pink and purple and blue. Here are pictures of what they looked like in their containers. Notice that the tips of the fabric are not in the dye, so they are going to be lighter.

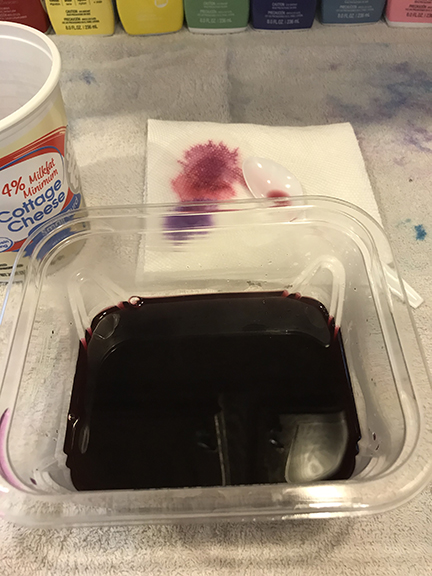
STEP 6: RINSE OUT THE DYE
After your fabric has sat in the dye for long enough, carefully take the fabric out of the dye bath (wear gloves!) and rinse it out in the sink. Use cool water. Rinse and rinse until the water runs clear. You will probably need to rinse it for longer than you think. Use one of your empty containers to gently squeeze the water out of your fabric into. If the water is not clear, you have not rinsed it for long enough! When you finally get all the dye out, carefully squeeze out the excess water and lay your fabric down on a towel. Spread it out with your hands to get out as many wrinkles as possible. Be sure that your gloves are clean, or else you could transfer some dye of an unwanted color to the fabric.
The fabric is much darker when it is wet!
Let the fabric dry almost completely, and then iron to get all the other wrinkles out. It is easier to do this when the fabric is just ever so slightly damp; completely dry fabric is much harder to get wrinkle-free.
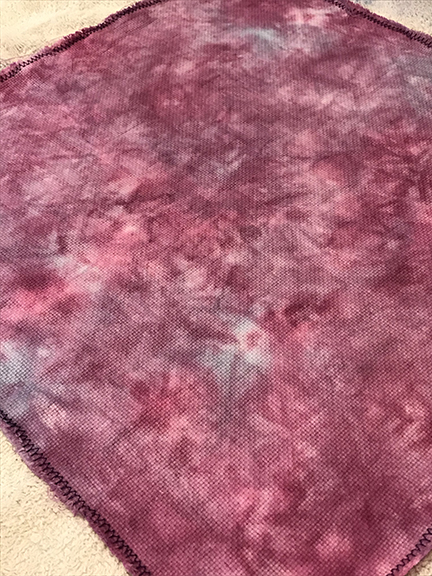
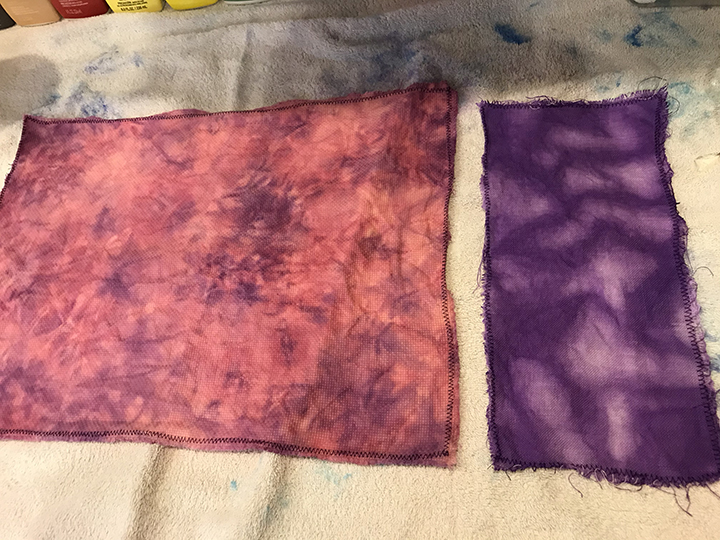
STEP 7: ENJOY STITCHING WITH YOUR NEW FABRIC!
The finished pieces of fabric!
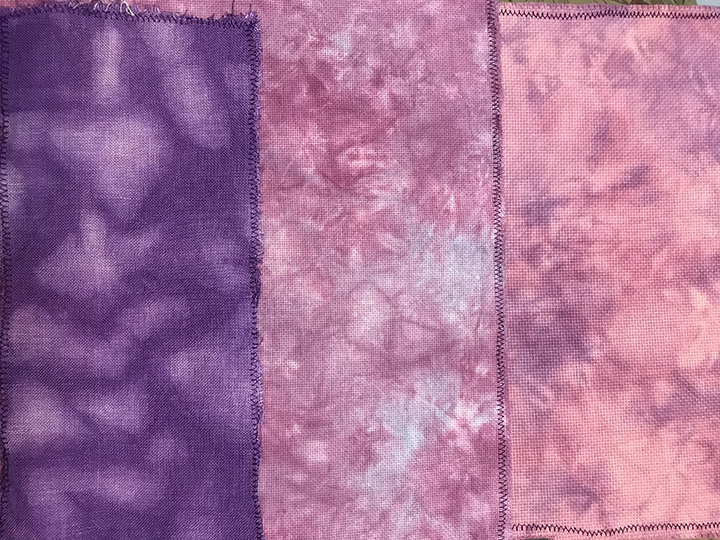
I hope this tutorial helps you to hand dye your own cross stitch fabrics. It is a lot of fun, and not very expensive. Be sure to use those 40% off coupons at the craft stores for the dye and fabric!
XXX
Carrie
I was so excited to find a DMC wooden floss cabinet on Facebook Marketplace a few months ago. It was in pretty good condition and the seller only wanted $9! The drawers did not contain the plastic divider inserts to separate the floss, but I knew I could pick them up online. But when I tried to order them, they were either sold out or no longer for sale from the distributors I had used before. But I placed an order with Wichelt Imports and they did eventually get them back in stock. The inserts were $4 each so I have $21 into this cabinet now. But new ones sell for $155 on DMC’s website, and they are never in stock. What a score! The seller called it “storage” was using the drawers to store sunglasses!

XXX
Carrie
DMC has raised the price of their floss to an MSRP of 99 cents and a MAP (minimum advertised price) of 60 cents. It wouldn’t bother me so much if the quality didn’t seem to be going downhill the last several years…
I have seen lots of stitchers complaining on Facebook groups lately about how their floss has a knot in it, as if to tie together two ends (from the end of one lot and the start of a new one, I guess). I have seen this first-hand.
XXX
Carrie
Our nation – no, our world – is having a crisis right now, and it is calling on everyone to stay in their homes to prevent the spread of this horrible COVID-19 pandemic. For cross stitchers, this seems like a dream come true. But people are quickly finding that it is not all it’s cracked up to be. Toilet paper shortages, food shortages, lost income, and uncertainties about their kids’ educations are causing people to start to crack. I have not felt this stress yet; for me things are still pretty much life as usual. My days are generally spent at home anyway, unless I have to go out for a doctor’s appointment. I’m sure things will change soon, and I will start going a little stir crazy. But for now, I know that my family and I are staying put at home and therefore are safe. Because of my health problems, we are not even setting foot in a grocery store or pharmacy. Luckily the pharmacy has offered to bring my prescriptions to the car for me, and grocery stores have options to shop online and then have an employee bring the items to your car and load them in your trunk. I’m not sure how much longer this pandemic will last, but for now I’m just thankful that my loved ones are safe. I hope yours are as well. We are cross stitchers – we can totally rock this quarantine thing!
XXX
Carrie
The Christmas holiday has been nice and quiet and pretty uneventful. I have spent my time catching up on much-needed sleep. Besides that, I have managed to find some nice relaxing stitching time. I am going to attempt to finish the red-headed mermaid without working on anything else. I am able to work on this even though it is very dark and dreary and cold outside, due to a wonderful new task lamp that I bought for myself (Merry Christmas to me!)
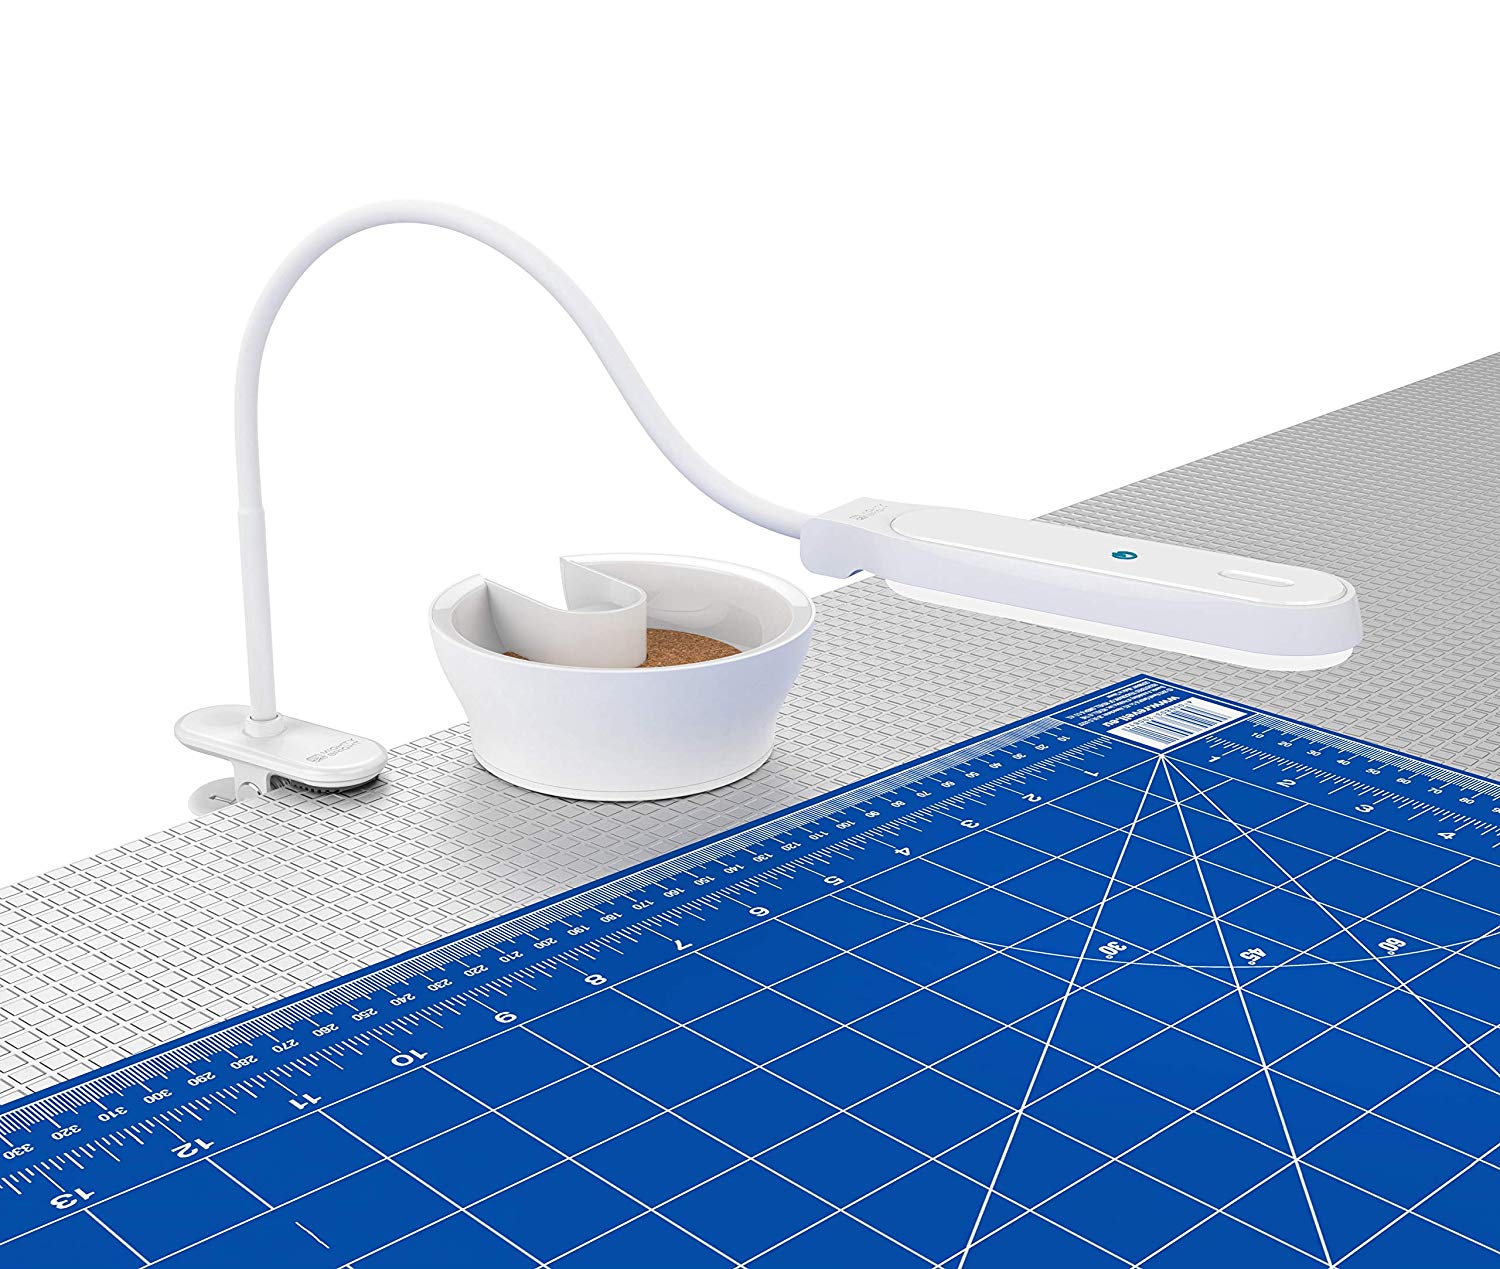
The Mighty Bright LED Task Light Table Lamp was featured in a recent issue of Just Cross Stitch magazine and it sounded exactly like what I was searching for. Of course, upon doing a search for this lamp, I found out it was sold out everywhere. The company itself didn’t have any, Amazon didn’t have any, no one had any. My guess is that it is a discontinued product. But I was determined to find one, and I eventually did find one at an online quilting shop. The MSRP was $90, but I was able to snag the lamp, a pair of stork embroidery scissors, some bobbins for my sewing machine, and several yards of pom pom trim on Cyber Monday for only $75, including shipping. I have been using the lamp for stitching, reading, even just having added light in the living room when sitting there in the evenings. What I love about this lamp in particular is that it has the ability to be used in its base or clipped onto something. I keep it in the base, and the base has cork in the bottom of the tray to hold scissors, needles, threads, etc. The lamp has three brightness settings (I always use the highest) and it can be adjusted from yellow light to white light. I love this feature! Normally white (daylight) lightbulbs really bother me. I have to make sure the light bulbs in our house are the yellow kind, or else I get really nauseous. I have no idea why, they have just always bothered me since the old incandescent bulbs went out of fashion and compact fluorescent (and then LED) bulbs were introduced. I thought for sure I would want to have this lamp set on the yellow bulb setting all the time, but I found I actually prefer the white setting. It gives a more accurate color representation for the fabric and floss. And as long as it is above me shooting straight down, it doesn’t bother me. This is easy to do with the swivel neck that can bend in any direction.
If you can find one of these lamps somewhere, I highly recommend it. I noticed that the website I purchased mine from is already sold out, and like I said I don’t think these are even being made any more. But it has sure saved my eyesight and helps with neck strain as well because I don’t have to bend over as much.
Happy New Year!
XXX
Carrie
The other day on Facebook I saw a post from a lady who had purchased a kit and was going to start it. It was her very first project. I thought it was adorable – a neon colored mandala displayed in a hoop. Some other people pointed out that it was not cross stitch at all, but embroidery. Others said they had stitched it and loved it, while others said they could not get the hang of it. I have done embroidery before, although certainly not as much as cross stitch. But I adored this project and decided to search for it online. I ended up finding the kit on sale on Amazon for $6.99 with free shipping, and there were only 4 left in stock. I looked at it for a few minutes and then there were only 3 left. I decided to snag one before they were gone, and sure enough later that day they were sold out. I plan on working a bit on the mermaid pattern for a while, but then I want to dive into this. The hoop is only 6 inches, so it has to be a small project. Lately my brain fog has become worse and worse, and even if I am having a pain-free moment in which to stitch, the counting is difficult. I think doing a project like this will be easier since you are simply tracing the pattern on the fabric.
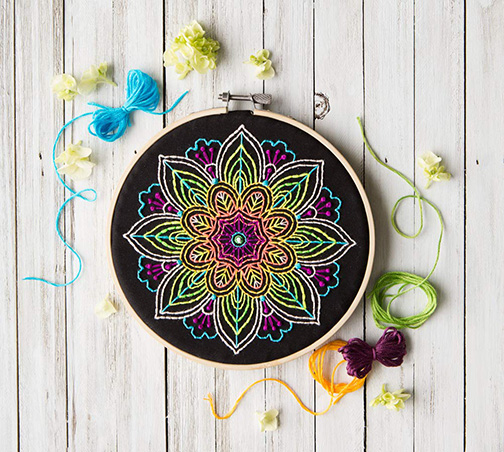
The kit is by Leisure Arts and is called Mini Maker Neon Mandala, item 49808. It retails for $7.99.
XXX
Carrie
The November issue of Cross Stitch Crazy just came out (issue 260) and once again my blog was mentioned! Turn to page 63 and you will see a picture of my ORT jar and the answer to the question, “what IS an ORT jar, anyway?”
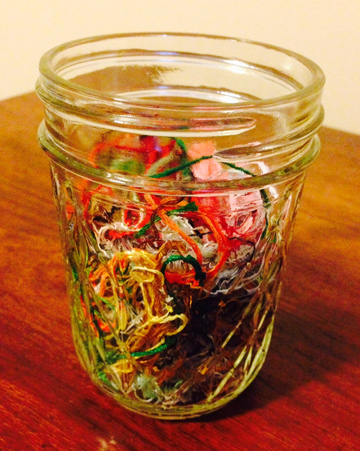
You can view my original post here.
XXX
Carrie
Many weeks ago, I was contacted by Cross Stitch Crazy magazine and was asked if I would allow them to mention my Mason jar tutorial in an upcoming issue. Of course, I said yes! I created the tutorial after making up an elephant for one of my daughter’s preschool teachers. And in just a few weeks, my daughter will be starting 5th grade!
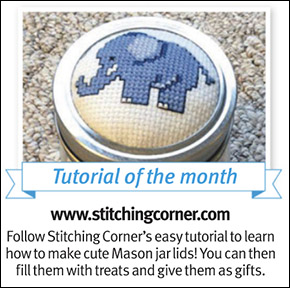
You can find the Mason jar tutorial here.
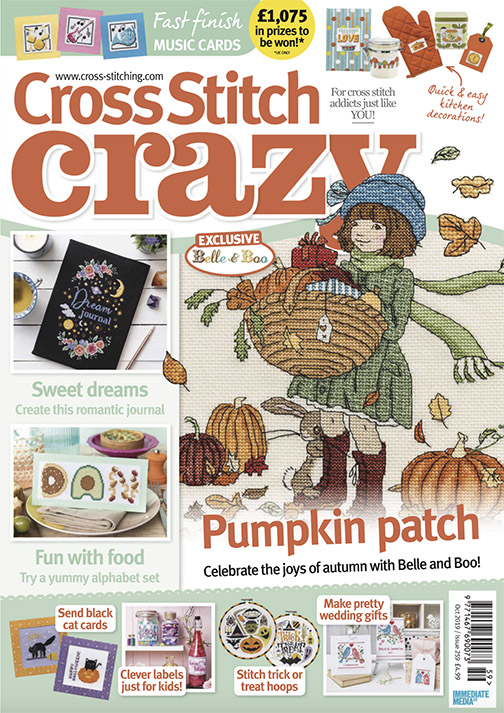
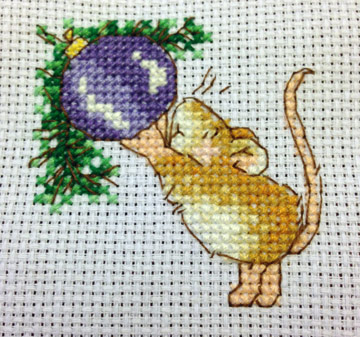
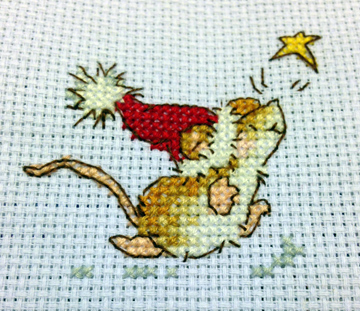
Be sure to check out issue 259 of Cross Stitch Crazy, which contains so many neat designs. I’m very partial to the Halloween designs by Emma Congdon, and just love the way they are framed in embroidery hoops decorated with ribbon.
XXX
Carrie
The new issue of Cross Stitch Crazy is out, and I absolutely adore these cute llama charts! I am especially taken with the pink one, because what’s not to love about a fuzzy pink llama?
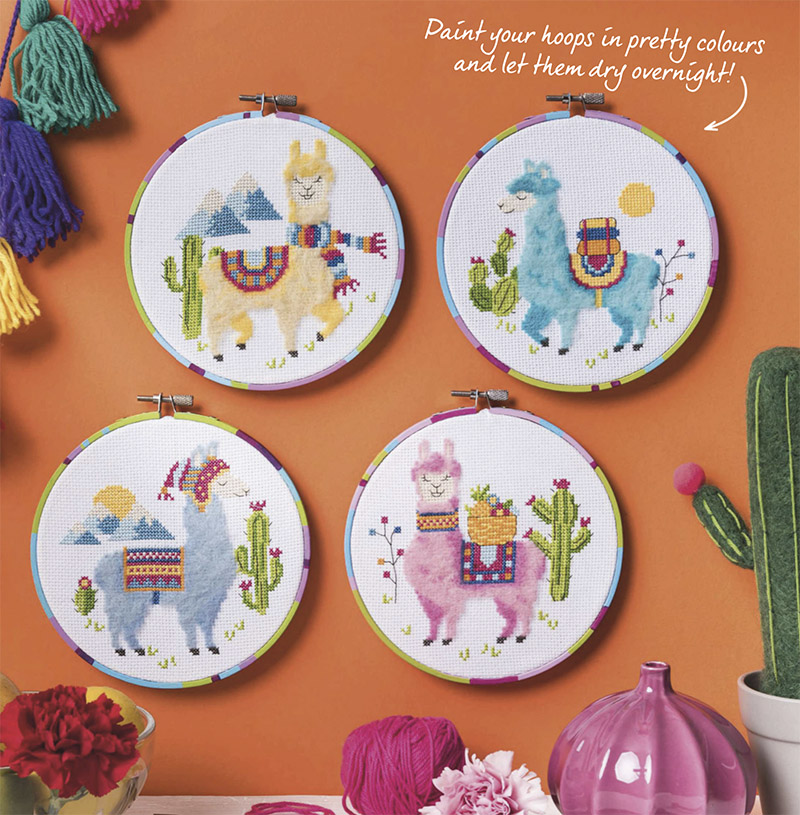
The only problem is, these charts utilize Madeira Lana threads to give the llamas that fuzzy look. It is a 50% wool, 50% acrylic blend that turns fuzzy when applying a wire brush to it after stitching is completed. I have searched online to no avail, this thread simply doesn’t seem to be available in the US. Rainbow Gallery does make a thread called Wisper that is supposed to create the same effect, but it does not come in as many colors as the Lana. And it is 70% mohair and 30% nylon, so it is a bit different. I do have some kid mohair threads in my stash which I have never stitched with because they are so fuzzy. I figured using them would be a royal pain. But I will have to dig my stash out and see if I have any colors that would work for this design (I highly doubt I have two shades of pink, if I have any bright colors at all).
I just love how they painted wooden hoops in bright colors and framed these designs in them. This whole set would look so cute hanging up by my desk!
You can find these charts in the June issue (255) of Cross Stitch Crazy.
XXX
Carrie

The cross stitch world lost a beloved designer recently, Margaret Sherry. Margaret designed adorable critters that stitchers just loved, and she will be greatly missed in the stitching world. Margaret’s daughter issued the following statement:
“It is with the deepest sadness that I announce the death of my mother, Margaret Sherry, aged 72. She passed away peacefully and surrounded by family after losing her battle with cancer. She was a devoted mother and grandmother and she has left a huge void in our family. Margaret was an incredibly talented and inspirational artist, who over many years created a massive range of much-loved characters for cross stitch magazines and greetings cards. She was aware of, and extremely humbled by, her following, and her wish was not to let her characters die with her. Therefore, she passed the legacy on to me, her daughter, to continue the company and ensure The Margaret Sherry Collection and the vast catalogue of published and unpublished designs continue to be released and enjoyed long after her passing.”
Here are a few of my favorite Margaret Sherry designs I have stitched.
RIP, Margaret. You will be missed.
XXX
Carrie
If you have an obsession with cross stitch, and with KFC fried chicken, you’re in luck. You can now purchase cross stitch charts from your favorite restaurant. KFC has set up an Etsy shop called HandmadeByKFC, where 5 patterns are available for instant download at a cost of $4.50 each (kits are also available but it looks like they are only being shipped within the UK). All of the proceeds go to charity, and supposedly you can even get free chicken by actually stitching one of the patterns. But the details on how to get your free chicken are not very clear, and that offer is definitely only for residents across the pond. A spokesperson from KFC UK & Ireland siad: ”The real secret behind why our food tastes so Finger Lickin’ Good isn’t the secret recipe – it’s the way we bread it each day by hand. What better way to share that with our loyal fans than by inviting them to hand craft their very own KFC masterpiece whilst giving back to our local communities in the process”.
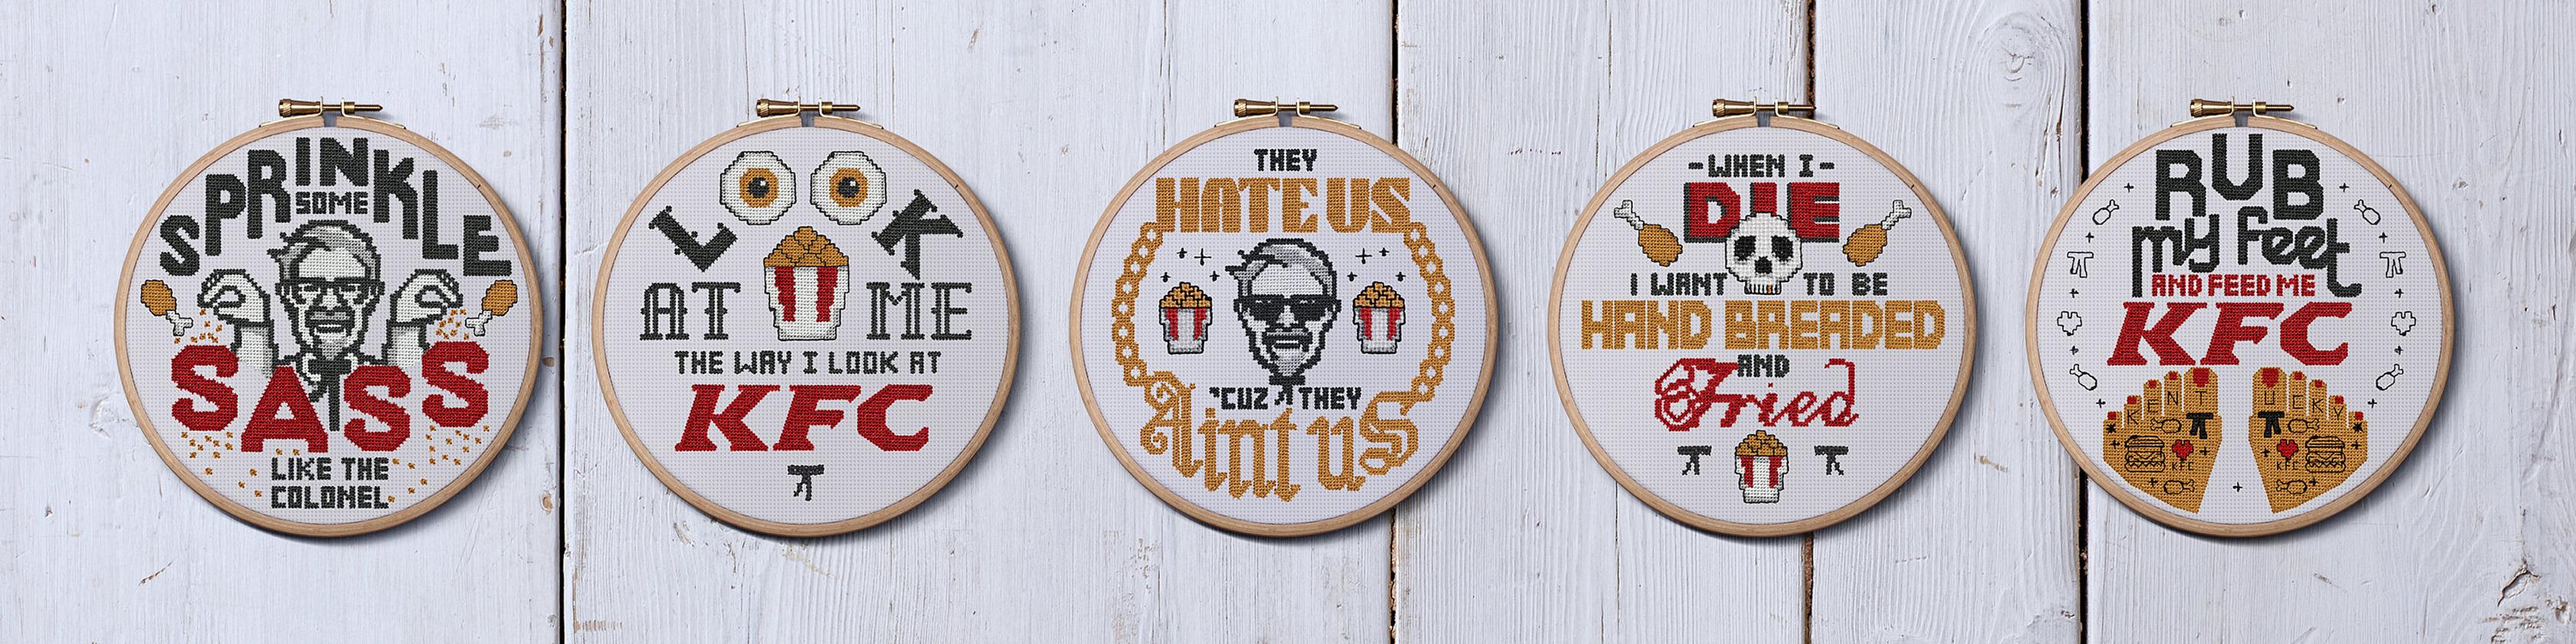
If you are interested in these charts you better hurry, because these patterns are available for a limited time only.
View the Etsy shop: https://www.etsy.com/shop/HandmadeByKFC
XXX
Carrie
I love Alice in Wonderland, both the books and the Disney movies. I even dressed up as Alice one year at Disney World for Mickey’s Not So Scary Halloween Party. But I have never cross stitched anything Alice related, probably because Disney does not license many cross stitch charts to begin with. But I just found a ton of Alice charts on Etsy, and a few of them really stood out. At first, I figured these patterns were totally illegal if they had the likeness of the Disney Alice characters, because there is no way these small time designers get permission from Disney to make money off of their copyrighted images. But, Etsy is somehow allowing people to get away with this, and Disney is obviously not going after anyone.
The chart that I really want to stitch is by CutePatternsByMaria, from the Ukraine. I absolutely love all of her designs! But this Alice in Wonderland design is like a watercolor painting, and so lifelike. It doesn’t have the cartoon-y feel to it like the Disney images.
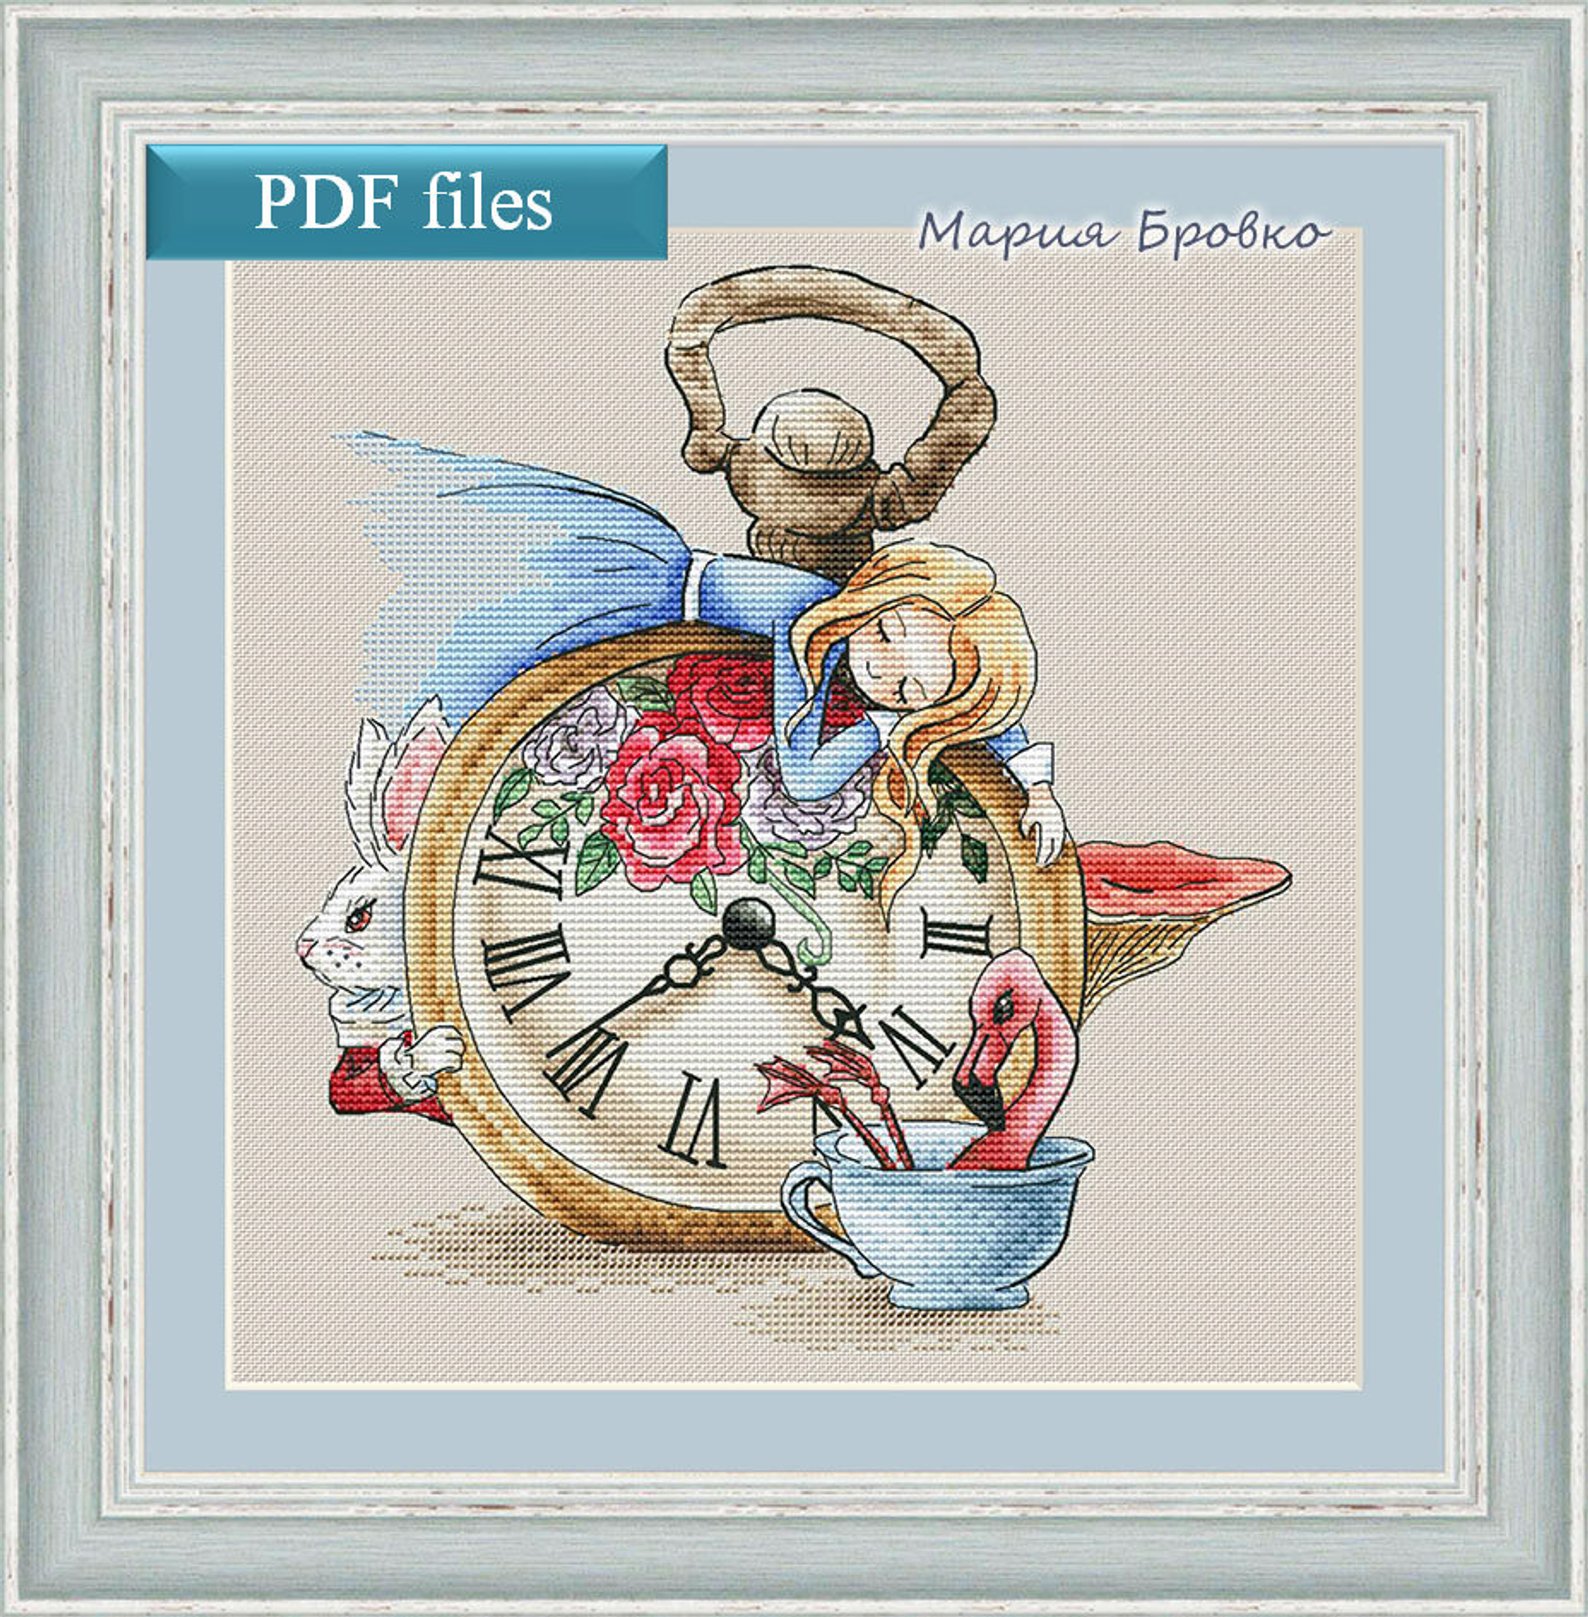
You can purchase this chart on Etsy here: https://www.etsy.com/listing/595272049/alice-in-the-wounderland
And do be sure to check out the rest of her beautiful patterns.
The next pattern I loved was a splatter watercolor by SilhouetteStitch. At only $3.00, this one is a real bargain. I love the bright colors! And it looks like it would contain whole cross stitches only.

You can purchase this chart on Etsy here: https://www.etsy.com/listing/686292205/alice-in-wonderland-watercolor-cross
There is more to Alice in Wonderland than just Alice, however. I adore the Cheshire Cat (or as my daughter calls him, the Treasure Cat. She could not pronounce it correctly when she was a toddler, and the name has stuck ever since!)
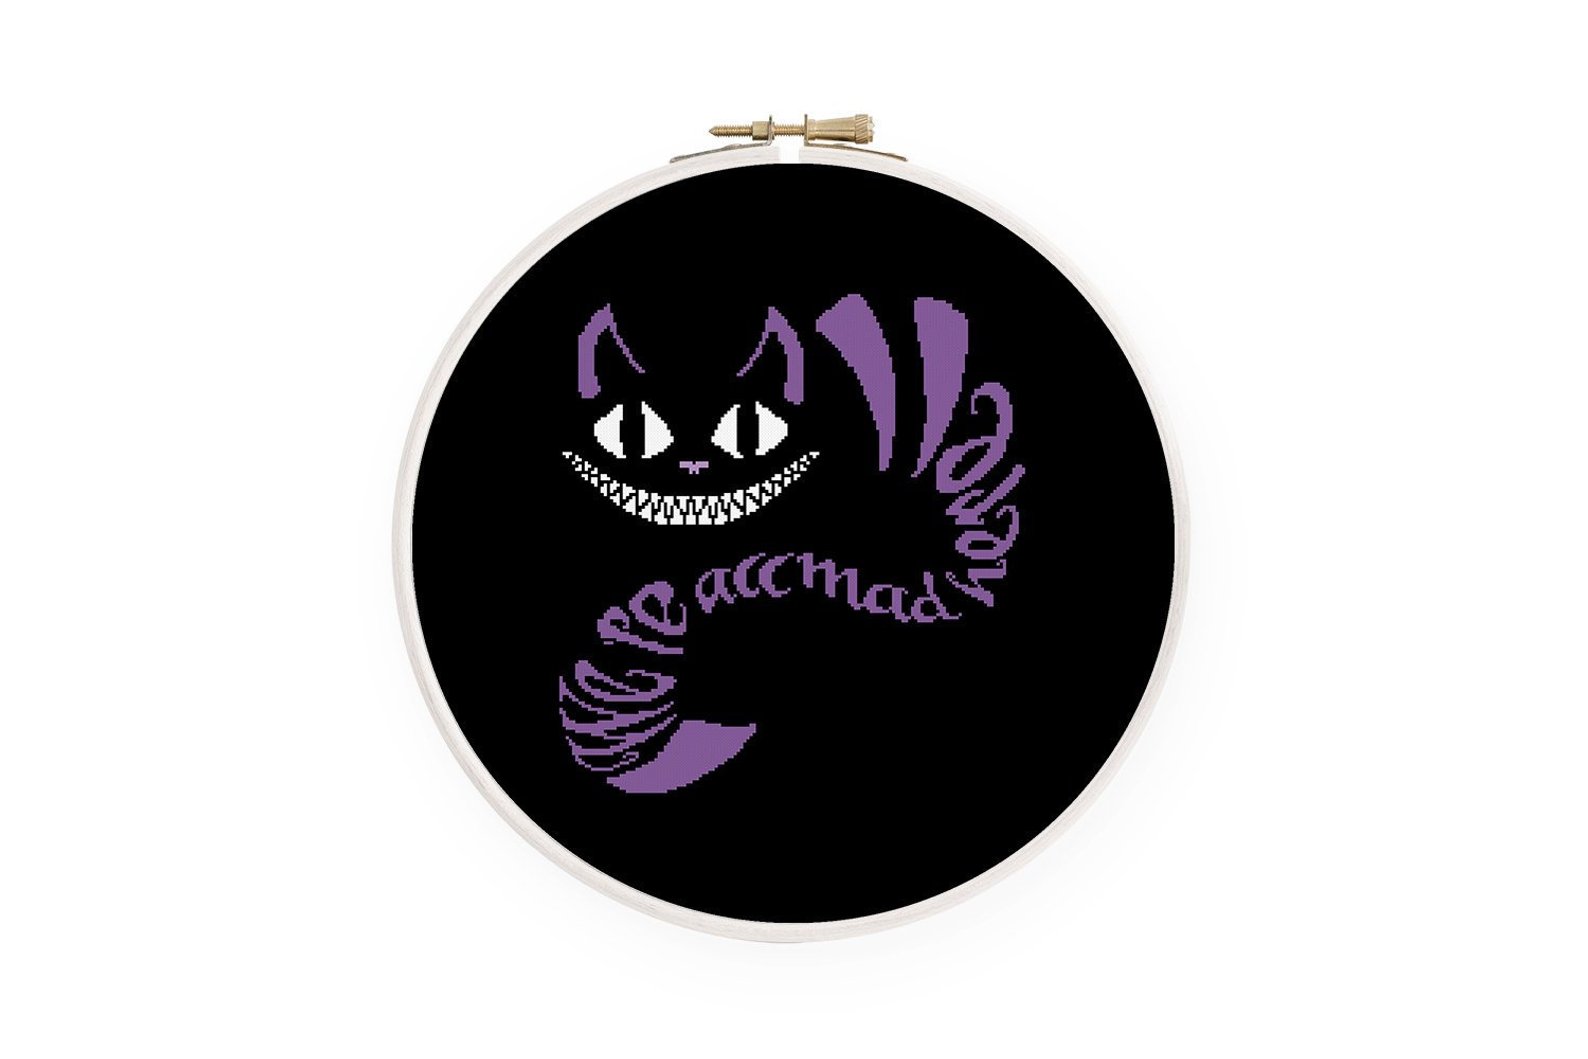
This design is by RockingHorseCS and features the saying “we’re all mad here”. You can purchase this chart on Etsy here: https://www.etsy.com/listing/503831354/cheshire-cat-cross-stitch-pattern-alice
I also love NataliNeedlework’s set of card suits, which gives you patterns for “curiouser and curiouser” and “twinkle twinkle little bat, how I wonder what you’re at”. These are a bit pricier at $4.95 considering they are just words, but they should stitch up in a jiffy.
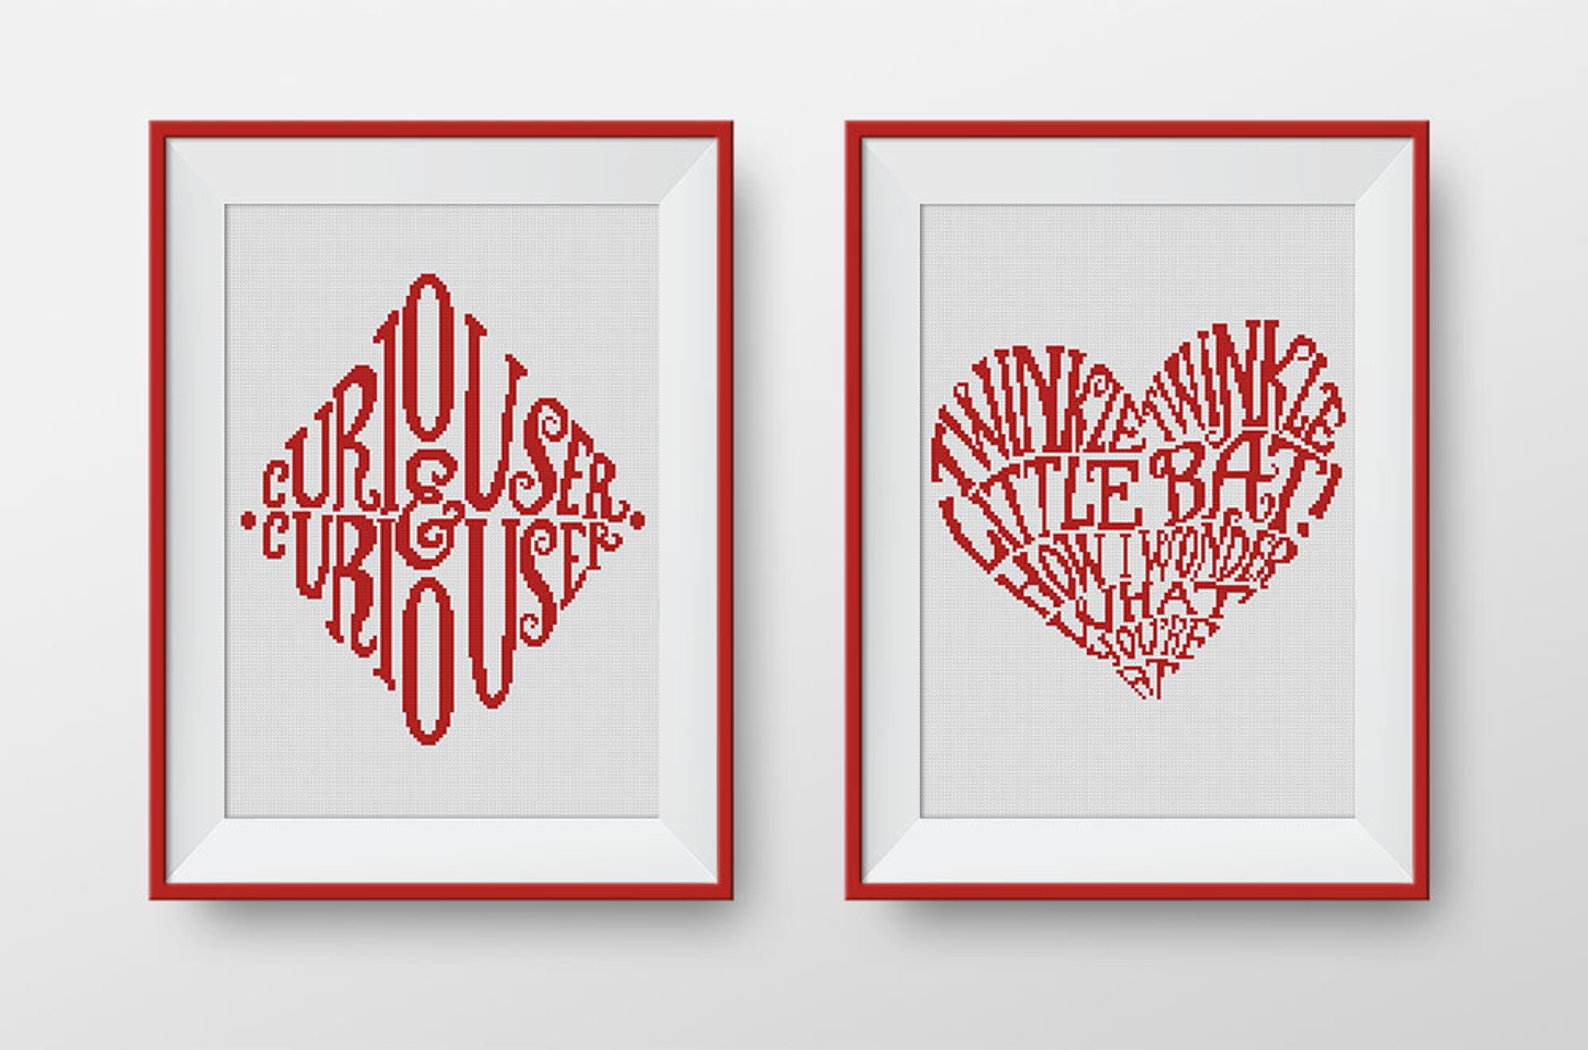
You can purchase this chart on Etsy here: https://www.etsy.com/listing/503831354/cheshire-cat-cross-stitch-pattern-alice
Which Alice in Wonderland character is your favorite? Drop me a note in the comments below. What I really was hoping to find a chart for (and could not) was something along the line of “don’t step on the mome raths”! That is a favorite quote of my daughter’s and mine. Maybe I will just have to design something myself!
XXX
Carrie
My daughter’s Girl Scout troop recently celebrated World Thinking Day. Each participating troop had to pick a country that they wanted to learn about and my girls chose EGYPT! I was actually pretty surprised (and excited) because I’ve had a fascination with ancient Egypt for a long time. The girls had to learn about Egypt’s climate, religion, people, sports, foods, and more. They created a display, wore scarves to cover their heads, handed out “swaps” done in the colors of Egypt’s flag, and served everyone that attended an Egyptian dish: watermelon salad. Did you know watermelons were first cultivated in Egypt? Part of their display consisted of my books on ancient Egypt and how to read hieroglyphs. Flipping through these books got me interested in the cross stitch aspect of Egypt again, and making me wish I had more pain-free days for stitching. I decided to search Google for Egyptian themed charts, as I’m sure a lot of new ones have come out since the last time I looked. Look at these gorgeous cross stitched creations!
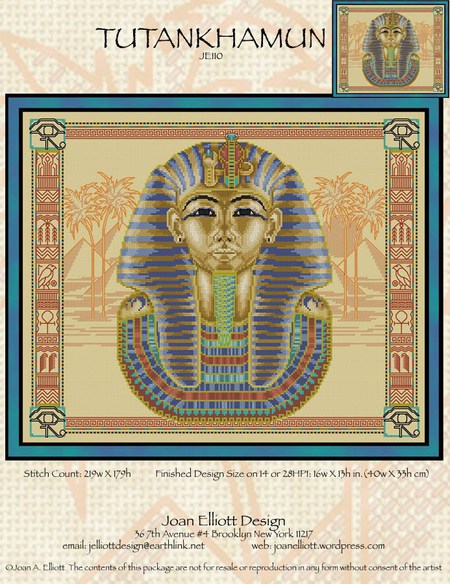
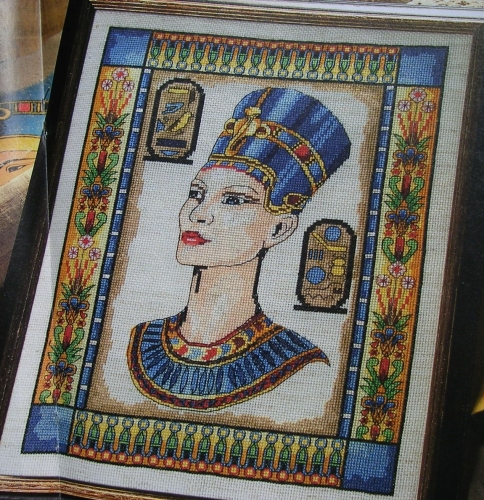
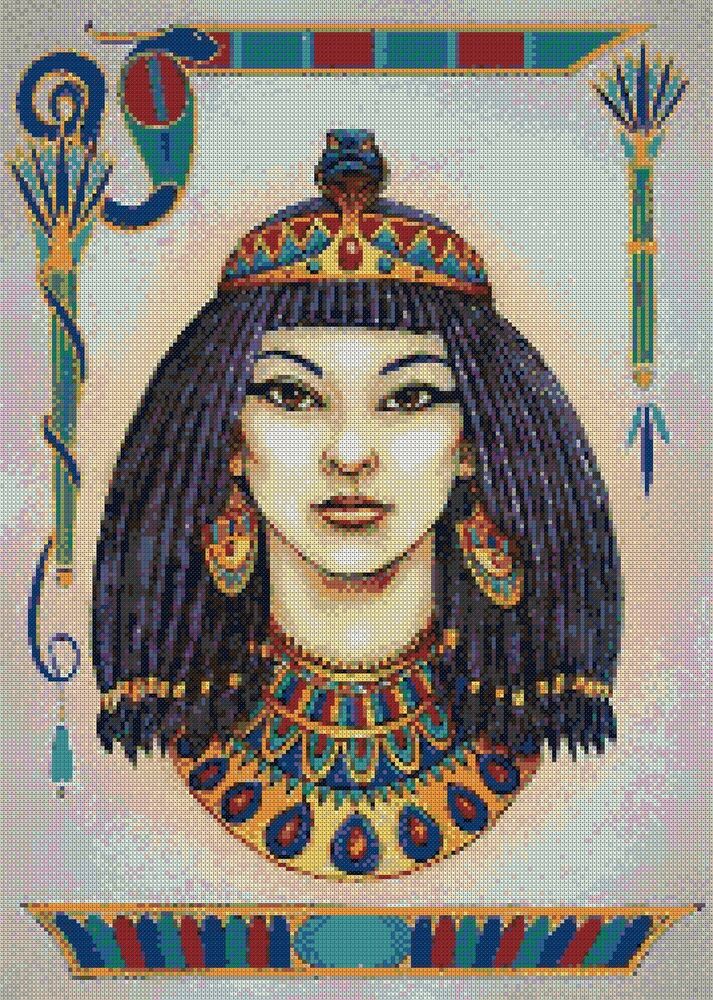
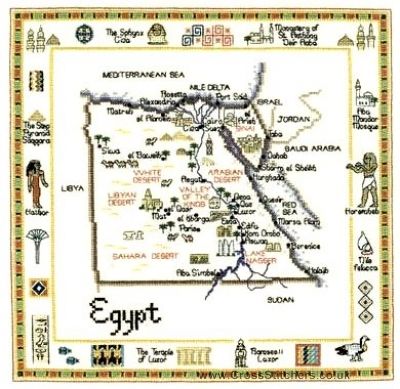
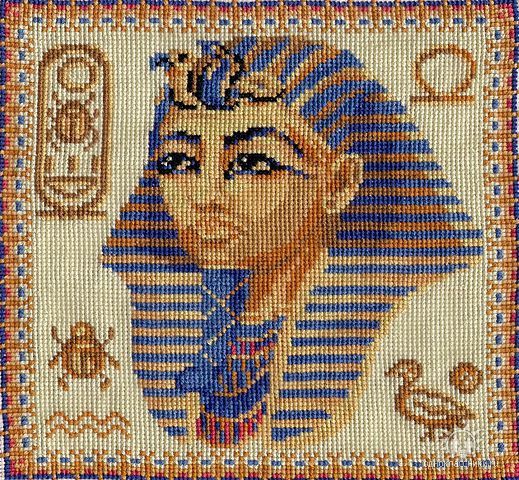
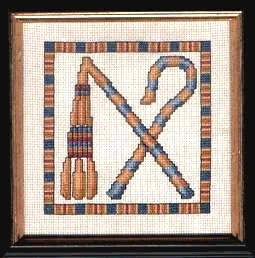
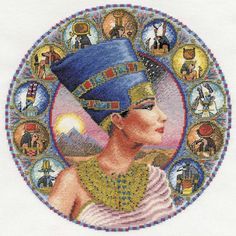
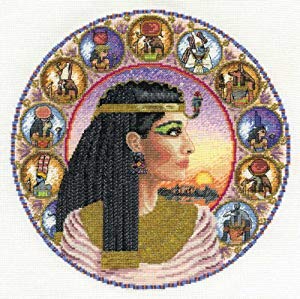
I’ll need to search for the kits or patterns for some of these, to add to my collection. What cross stitch theme do you always need more designs of?
XXX
Carrie