The cover has been released for the 2021 special Halloween issue from Just Cross Stitch!
This issue will be available for sale in July.
XXX
Carrie
The cover has been released for the 2021 special Halloween issue from Just Cross Stitch!
This issue will be available for sale in July.
XXX
Carrie
I am loving working on this because it is 11 count (so easy on the eyes!) and large blocks of solid color.
Any guesses yet? It should be pretty apparent now! I forgot to take other progress photos before I got too far… oops!
XXX
Carrie
I was able to get in a little bit more on this project over the weekend. You might think you know what it is… but there’s a good chance you’re wrong! 🙂
XXX
Carrie
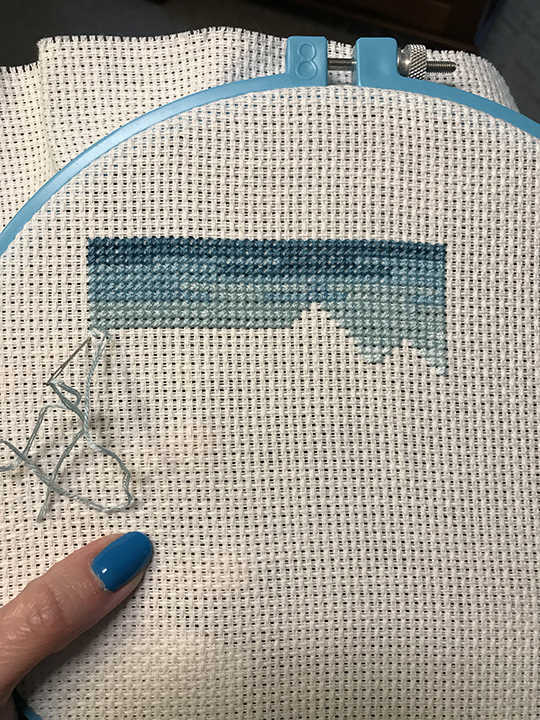
I’ve started a new project. While the Alice SAL is fun, my concentration hasn’t been the greatest lately and I am also feeling I don’t have much time that I feel up to stitching. But I wanted to be able to work on something. This new project will have very little backstitch, and large blocks of a solid color. I am finding it much easier to work on a project like this at the moment, although my stitching time is currently almost non-existent. I’m hoping to be able to get in about an hour a week. My neck, however, may have other plans. For now, this mystery project is quite blue… any guesses as to what it will be?
XXX
Carrie
I have heard a lot about the website AliExpress but had never checked it out before. I decided to try ordering some trims to use to finish off my cross stitch projects as ornaments, mini pillows, etc. When I visited the site for the first time I was overwhelmed. You can get just about anything on there! Because I wasn’t 100% certain that it was legit, I decided to keep my purchase to around $20. This way if the items never came and I didn’t get my money back, or if the supplies themselves were very sub-par, I wouldn’t be out much.
My main interests were ribbons and pom pom trim, but I found some lace and ric rac that was cute so I decided to add those too. One thing I didn’t get that I sort of wish I had looked for, was different colored baker’s twine. It is really expensive to buy at hobby shops or in the cake decorating section.

For the pom pom trim, I went with multi packs that contained many colors. One pack was all the same size, just in different colors. The other was a grab bag of sizes and colors.
The lace was just a couple of things that stood out to me, mostly in white but also a star trim in black.
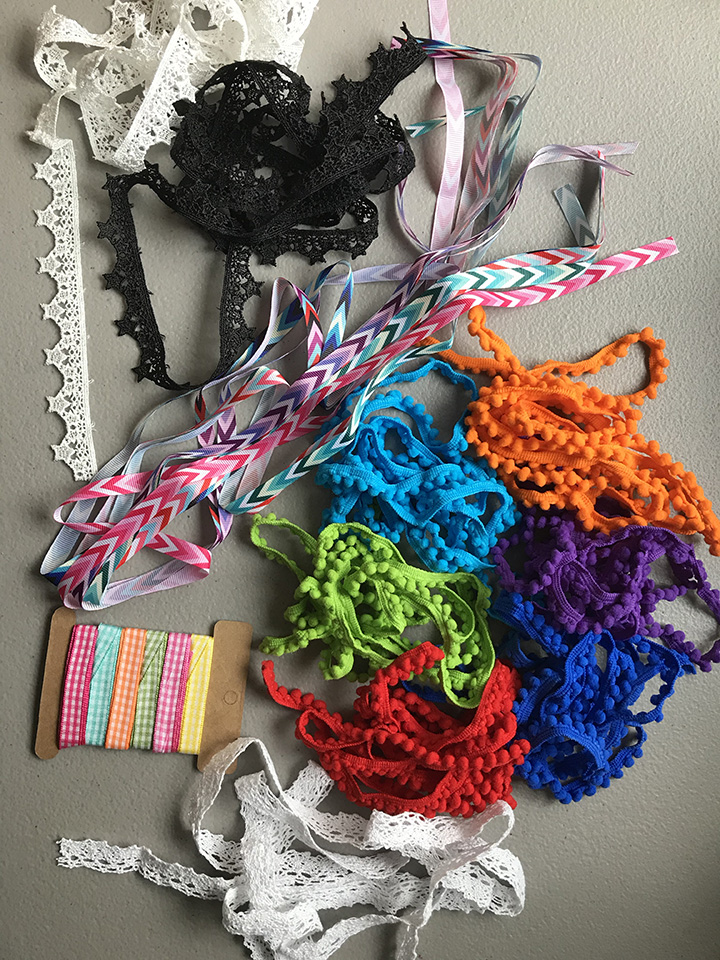
The ribbons were a mixture of colors but all the same pattern in a pack – I ordered polka dots, gingham, and chevron. I also ordered a “mystery pack”. I knew how many ribbons I would get, how wide they were, and how long, but I had no idea what would be in the package. That one turned out okay. A few were ginghams and polka dots similar to what I had already purchased, and one had the word Handmade all over it. Apparently you cut the ribbon into little pieces and use one piece to attach as a label to something you have made. One had the word NICE written all over it so it came out looking like ICENICENICENICENICENICENICEN. I doubt I will use that one, as it is just odd. Another one says Forever Love all over it and is kind of gimicky. But at least the words are separated. I probably will not buy a mystery bag in the future.

It only took 27 days to receive everything from China. I did order each item from the same shop. I am not sure what would have happened if I had ordered from multiple shops. I am guessing I would have received more than one package in the mail and they probably would not have come at the same time.
The total cost for everything shown in the photos was $21!
I can’t wait to finish off some of my projects using these trims. My favorites are the polka dot ribbons and pom pom trims. I wish I had ordered some ribbons in solid colors, along with the baker’s twine. But I am very happy with my purchase and will likely order again.
XXX
Carrie
It is a cold, snowy, miserable Saturday. Time to get going on finishing off two recent projects!
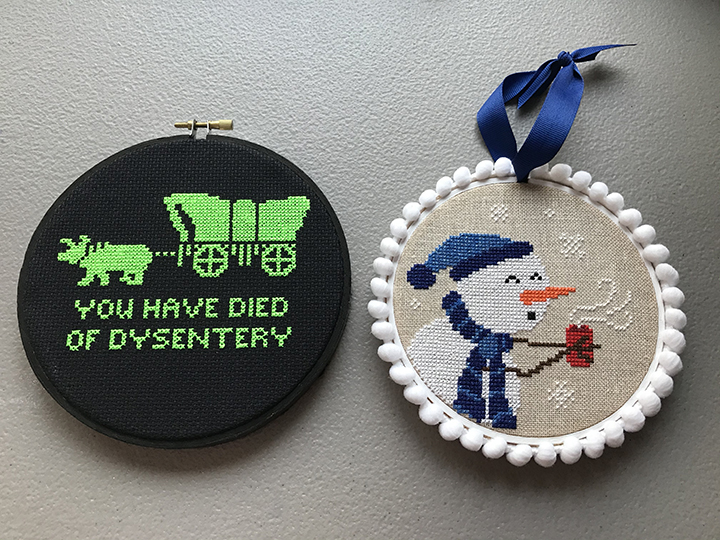
The Oregon Trail piece is going to be really simple – paint a hoop black and then display it in that. I want the neon green to jump out from the black and be the star of the show. For the hot chocolate drinking snowman, I want to frame it in a white hoop and add white pom pom trim to the edges to look like snowballs. None of this was actually my idea; it’s simply a copy of how the finished project appeared in the magazine (Just Cross Stitch December 2020). Although, they finished theirs off as a flat ornament, and did not use a hoop. They also used twisted cord or floss as the hanger and I plan to use a ribbon.
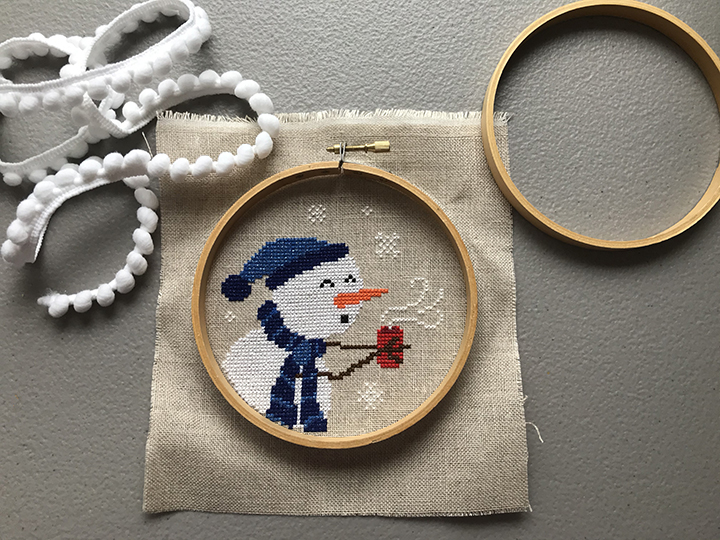
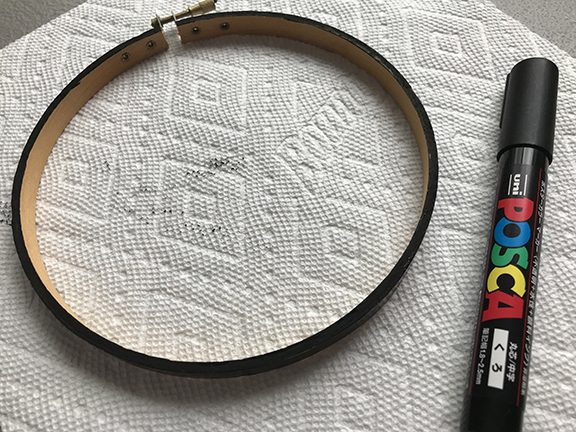
The first step was to use Posca pens to paint the hoops. They required about 3 coats each, but each coat only took a couple of minutes to be fully dry, unlike paint which would have taken a few hours total.

Then it was time to frame the pieces in the hoops. I cut off most of the excess fabric, then turned the fabric to the back and hot glued it in place inside the rim of the hoop. Then I cut a piece of felt the same size as the back of the hoop and glued it to the hoop, ensuring that everything was covered and the fabric that I had glued down didn’t peek through. I chose felt sheets the same shade as the cross stitch fabric so that when the hoops are hanging in a window the sunlight will not shine through. The pom pom trim was hot glued to the outside of the hoop and a hanger was attached using blue ribbon.
I absolutely love how these turned out! I don’t have a hanger added to the black piece yet, but I probably will go with something really basic that doesn’t take away from the overall design. I do like how the blue ribbon actually accents the snowman’s hat and scarf nicely.
XXX
Carrie
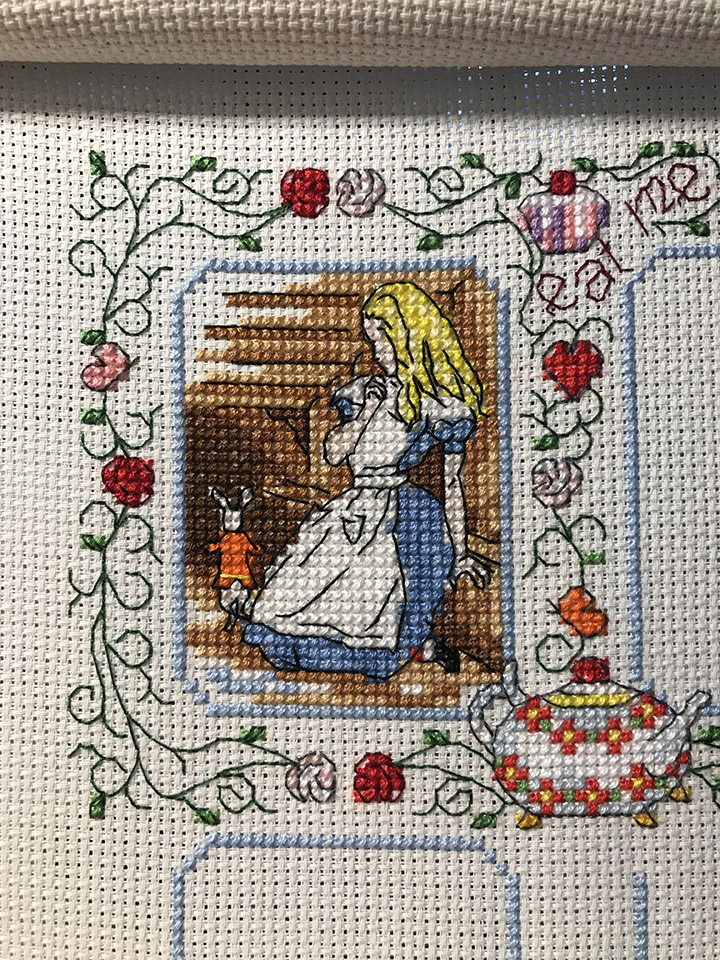
The White Rabbit was actually very fast and easy to stitch. I did leave off the beads and metallic backstitch (there will be a gold chain for his watch and buttons on his coat). Those will get added at the very end after all of the cross stitching is complete. I rather like this little cutie!
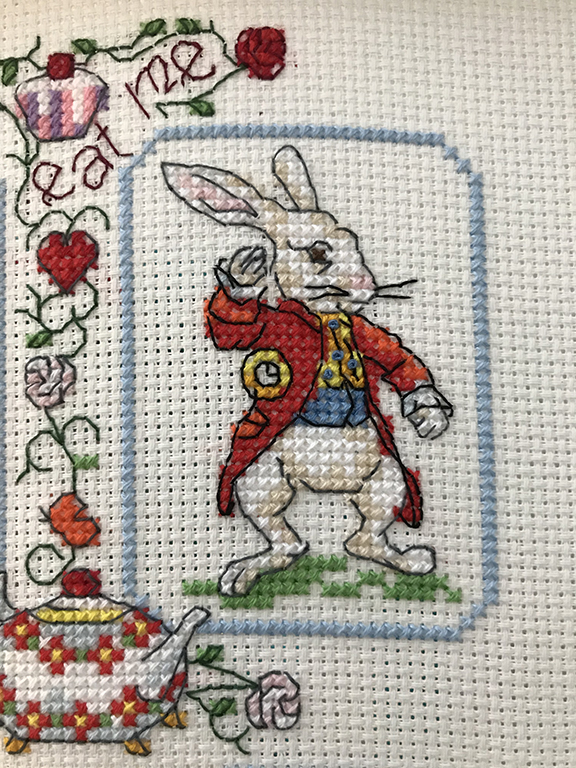
Here is the progress on Alice so far:

The missing backstitch on that one leaf to the left of the Rabbit is driving me nuts! I do think I will start on Square 3 because it is another small, quick character to stitch. But after that I am going to have to get back to all of the dreaded border work. If I have the patience, I may even make myself complete the border around and underneath the next set of 3 squares before I start on them.
XXX
Carrie
I’m so excited to have Alice complete. She is beautiful… but this backstitching is just awful. If I had known that none of it would be actually in the holes, I would have chosen to do this on evenweave fabric. But, I’ve come too far to start over. My fingers are really sore from pushing the needle through the middle of the Aida blocks, so I will have to find a sharper needle to use for the rest of the project.
XXX
Carrie
Now that Oregon Trail is complete I am going to focus on the Alice SAL. I am so happy that I was able to finish off the cross stitch portion of the first square.
There is a Facebook group called 24 Hours of Cross Stitch, and a few times a year they put together a marathon stitching weekend for stitchers all over the world. This happened to be one of those weekends. Some people stitch for 24 hours nonstop, some people try to get in 24 hours total spread out over the course of Friday, Saturday, and Sunday. And then there’s people like me… who start Thursday evening, stitch as much as they can during the other 3 days, and still only get in a total of 7 or 8 hours. I can’t sit for very long at all, and I have constant neck pain. While I feel that the stitching motions are really good for keeping my hands from deteriorating, I can only do so much. I came up with a plan that seemed to work really well for me. I put a TV series on which consists of 22 minute long episodes. I stitch during an episode, then I have to get up to stretch, move around, get a drink, eat, use the bathroom, lie down, etc. I can get in a few of these 22 minute stretches in a day if I plan it out correctly. I know I will never be able to sit and do anything for 24 hours straight, but by doing 22 minutes at a time I am able to get in quite a bit of work. It also helps if the projects are easy and don’t require starting new threads every few stitches. The Oregon Trail was great for that, and didn’t require much counting. There won’t be another 24 hours of cross stitch for several months, and I am going to have to go back to stitching 0-2 hours per week. But it was fun to have a weekend (mostly) to myself and do something all for me for a change.
XXX
Carrie
It’s complete! I had so much fun stitching this, although the neon floss was a pain to work with and made it take so much longer. I could have had this done in a weekend, easily, with normal DMC floss. But the neon green floss matches my T shirt perfectly! The regular floss would not have had the same WOW factor. Now I just need to find a smaller wooden hoop and I think I will paint it black. I am also going to need to back the entire thing with black fabric or felt to ensure that light does not show through, as it is in this photo.
XXX
Carrie
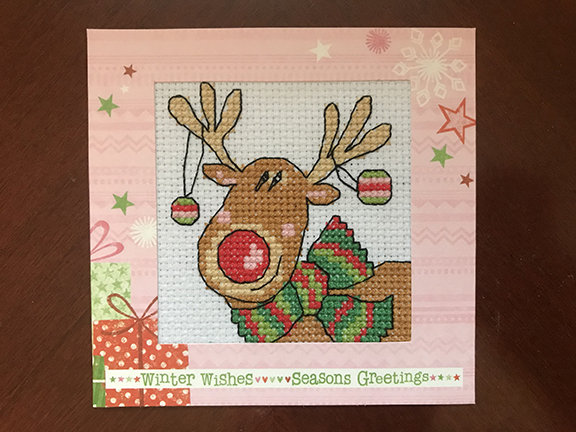
I have had this Rudolph cover kit from an issue of The World of Cross Stitching for a couple of years at least. I don’t even recall which issue it came with. But recently I found it and decided to give it a go even though it would not be ready before Christmas. It just seemed like such a cute little project, and quick to stitch. I worked on it during two weekends, then finally finished the backstitch today and mounted it into the card blank that it came with. I think he is so adorable and I’ll hang on to him until a future Christmas when I will send him to someone special.
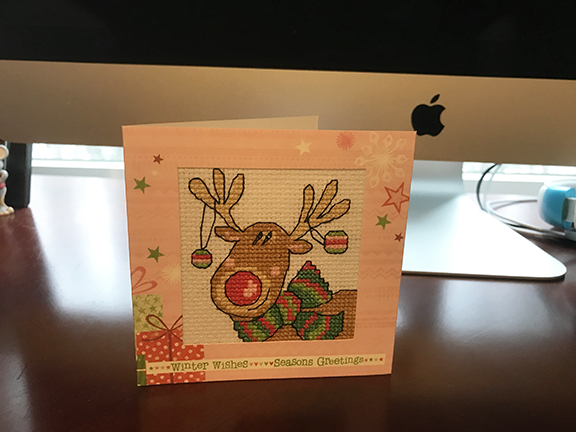
The finished cross stitch, without any backstitch:

XXX
Carrie
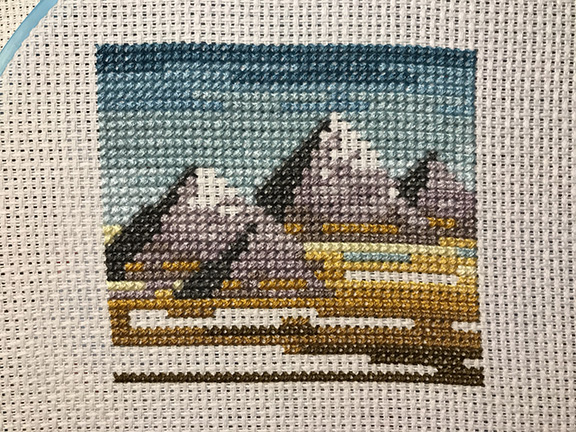
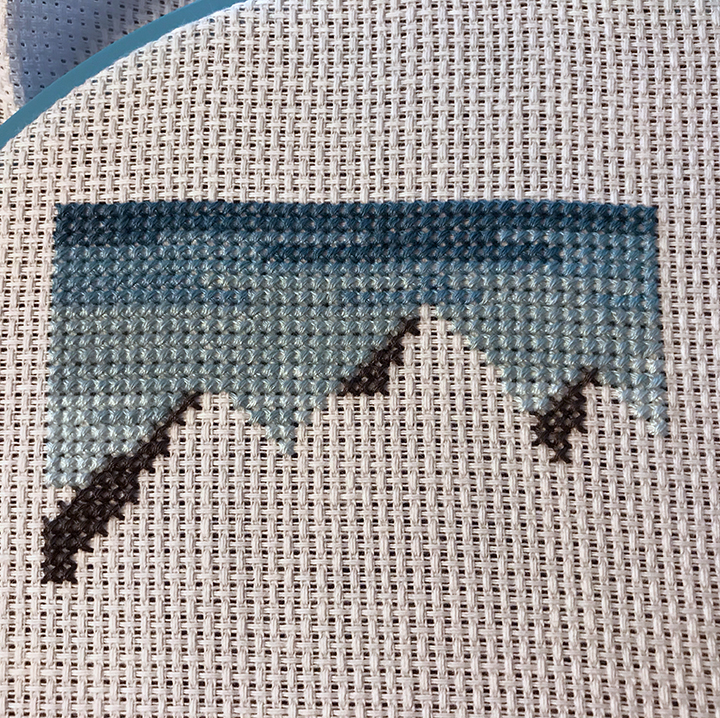
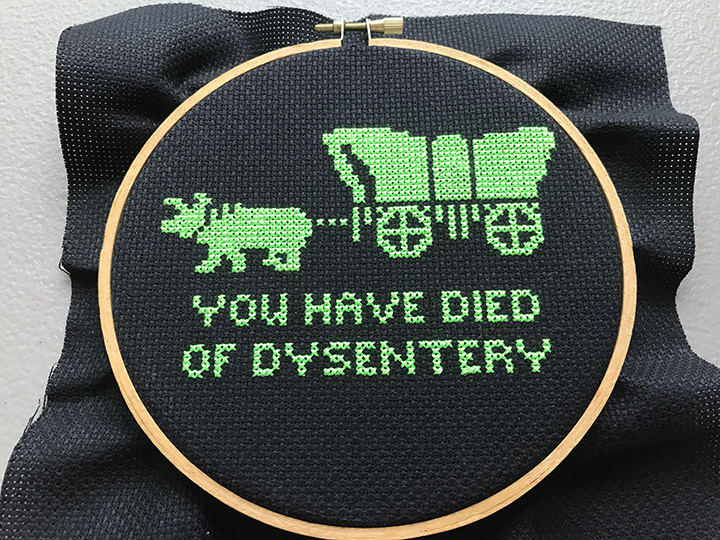
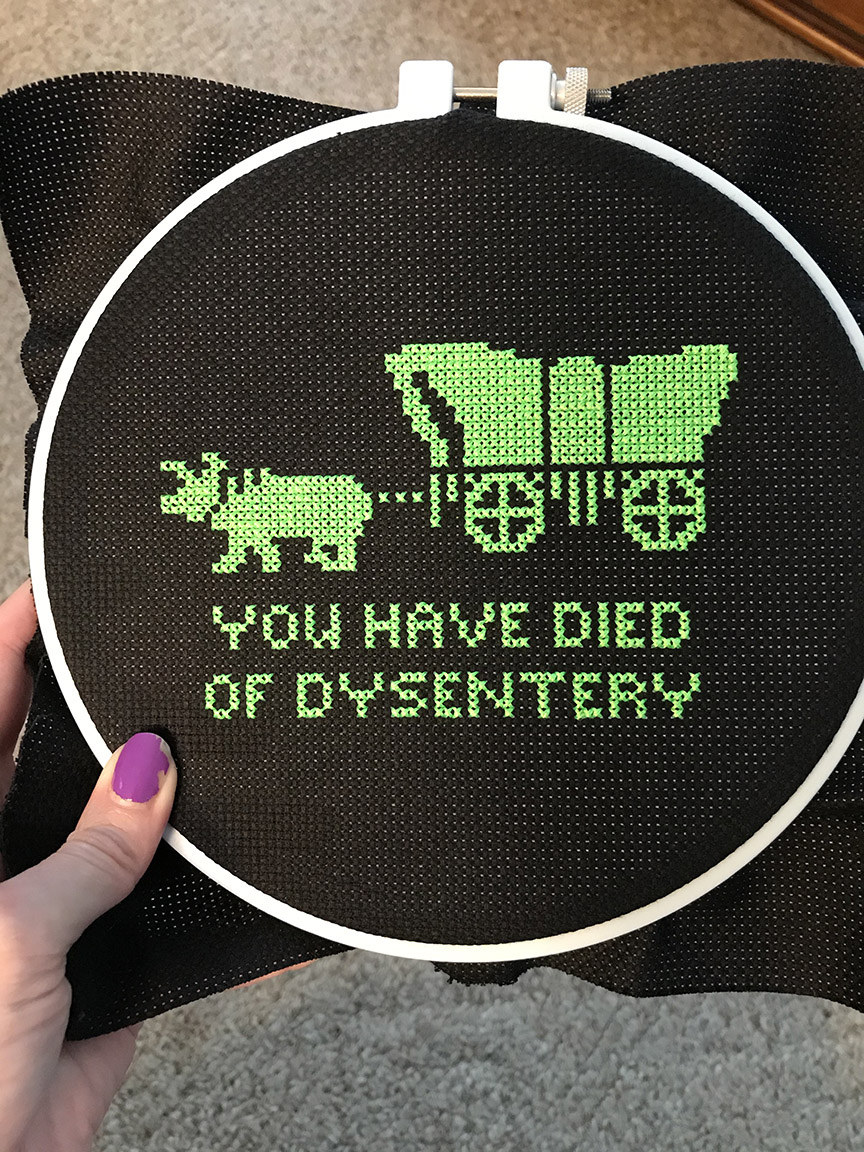
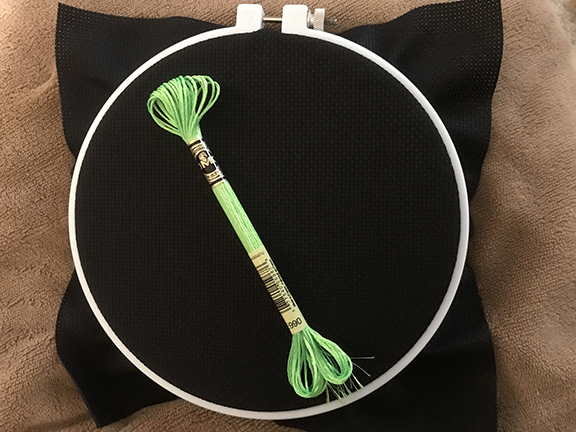
One of my favorite memories from childhood is playing Oregon Trail on an Apple II computer, complete with neon green text on a black screen. Those Apple computers were definitely the best part of going to school (we personally had a Commodore 64 at home). Recently, this game has had a sort of cult following, with all sorts of merchandise popping up relating to it. When I saw this T Shirt on Amazon, I had to have it.

This got me wondering, were there any cross stitch patterns available with this design? A quick Google search found that although there were some finished pieces out there that had been sold on Etsy, no one was selling a pattern. But the design was so simple, I decided to try my hand at creating a pattern based on the T shirt and the few cross stitch Google images I found. I got out some graph paper and started shading in colored blocks with a pencil. It was pretty crude, but the end design seemed pretty accurate. I never stitch on black Aida because it is so hard to see the holes, but I decided to give this a try. And I happened to have one old (but new) package of Charles Craft black Aida in my stash. To give you an idea of how old it was, it was packaged in a clear round tube… they have not sold it that way in years! The tricky part was going to be finding a bright green shade of DMC floss that matched the T shirt. I looked at the entire line of DMC but nothing was bright enough… until I found the neon E990. I really did not want to work with Light Effects floss, as it is so finicky. But it was really the only bright green color that matched. So I dug out my old tub of Thread Heaven and got to work.
The floss was just as bad to work with as I thought, but luckily the pattern was super easy to follow and not very large. I got this done in just two days of stitching:
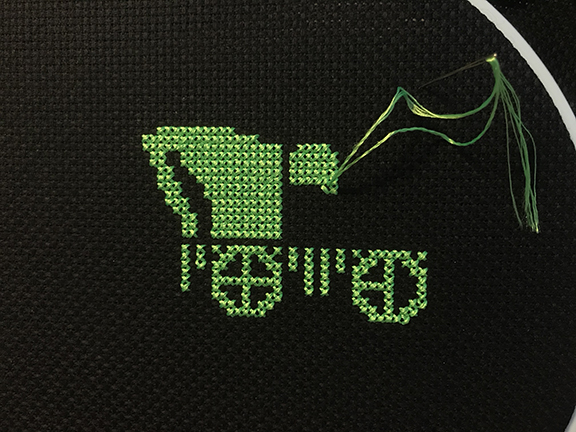
I just noticed while adding the photos that one of the spokes on the wheels is not complete. Glad I noticed that before I finished and framed the piece! I will be displaying it in a hoop which I will probably paint black.
XXX
Carrie
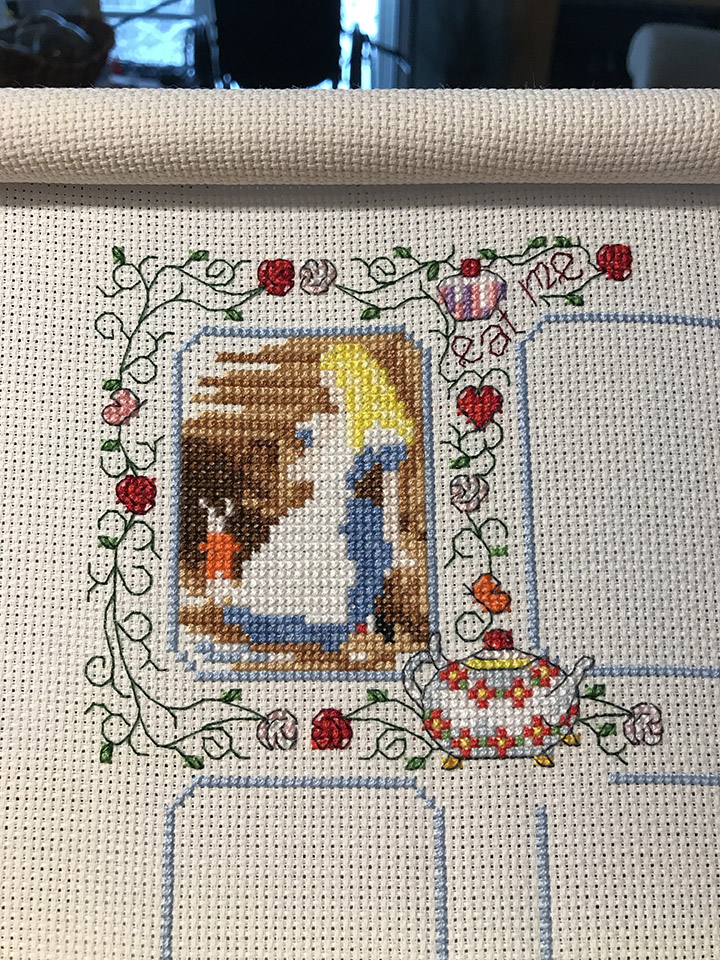
I have made a little bit of progress on the Alice in Wonderland SAL from CrossStitcher magazine. But not much.
I don’t think I will have much chance to work on this until after the holidays, when the kids are back in school and things calm down a bit. But at least you can see Alice’s outline 🙂
XXX
Carrie
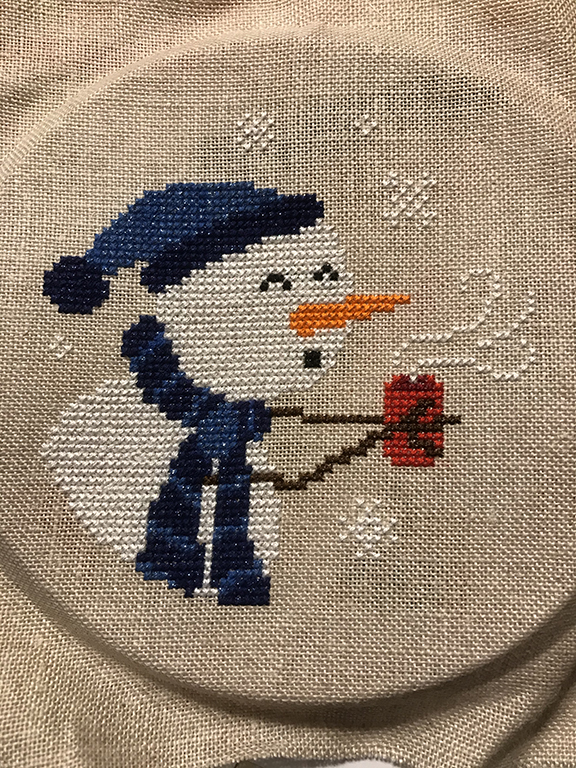
This snowman is finished at last! It’s hot off the hoop – I didn’t even have a chance to iron it! I am not sure if I am going to display him in a hoop or make him into a flat ornament, but either way I am going to add white pom pom trim to the edge, just like the finished project in the magazine. Sometime after the kids get back to school I will try to find the time and energy to get this guy completed. No hurry, as we will have snow here into May, easily!
XXX
Carrie
Ooh, I love how he is coming along!

XXX
Carrie
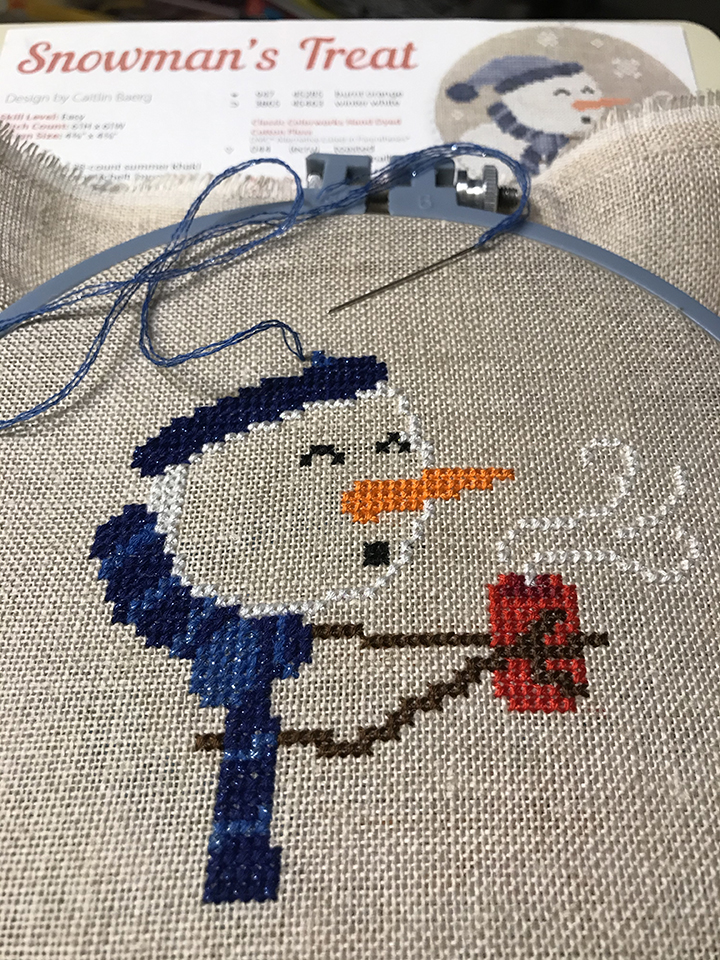
I took advantage of the long Thanksgiving weekend and decided to start a small new project. There was an adorable snowman pattern in the December 2020 issue of Just Cross Stitch that grabbed my attention. Although I HATE winter and snow (and unfortunately live in an area with 6+ months of it), this little guy was just too cute. It was one of the winners of the magazine’s annual Christmas Ornament Contest. The pattern was created by Caitlin Baerg and I have seen that lots of other people online are stitching this design.
I opted for a scrap of linen that was the same count and color as the model, but decided to swap out some of the threads. I only had one of the two Weeks Dye Works colors needed for the scarf, so I figured this project would be a great time to try out DMC’s Etoile threads. I didn’t have the other brand of floss at all, needed for the snowman’s body. So I decided to use DMC B5200 which is a brighter white than regular Blanc, and added a strand of Kreinik blending filament in 032 to make the snow really sparkle!
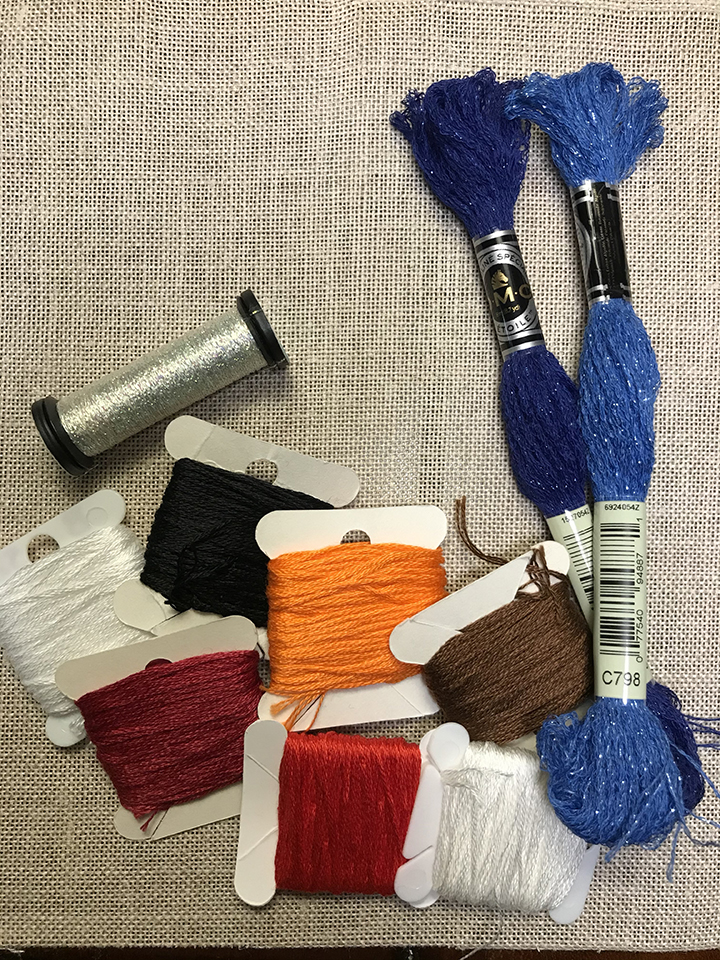
The Kreinik in the white floss shows up really well in person, but did not show up on the photo. I have only stitched the outline so far, because I was excited to get to work with the Etoile. I was not disappointed. I decided to use three strands instead of the two strands of regular DMC that I used for the other parts of the pattern. I just really wanted the snowman’s scarf to appear warm and thick. Not only did it turn out thick and fluffy, but the sparkle really shows. I did use Thread Heaven on the Etoile and Kreinik threads, and I think that helped a lot. After stitching one length with the Etoile, I decided to cut my lengths shorter. The three strands put together plus the roughness of the linen fabric really did a number on the floss as it was pulled through each hole. Towards the end of the length, it started to get frayed and worn out.
My stitching is still slow going. Compression gloves are helping a bit, and I think the act of stitching is helping my hands to not stiffen up as much. My neck still only allows me to stitch for a short period of time, but my goal is to get in about 30 minutes a day, 3 days a week right now. Unfortunately my neurologist has referred me to two neurosurgeons, one of which knew nothing and the other didn’t bother to take the referral. I found another doctor on my own just so he could look at my imaging, and he informed me that that second doctor was on his way out (retiring) and he would be very surprised if I got an appointment with him. The insurance company also refused to grant the MRI that my neurologist wanted. I am so glad we are into December and this year is almost over. I don’t make new year’s resolutions, but I am determined to have a happier, healthier 2021.
XXX
Carrie
After seeing so many people online make their own dyed cross stitch fabric, I decided to give it a try. I looked up articles online and watched videos on YouTube, and combined the best tips and tricks from all of them to try it out myself. My first try was a big success and I am so happy with how my fabrics turned out. My daughter was so impressed (and it looked like so much fun) she begged to help me out with my next batch. The first batch I did consisted of fabrics that I have collected over the years from garage sales, grab bags, etc. They may have been dirty or musty smelling, had pet hair on them, were odd or small sized pieces, or were fabric counts I wouldn’t usually stitch on. I thought they would be a good test for the dyeing process and if it didn’t work out, I wouldn’t be out anything except for a bit of dye.
STEP I: WASH FABRICS
Note: You do not need to do this step if your fabric is brand new. I only washed my fabric because I did not know where it came from and some of it had obvious stains on it or came from a smoking household. Most of it was white but I did have one piece of a salmon colored fabric that I didn’t really care for, and decided I wanted to add darker pink and purple to it.

Put the fabric in a large bowl filled with warm water and a tiny amount of dishwashing liquid (such as Dawn). Agitate the fabric in the sudsy water and let sit for about 15 minutes. Agitate the fabric again and then take the fabric out and rinse it completely in clean water.
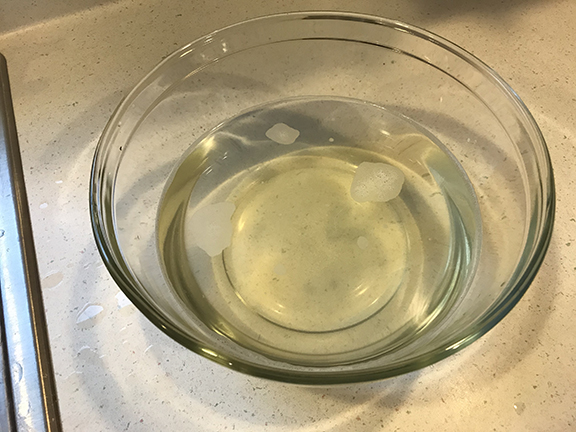
This is what my water looked like after I washed the fabric… yuck!
STEP 2: GATHER YOUR SUPPLIES
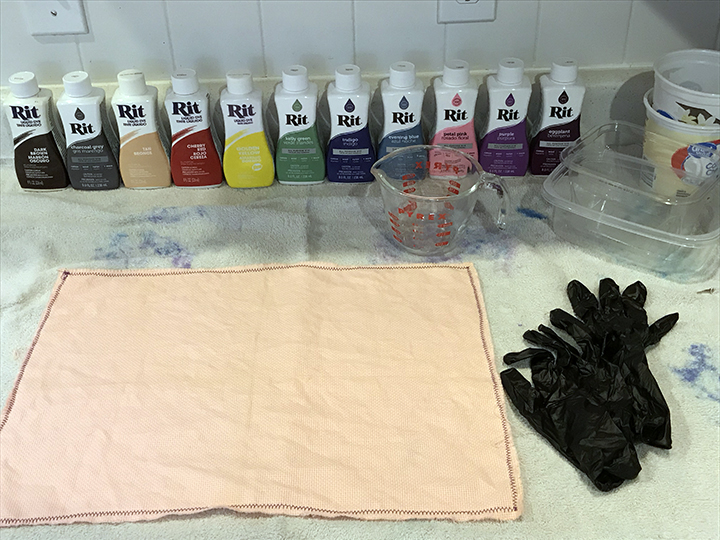
You will need some old towels that you don’t mind getting stained, gloves (either household rubber gloves or the disposable kind), plastic spoons, various sized plastic or glass containers, a measuring cup, a pot of very hot water (make sure it stays hot during the whole dyeing process), paper towel, your cross stitch fabric, and your dye. I used liquid Rit dye which can be purchased at grocery and craft stores. Save the powdered dye for when doing the ice dyeing method. Rit makes two kinds of liquid dyes, one for natural fibers and one for synthetics. Since you will most likely be dyeing cotton or linen, you will want the original Rit dye. Look for their special dye for synthetic fabrics if you are dyeing things like polyester.
It also helps to wear old clothes that you don’t care about, as you may get dye on yourself.
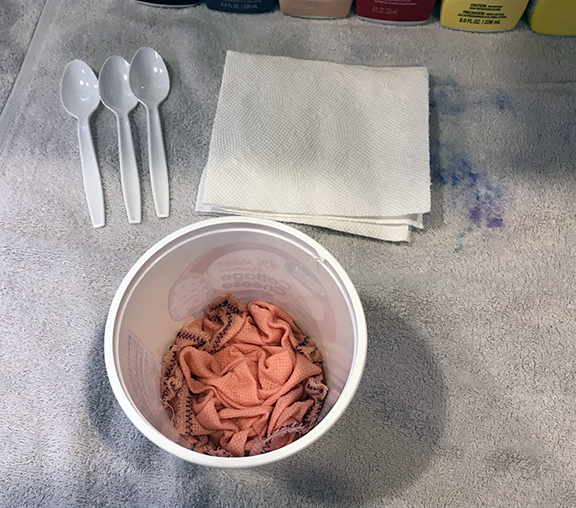
Note: DO NOT USE ANY UTENSILS/BOWLS FOR FOOD AFTER USING THEM FOR DYEING! Gather up some old or disposable items for this project. I used plastic spoons and various containers like yogurt and cottage cheese tubs and the plastic tubs that lunch meat comes in. Make sure if you are using plastic that it can withstand very hot (almost boiling) water. I learned this the hard way! Anything that is dishwasher safe should be good to use.
STEP 3: PREPARE FABRIC

Use a sewing machine or serger to either zig zag stitch or serge around the edges of your fabric. TIP: If you need to wash your fabric like I did above, you will want to do this before washing it. The fabric will unravel when it is handled or gets wet.
If you are using unwashed fabric, it will be dry. Wet it thoroughly and carefully squeeze out the excess water.
If you want to dye your fabric a solid color, make sure you use a large container to dye it in – it should be bigger than the piece of fabric. Lay your wet fabric down flat in the container so that the dye can cover the fabric evenly.
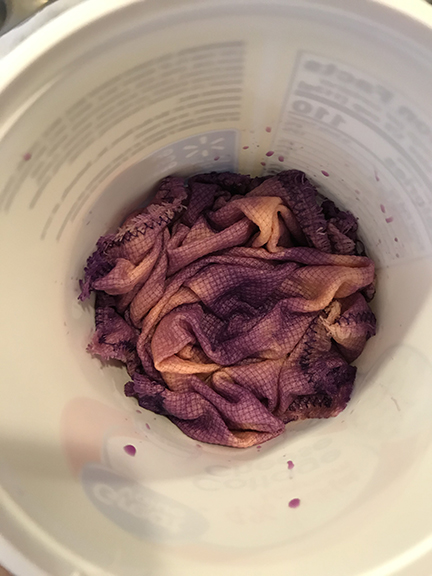
If you want the mottled effect, use a container that is much smaller than your fabric. Lay your wet fabric down on your work surface (covered with an old towel) and pinch it in the center. Carefully scrunch the fabric bit by bit all the way around, by pinching and pulling it towards the center of the fabric. Place it like this in the bottom of a small container. Use your fingers or the end of a spoon to make sure the fabric is nicely scrunched up all over. You want some areas to be on the bottom of the container to catch the most dye, and some areas to be peaked up at the top to not get as much dye.
STEP 4: PREPARE DYE
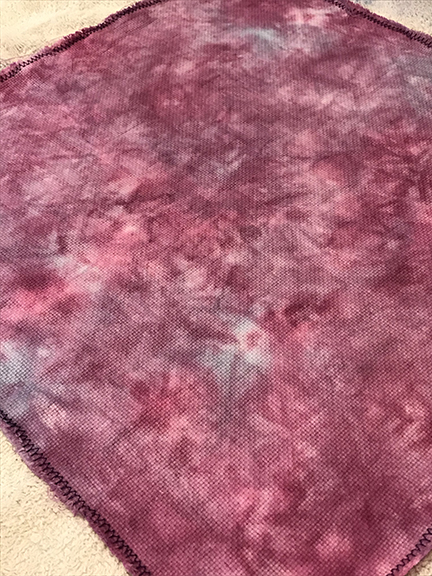
As you can see in the photo above, I started with a salmon pink color of fabric that I knew I would never use for anything. I dyed directly on top of this color to make a darker pink/purple color. You can start with fabric that is white, beige, pink, yellow, or any other light to medium color. Just make sure the dye you are using is a darker color. If you are using white fabric but want to dye it a solid color first and then do mottling on top of it later, be sure to use a large container to dye the initial fabric all one shade.
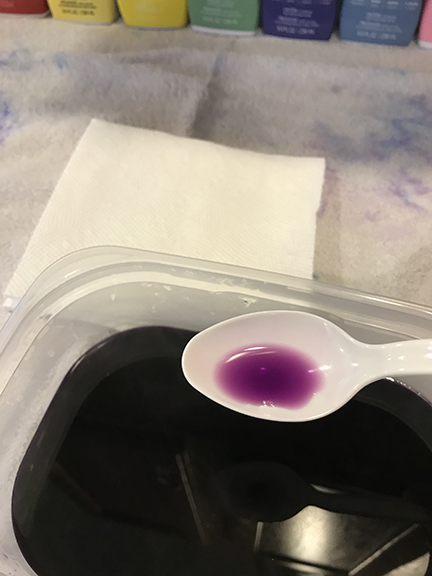
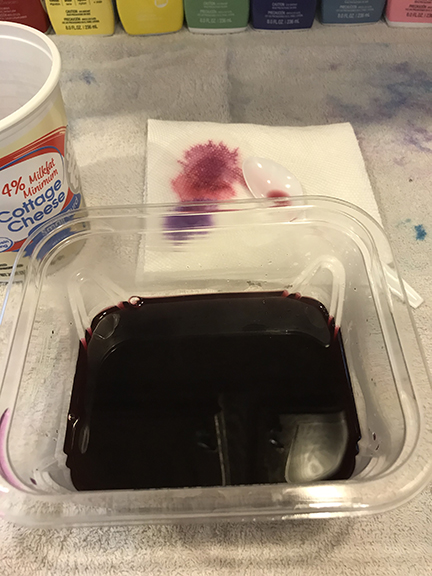
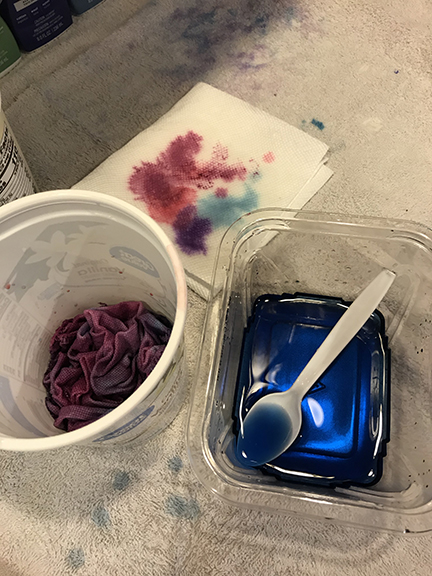
Scoop out one cup of hot water and put it into a separate container. Be careful, really cheap plastic containers will melt when you add the hot water! Shake well the Rit dye of your choice and add about 1 T of dye to the water. Stir with a spoon until thoroughly mixed. Take a small amount of dye on your spoon and let it drop onto a white paper towel. This will give you an idea of the shade. If needed, add more dye until you are happy with the result.

STEP 5: DYE YOUR FABRIC
Carefully spoon out some of the dye and pour it onto your fabric.

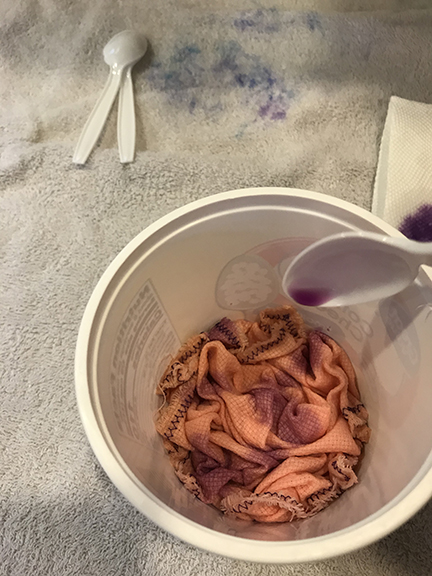
Keep spooning the dye over the fabric until you think you have added enough. To get a nice mottled effect, add more dye to some areas and less to others. Anything that is sticking out on top will have the least amount of dye. Use the spoon to poke the fabric and make sure that the nooks and crannies are filled in. With this fabric, I did leave parts of the salmon color un-dyed since it was already a solid color. If your fabric is white and you don’t want any white spots showing, make sure you take the time to poke around at the fabric and ensure that no white is showing. Clear containers are nice because you can look at the bottom and sides to make sure no white is showing. Do not add too much dye. You do not want the fabric swimming in dye. The top of the fabric should not be submerged. You can pour off excess dye back into your dye container (or the sink) if you think you added too much.
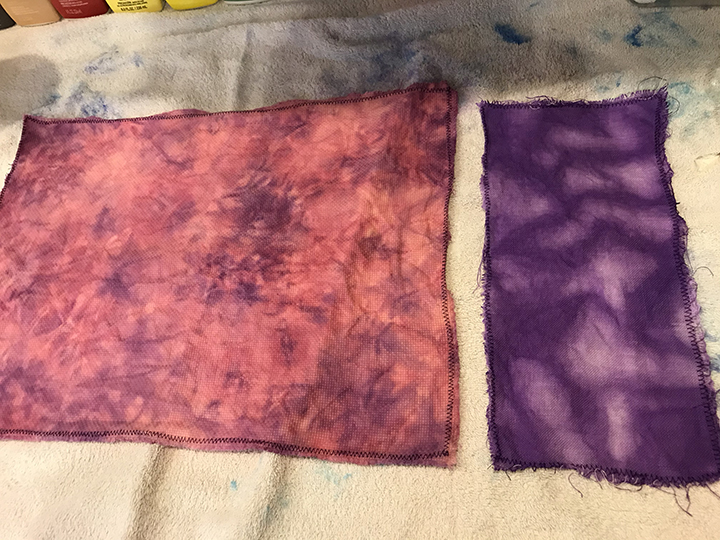
If you want to add more than one color of mottling, prepare the additional colors the same way you did with the first, using separate containers for each. Make sure your pot of water is still hot. If you keep it simmering on low, it should stay hot for you. If you turn the burner off completely, the water will cool down quicker than you think. You can also use the same (original) batch of dye and add more color to it to make it darker, and then pour that over some areas of the fabric. For my fabric above I dyed the salmon colored fabric first with purple dye, then I went and added eggplant dye to that purple dye to make it a darker and slightly different shade. You can see the purple and the eggplant dye samples on the paper towel, below.
Let the fabric sit for 20-30 minutes, depending on how dark you want the colors to be. Keep in mind that the fabric will appear much darker when it is wet.
After getting that piece of fabric done, I moved on to two pieces of white fabric. I wanted to dye one piece a nice dark purple with lighter mottling, and the other a mixture of pink and purple and blue. Here are pictures of what they looked like in their containers. Notice that the tips of the fabric are not in the dye, so they are going to be lighter.

STEP 6: RINSE OUT THE DYE
After your fabric has sat in the dye for long enough, carefully take the fabric out of the dye bath (wear gloves!) and rinse it out in the sink. Use cool water. Rinse and rinse until the water runs clear. You will probably need to rinse it for longer than you think. Use one of your empty containers to gently squeeze the water out of your fabric into. If the water is not clear, you have not rinsed it for long enough! When you finally get all the dye out, carefully squeeze out the excess water and lay your fabric down on a towel. Spread it out with your hands to get out as many wrinkles as possible. Be sure that your gloves are clean, or else you could transfer some dye of an unwanted color to the fabric.
The fabric is much darker when it is wet!
Let the fabric dry almost completely, and then iron to get all the other wrinkles out. It is easier to do this when the fabric is just ever so slightly damp; completely dry fabric is much harder to get wrinkle-free.
STEP 7: ENJOY STITCHING WITH YOUR NEW FABRIC!
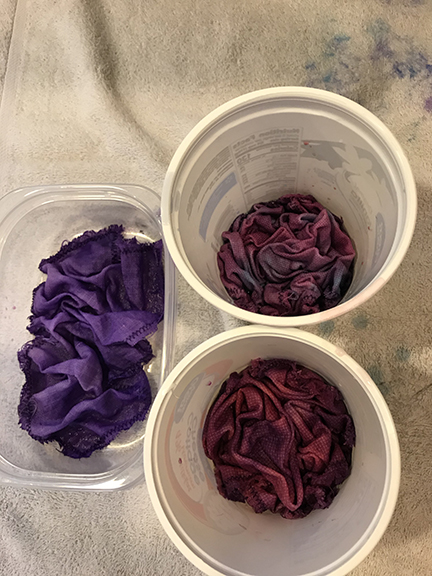
The finished pieces of fabric!
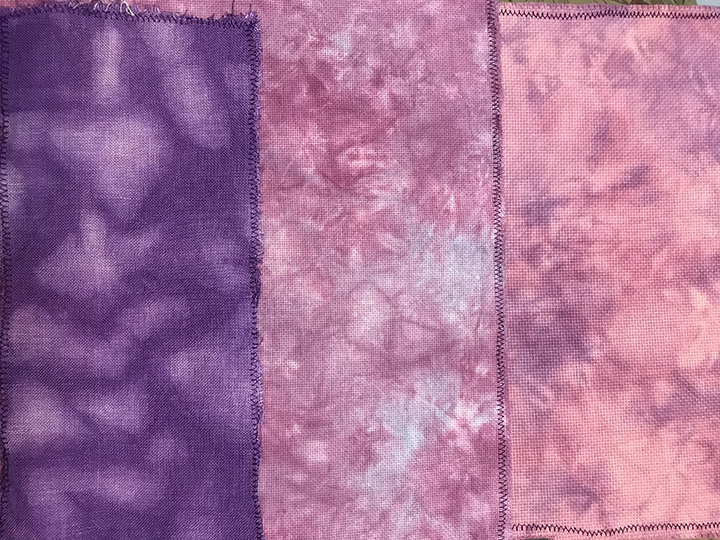
I hope this tutorial helps you to hand dye your own cross stitch fabrics. It is a lot of fun, and not very expensive. Be sure to use those 40% off coupons at the craft stores for the dye and fabric!
XXX
Carrie
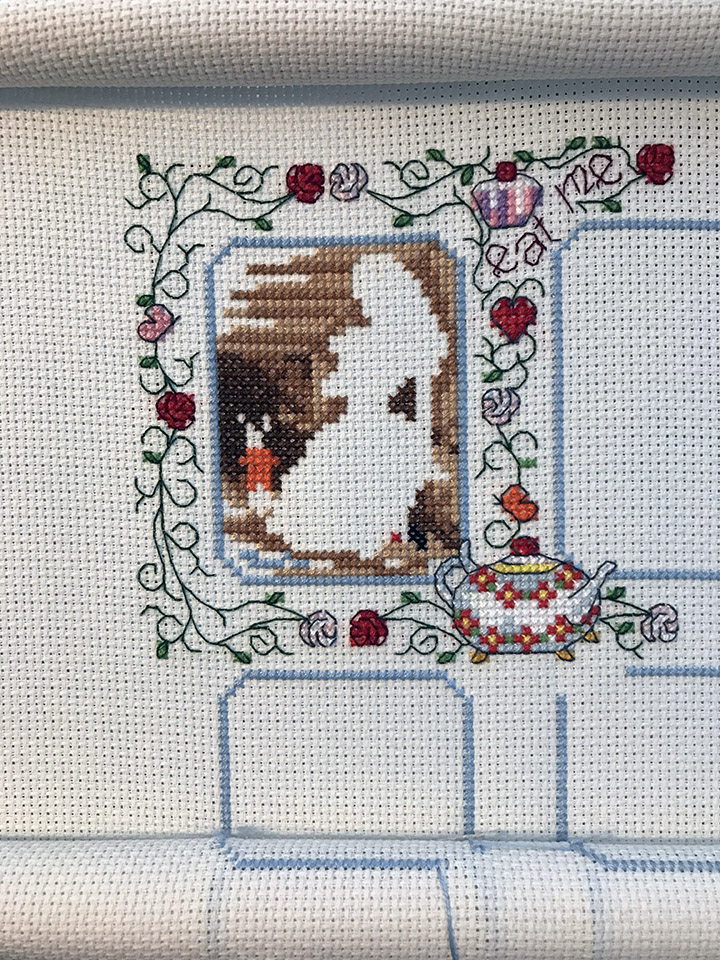
I did manage to get a bit more done on my Alice SAL. Not as much as I had hoped, but it’s a start. Next I am going to tackle the first square, which is Alice at the start of her adventures.

I’m not sure what the orange above the teapot is supposed to be. At first I thought it was a carrot, but then after adding the backstitch I thought it looked like a butterfly..?
XXX
Carrie
The October 2019 issue of Cross Stitch Crazy magazine featured in one of its columns a small pattern for the Egyptian pharaoh Khufu, the commissioner of the Great Pyramid. Loving all things Ancient Egypt, I knew I had to add this to my to-do list. It wasn’t until a year later that I needed a quick project to work on and decided to give this one a go.

The fabric was left over from Spaceship Earth and was just the right size for this chart. I debated about what fabric to use for almost as long as it took to stitch the design, because I wanted the finished piece to resemble the only statue that exists today of Khufu, which is in a museum and is approximately 3 inches tall.
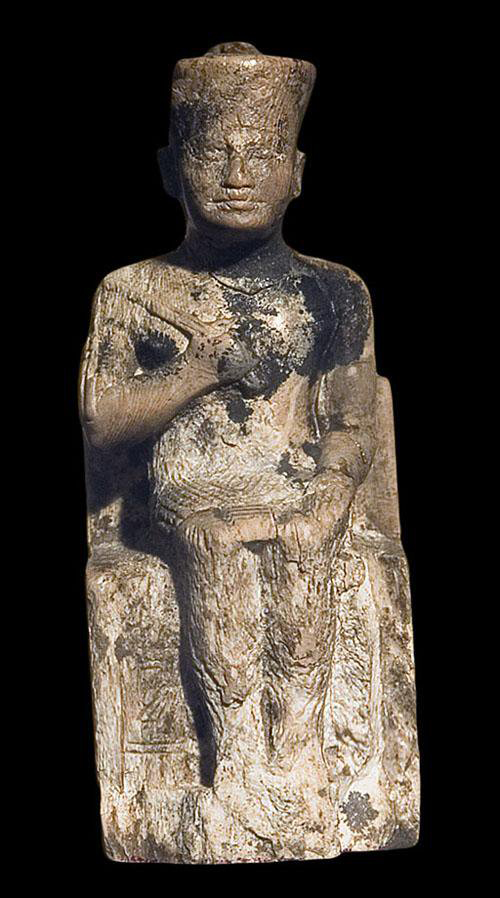
What do you think? Does the cross stitched piece look like the original?
I didn’t take any progress photos because this one stitched up really quickly. The colors used were all very similar, so good lighting was needed to complete this one. And it really didn’t look like much of anything until the backstitch was added.
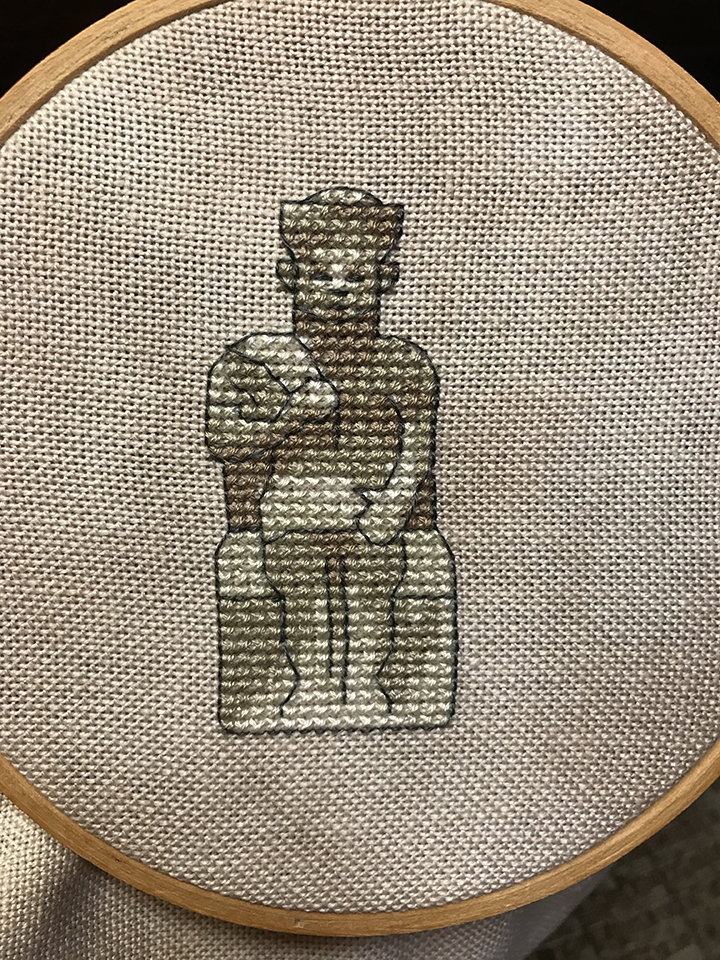
I am not sure how I am going to finish off this piece. My initial plan was to cut the figure out and stuff it, with a weighted base, so he would resemble the actual statue. But I am not sure how that would really work out, and it would probably get lost in all the clutter sitting on my desk. I may end up framing it instead, but for now I am not sure.
XXX
Carrie
Several months ago I decided to start on the Alice in Wonderland SAL (stitch-a-long) from CrossStitcher magazine. The February 2020 issue included an outer framework with 12 rectangular shaped openings. Each month after, for the next year, a character would be added to the openings. I had other things on the go, so I did not get started right away at the beginning of the year. But in late spring I started on the framework. I got all 12 rectangles stitched and then started on the border, which was a lot of color changes and few stitches of each color. It is also a LOT of backstitch.

After a while I put it away to work on other things, and then I heard a “rumor” that CrossStitcher was going out of business, just like how Cross Stitch Crazy and Cross Stitch Gold stopped publication (due to COVID). This kind of freaked me out and I decided not to work on it any more, because I didn’t want to have a lot of time invested in something that would not be completed. I have just noticed that the November issue is available in my Zinio account, and this issue features one of the characters. There should be only two more issues left to complete the series, if my calculations are correct. So I think the rumors I heard were indeed just rumors. I am going to get back to working on this framework, although I am not sure when. I have found a few Halloween themed things I would like to stitch, and one is done on orange fabric all in black floss. That would be super easy to follow along and work on even while watching TV, and should stitch up quickly.
XXX
Carrie
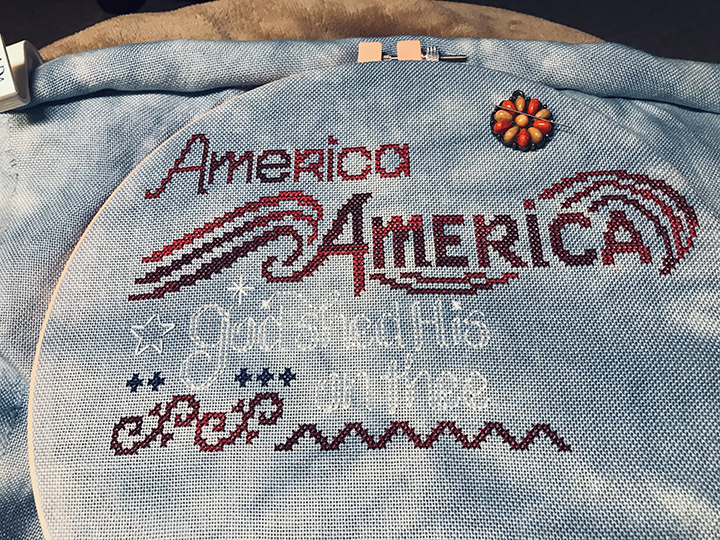
Done at last!
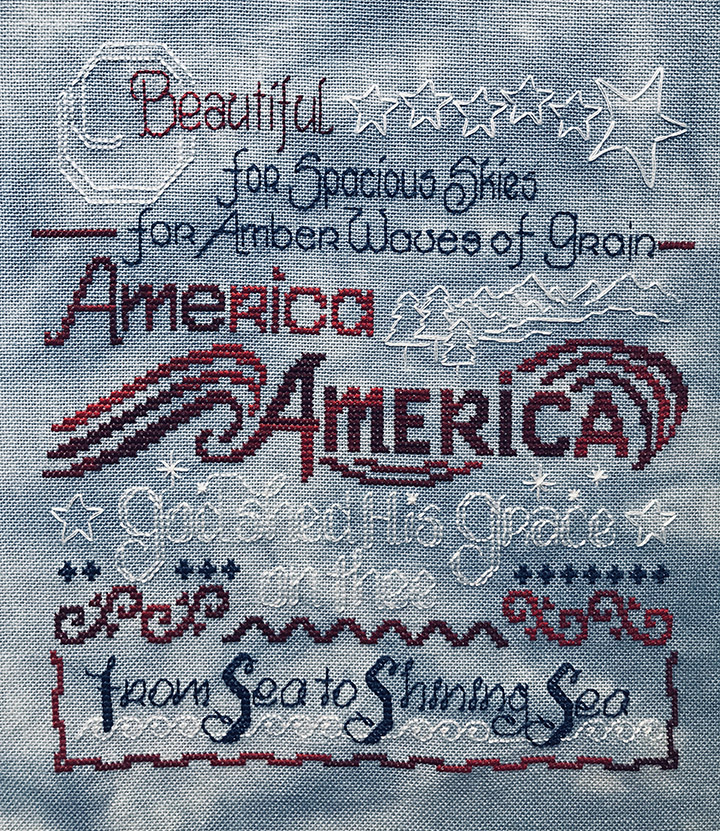
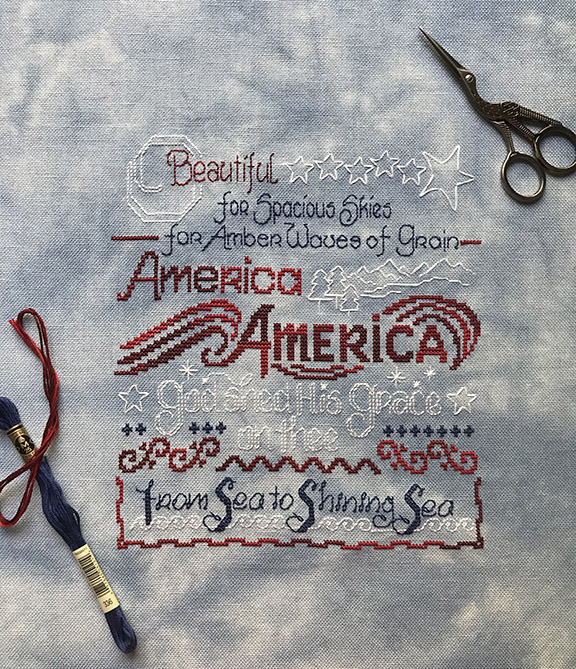
I’m so happy to have this project completed. I probably won’t get around to framing it for a while, but I think it would look good in a distressed white frame. This has been a nice, calming project to work on. The specialty stitches were a bit tricky to count due to my eyesight not being what it once was. However, the colors are just so beautiful (and nowhere near as vibrant in the photos as they are in real life) and the patriotic feel of this project during the troubling times we are in was just so relaxing. We all need more relaxing right now, I think!
XXX
Carrie
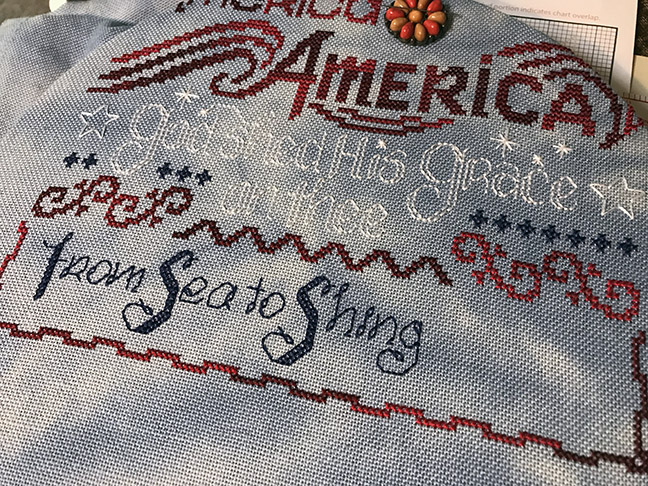
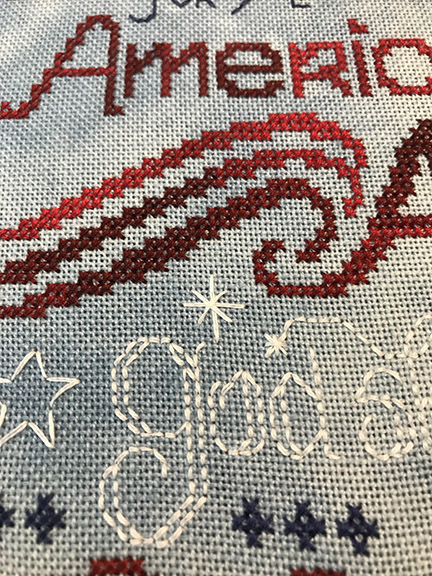
Oops. I guess I wasn’t paying enough attention when stitching the word “Shining”, as I accidentally stitched “Shing”. Luckily I noticed it before I moved on to the next word, and was able to rip it out and start again.

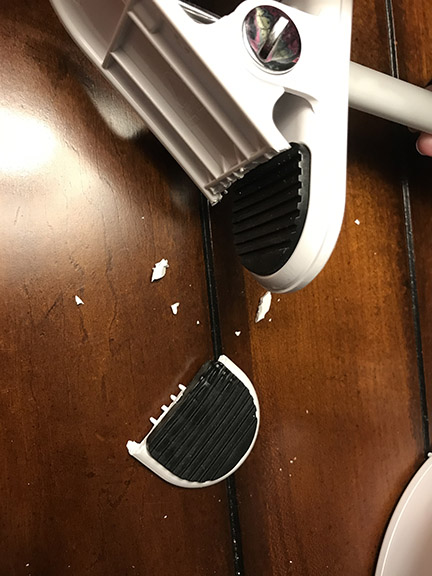
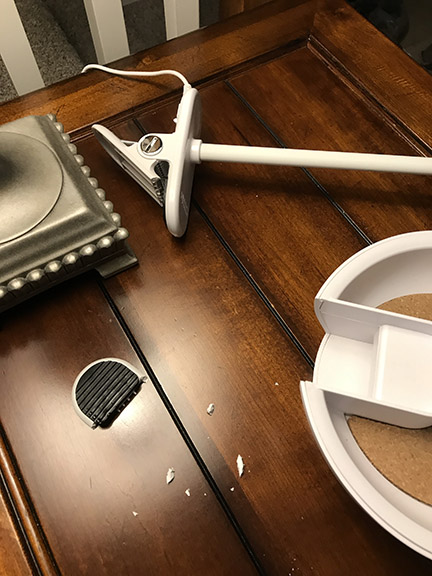
I normally don’t make mistakes. Not because I’m perfect, but because I am a slow stitcher and count, double count, and triple count everything. This goof was partly because I had just stitched the letters “in” and that part of the pattern was split from one page to the next. But I am going to blame the majority of the goof on the fact that I BROKE MY LAMP! The day before I had tried to adjust the goose-neck portion of my Might Bright LED Task Light Table Lamp. In doing so, the clip part that clips onto the weighted base broke. It is just made of plastic, so I don’t see any way that I can fix it. Even if I could try to glue the pieces back together with something strong like Gorilla Glue, I would have to hold the pieces in place by hand for… a long time. As soon as you let go, it wants to clamp together, and would make the glued part bend in half. My husband did manage to rig the lamp up so I could still use it. The bulb itself is not broken, and neither is the goose-neck. His ingenious method of rigging it back together was to put the broken part where it is supposed to go and balancing two canned goods on either side of the clamp. Uh, yeah, it really does look spiffy, doesn’t it? My daughter’s Sponge Bob blanket is being used to ensure that if the cans fall off, they don’t ding the end table. I have to be VERY careful while stitching to not bump into the whole setup, or else it falls over. (And yes, I know this because I did knock the entire contraption over once when cutting off a new piece of floss and my left hand got a bit too close.) What makes me the most upset is that I just bought this for myself at Christmas last year. I have not stitched much since then, and don’t even have 20 hours of use out of this lamp. There is no way to replace just the broken part, either.
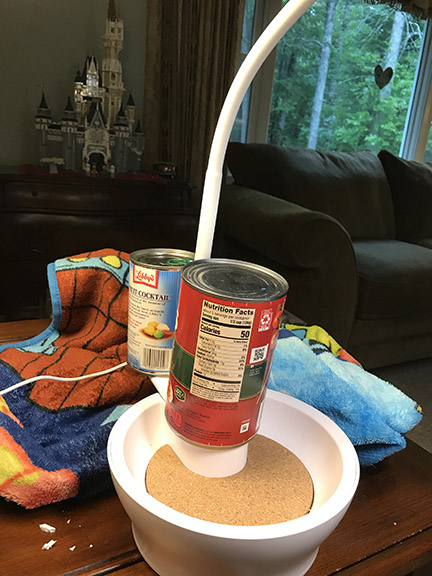
I am hoping there are no more stitchy disasters until at least next week!
XXX
Carrie
I was so excited to find a DMC wooden floss cabinet on Facebook Marketplace a few months ago. It was in pretty good condition and the seller only wanted $9! The drawers did not contain the plastic divider inserts to separate the floss, but I knew I could pick them up online. But when I tried to order them, they were either sold out or no longer for sale from the distributors I had used before. But I placed an order with Wichelt Imports and they did eventually get them back in stock. The inserts were $4 each so I have $21 into this cabinet now. But new ones sell for $155 on DMC’s website, and they are never in stock. What a score! The seller called it “storage” was using the drawers to store sunglasses!

XXX
Carrie
I have not been able to cross stitch much at all in the last few weeks. After several months of being closed down due to COVID, all of our family’s doctors offices have now been calling to schedule appointments that were missed since March. It seems like every week we have at least 3 appointments, and there doesn’t appear to be an end in sight. One appointment I am looking forward to is the eye doctor… I have started taking my glasses off to see things up close, like my phone, which is not like me at all! I can’t really see anything without my glasses on, but now I am getting to the point where my glasses aren’t working for seeing far away OR up close. My doctor warned me a couple of years ago it was getting time for the dreaded “b” word, but I have been lucky enough not to need a prescription change (until now). I think it is finally time for… *gasp*… bifocals!
This Americana project has been fun, but the white stitching is just not working at night time even with my beloved task lamp. It is much more suited to daytime stitching, but I don’t really have the option to stitch during the day. So I have been struggling to get it done a little bit here and there, in the evenings when everyone else has either gone to bed or is watching TV. I am slowly but surely plugging away at it.
XXX
Carrie